
Borland C++'s pre-compiled headers can save you a lot of time during program compiles. When the compiler processes any #include file for the first time, the compiler saves a binary image of the processed header information. Subsequent compiles of that #include file use that pre-compiled information instead of compiling the same file again. However, the compiler can't reuse that information unless you follow some very specific rules.
Unfortunately, misapplying these rules can cause compile sessions to reprocess source files unnecessarily. On a large project, reprocessing the source files may waste more time than pre-compiling the header files saves.
In this article, we'll show you how to organize your source files' #include directives so that the compiler can effectively reuse the pre-compiled header information. First, let's see how the compiler processes header files.
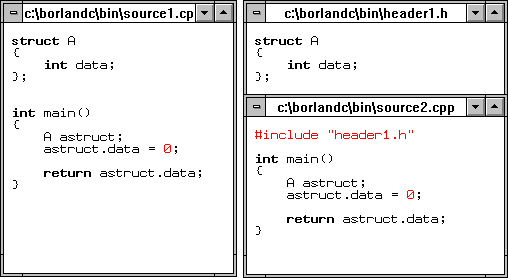
When the compiler processes a source file and finds an #include directive, it treats the contents of that file as if it were imbedded in the source file at that point. Figure A shows two equivalent source files: One uses an #include directive and the other contains the struct definition in the source file itself.
Figure A - These two source files are functionally equivalent.

As the compiler processes each #include file, it loads the type definitions into a symbol table that contains all the types and declarations for the current source file. If two source files contain the same #include file, the compiler will create an identical symbol table for that #include file when it processes the second source file.
If we could instead save the symbol table after the compiler processes the #include file, we could then simply load the symbol table from that file without having to reprocess the #include file. This is exactly what happens when you use pre-compiled headers.
The requirements for using pre-compiled headers in a Borland C++ project are fairly simple. See Optimizing your header files, for some guidelines for organizing your header files.
First, you must tell the compiler to pre-compile the header files, either from the Integrated Development Environment (IDE) or from the command line. Second, you must use the same language (C or C++) for each source file, and all #define macros must have identical values. Third, the time/date stamp must be the same on all #include files so the compiler will know they haven't changed since the last compile. Finally, you must use the #include directives in the same order in each source file, as shown in Figure B.
Figure B - SOURCE2.CPP will reuse WINDOWS.H and HEADER1.H.

If the two files shown in Figure B are part of the same project that uses pre-compiled headers, the compiler will process the first file and then reload the symbol table for WINDOWS.H and HEADER1.H when it begins processing the second file. After the compiler loads the symbol table, it will process HEADER2.H. However, if the compiler processes the files in reverse order, it will reprocess WINDOWS.H and HEADER1.H since HEADER2.H is already part of the symbol table but doesn't belong in SOURCE1.CPP. Now, let's work through a simple example that uses pre-compiled headers.
To begin, launch the Windows version of the Borland C++ IDE (you can use either the DOS- or Windows-hosted environment for this example). After the IDE starts, choose Open Project... from the Project menu, change to the subdirectory \EXAMPLES\WIN30, and then select the WHELLO.PRJ project, as shown in Figure C.
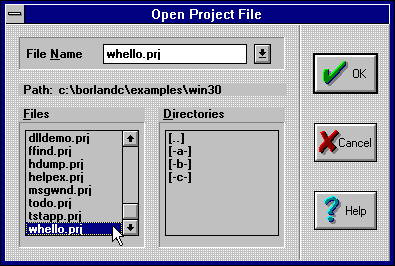
Figure C - The Windows version of "Hello World" is one sample project in the \EXAMPLES\WIN30 subdirectory.
Now, load the WHELLO.PRJ project by clicking the OK button in the Open Project File dialog box. When the Project:whello window appears, choose Compiler from the Options menu, and then choose Code Generation... from the Compiler submenu. Select the Pre-compiled Headers check box, as shown in Figure D, and then click the OK button to save the new setting.
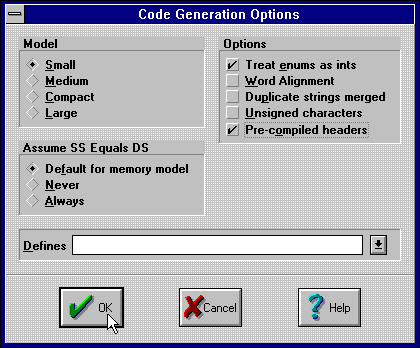
Figure D - You enable pre-compiled headers from the Code Generation Options dialog box.
Now, compile the Hello World project by choosing Make from the Compile menu. As the project compiles, notice that the compiler processes the entire WINDOWS.H header file. When the Compile Status dialog box displays "Success" as the current status, click the OK button to dismiss the dialog box.
Since the compiler saved the compiled header information in a file, any changes that you make to the source filethat don't affect the header fileswill recompile without reprocessing WINDOWS.H. To see this in action, open the main source file by double-clicking on WHELLO.CPP in the Project:whello window.
Locate the void MainWindow::Paint(void) function.
Then, replace the word you in the string
"Borland C++ welcomes you to the Wonderful World of Windows Programming!"
with your name. Figure E shows our changes to the Paint member function.
Figure E - By changing MainWindow::Paint(), you force the project to recompile.

Now, recompile the project by choosing Make from the Compile menu. This time, you'll notice that the compiler doesn't appear to process the header files at all but simply pauses briefly before compiling the functions in the source file. When the Compile Status dialog box displays "Success" as the current status, click the OK button to dismiss the dialog box. Table A shows the number of lines the compiler processed each time, as reported in the Compile Status dialog box.
TABLE A - The second compile doesn't reprocess the pre-compiled header files.
| Number of lines compiled | |
| First pass | Second pass |
| 6,477 | 281 |
During the pause at the beginning of the recompile, the compiler loaded the pre-compiled symbol table from the previous Make command. Now let's see how the pre-compiled symbol table reloads when multiple source files share the same #include files.
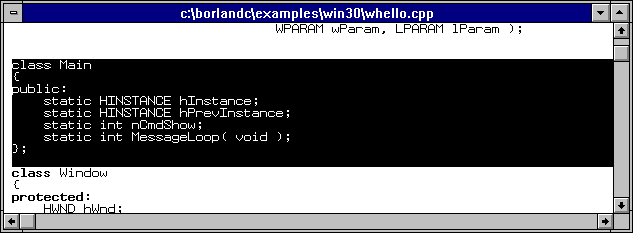
Locate the declaration of the Main class in the WHELLO.CPP file. Select the entire class declaration, as shown in Figure F, and then choose Cut from the Edit menu to move the text to the clipboard.
Figure F - The Main class's declaration is embedded in the WHELLO.CPP source file.
Create a header file for the Main class by choosing New... from the File menu and then choosing Paste from the Edit menu. Save this header file by choosing Save As... from the file menu, entering HEADER1.H in the File Name entry field of the Save File As dialog box, and then clicking the OK button. The window for the new header file should look like the one shown in Figure G.
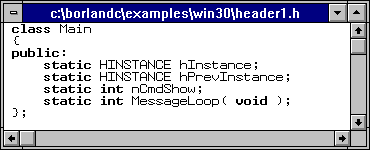
Figure G - You can use the HEADER1.H header file to share the interface for the Main class between source files.
Since WHELLO.CPP uses the Main class, move to the beginning
of the file and type #include "header1.h" immediately
after the line #include <windows.h>. Next, locate
the function int MessageLoop(void) in the WHELLO.CPP
source file, select the entire function, and then choose Cut from
the File menu to move it to the clipboard. Create a new source
file for the Main class's functions by choosing
New... from the File menu. When the new window appears,
enter the following:
#define STRICT


#include <windows.h>
#include "header1.h"
To complete the new implementation file for the Main class, choose Paste from the Edit menu. Now, you can save this new source file by choosing Save As... from the File menu again, entering WHELLO2.CPP in the File Name entry field, and then clicking the OK button. When you finish saving the file, its window should look like the one shown in Figure H.
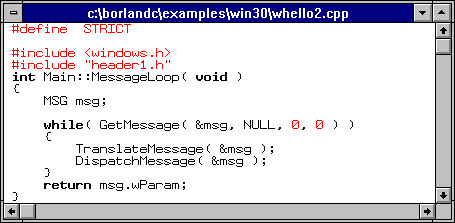
Figure H - The source file WHELLO2.CPP implements the MessageLoop member function.
Now you can add the WHELLO2.CPP file to the current project. To do so, choose Project:whello from the Window menu, and the Project window will become the top window. Select WHELLO.CPP in the Project window, and then choose Add Item... from the Project menu. When the Add To Project List dialog box appears, select the file WHELLO2.CPP, and then click the Add button, as shown in Figure I.
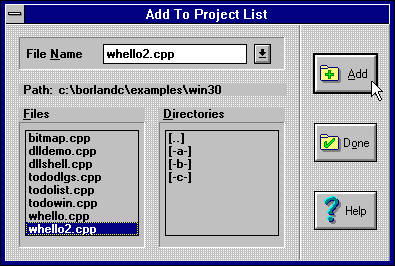
Figure I - Add the source file WHELLO2.CPP to the current project from the Add To Project List dialog box.
As the IDE adds the new source file to the project, the Add To Project List dialog box disappears. When the dialog box reappears, click the Done button to dismiss it.
Now, recompile the project by selecting Make from the Compile menu. When the Compile Status dialog box displays "Success" as the current status, notice that the duplicate #define and #include statements increased the number of compiled lines only slightly. Click the OK button to dismiss the dialog box. Now, let's move all the Library #include directives to a common header file.
Select the line
#include "header1.h"
in WHELLO.CPP, and choose Cut from the Edit menu. Then, move the
cursor to the line after the last #include directive,
and choose Paste from the Edit menu. Next, select the following
lines:
#define STRICT


#include <windows.h>
#include <stdlib.h>
#include <string.h>
Now, choose Cut from the Edit menu to move the selected lines
to the clipboard. In their place, enter
#include "common.h"
To create the COMMON.H file, choose New... from the File menu, and then choose Paste from the Edit menu. Choose Save As... from the File menu. Then, type COMMON.H into the FileName text box, and click OK. The window for the common header file should look like the one shown in Figure J.
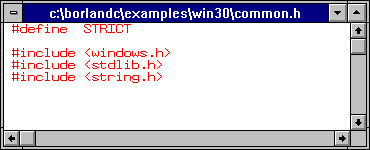
Figure J - COMMON.H allows each source file to share the pre-compiled symbol table.
Finally, locate the #include <windows.h> line in WHELLO.CPP, and replace <windows.h> with "common.h", and then recompile by selecting Make from the Compile menu. When the Compile Status dialog box displays "Success" as the current status, click the OK button to dismiss the dialog box.
In addition to the guidelines we've already mentioned, there are some other changes you can make when you organize your projects. If you look closely at the Borland C++ LibrariesTurboVision, ObjectWindows, or BIDSyou'll notice that they guard against reprocessing header files within a given scope and that they create separate source files for the implementation of each defined type. You'll also notice that the #include dependencies match the inheritance relationships.
To prevent the compiler from reprocessing a header file, most of the Borland Library header files use conditional compile directives. The most common form of conditional compiling that Borland uses relies on defining a constant macro whose name is uniquely related to a header file or to a type within that file.
For example, the Container Class Library defines the Array
class in the file ARRAY.H. To prevent the file from being reprocessed
in a given scope, ARRAY.H begins with the following directives:
#if !defined( __ARRAY_H )
#define __ARRAY_H
The #if !defined( __ARRAY_H ) directive will allow the
compile to continue normally if the compiler hasn't yet
seen a definition for __ARRAY_H . Since the next line,
#define __ARRAY_H
defines __ARRAY_H in the current scope, additional compile
passes in this scope will skip to the last line in the file:
#endif // __ARRAY_H
In simple projects, this type of conditional compiling may seem like overkill. However, on larger projects in which you may be using classes from different levels of an inheritance tree, conditional compiling will prevent the redundant processing of your header files.
You can prevent changes in the implementation of a class's member functions from forcing a recompile of other code by placing those functions in a source file for that class only. In the conditional compile example above, the Array class implements the non-inline member functions in ARRAY.CPP.
In object-oriented programming, when one class inherits from another, it becomes dependent on changes in its parent class. To make sure that changes to the parent class's format or interface (member function return types and argument lists) update the declaration of the child class, add an #include directive for the header file for the parent class in the child class's header file.
Once again, you can see an example of this in the ARRAY.H file
mentioned previously. Just before the file declares the Array
class, you'll see the following code:
#if !defined( __ABSTARRY_H )
#include <AbstArry.h>
#endif // __ABSTARRY_H
Between the conditional compile directives, ARRAY.H uses the #include directive with the ABSTARRY.H header file. If a change occurs in ABSTARRY.H, which defines the AbstractArray class, the compiler will reprocess ARRAY.H.
Pre-compiled headers can save a significant amount of time when
you build projects that use large header files. To use pre-compiled
headers effectively, you need to apply consistent rules when you
organize your source and header files. In this article, we've
shown you how to take advantage of pre-compiled headers when you
create C or C++ projects.
Copyright (c) 1996 The Cobb Group, a division of Ziff-Davis Publishing Company. All rights reserved. Reproduction in whole or in part in any form or medium without express written permission of Ziff-Davis Publishing Company is prohibited. The Cobb Group and The Cobb Group logo are trademarks of Ziff-Davis Publishing Company.