 Online
with realtime fulfillment, by phone (817) 640-6558, or by fax (817) 640-6614.
Online
with realtime fulfillment, by phone (817) 640-6558, or by fax (817) 640-6614.
 Online
with realtime fulfillment
Online
with realtime fulfillment
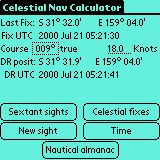
CelestNav guides you through the steps of computing a celestial fix. It records your sextant observations with sight times; applies the appropriate corrections for height of eye, atmospheric refraction, backsights, and sextant errors; combines multiple sights into a celestial fix; computes your position automatically; and maintains a dead-reckoning position from your last known fix.
CelestNav had its start on a 3500 mile tall ship voyage. In 1998 I sailed on Søren Larsen from Vanuatu to New Caledonia, then to Sydney, and on to Auckland. I spent much of the trip practicing with my sextant, and found that the most frustrating part was the long delay between shooting my sight and finding out what the answer should have been--calculating by hand on paper just took too long. CelestNav is intended to take the drudgery out of celestial navigation and to encourage sailors everywhere to stay current in this important skill.Reference books, nautical almanacs, sight tables, and tutorials for celestial navigation are available for purchase at the Mobile Geographics web store, http://www.mobilegeographics.com/navbooks.html. The prudent mariner will not rely on electronic devices. Have the books on board, and know how to use them.
Drag CelestNav.prc, and (if necessary) MathLib.prc into the "Install Handheld Files" or "Install Files" window of your Palm Desktop Software. Then perform a HotSync operation to transfer the files from your desktop computer to your handheld.
After the HotSync, you're ready to go. Tap the CelestNav icon on your handheld to start the program.
At the beginning of a voyage, and periodically through the voyage, you should recheck two configuration settings.
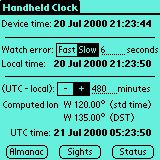
Device time, at the top of the page, is the time shown on your handheld's internal clock. You can change that with the Prefs program included on your handheld. CelestNav does not modify your handheld's internal clock. CelestNav assumes that your handheld's clock is set to approximate ship's time or local time.
All clocks gain or lose time, and your handheld's clock is no exception. If your handheld has drifted a few seconds fast or slow, enter that as a "watch error". Tap the "Fast" or "Slow" pushbutton, and enter the watch error in seconds. You will see your "Local time" updated immediately.
Finally, you need to tell CelestNav what time zone you are in, relative to UTC (sometimes called by its old name GMT). Enter the difference between your local time and UTC, expressed in minutes. Tap the "-" pushbutton if you are east of Greenwich, or the "+" if you are west of Greenwich. For the east coast of the USA, during the winter (not observing daylight savings time), enter "300" minutes and tap the "+" pushbutton. CelestNav will display the computed UTC time, as well as the longitude that corresponds to the UTC offset that you entered.
CelestNav lets you store multiple observing locations. You can edit these by choosing "Observer height of eye" from the "Setup" menu. You might just need one location. But if you sometimes shoot from the bridge wing, sometimes from the signal bridge, and sometimes from the flight deck, or if you sail on more than one boat, it can be handy to have multiple locations defined.
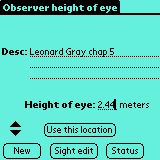
To create a new location, tap the "New" button. Enter a short text description, and then the height of eye. Tap "Use this location" to tell CelestNav that this is where you are now; CelestNav will use that height of eye for future sextant sights, but will not change existing sights.
To delete the currently-visible observation location, use the Delete entry from the Observer menu. If there are sextant sights in the sight database that were made from this location, you will not be able to delete it.
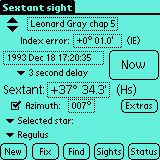
For practice, create a new entry. Enter "Leonard Gray chap 5" for the description, and 2.44 meters (8 feet) as the height of eye. Tap "Use this location". Now tap the "Status" button to return to the Status Page.
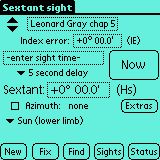
For this example we will use an index error of 1.0'. Tap the selector box next to "Index error:", and you'll bring up CelestNav's angle entry form.
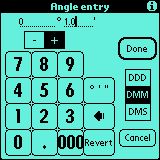
You can use the angle entry form to enter angles as decimal degrees (36.2341°), degrees and decimal minutes (36° 14.043'), or degrees, minutes, and seconds (36° 14' 3"). Tap the "DDD", "DMM", or "DMS" pushbutton to change modes.
Use either the numeric buttons or Graffiti to enter the numeric values in the proper fields. Use the "° ' "" button to cycle through the degrees, minutes, and seconds fields. The backspace button (left arrow) deletes one character at a time. The "000" button truncates the current field and sets all fields to the right equal to zero1; it's handy for quickly turning 36° 14' 3" into exactly 36°. The Revert button restores the value that you had when you started, but leaves you in the form. "Cancel" restores the original value and exits. "Done" saves your changes and exits.
You will always see a pair of pushbuttons to change the sign of the angle. They will be "-" and "+" for angles and bearings, "W" and "E" for longitudes, or "N" and "S" for latitudes.
Enter 0° 1.0' for the index error, and then tap "Done".
Once you enter an index error, it will persist and be used for all future sights until you enter a new index error. Check your index error each time you use your sextant.
If you have an assistant, choose "No delay" and have your assistant tap "Now" when you say (out loud!) "now!".
When you use CelestNav to practice, you will be entering times manually. For this example, the sight was made at 17:20:35 UTC on December 18, 1993. Tap the time selector (just above the "delay" trigger) and you'll bring up the Date and Time Entry screen.
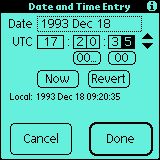
Tap the "Date" selector trigger to bring up the usual PalmOS date selector. Use it to enter the date of your observation (December 18, 1993).
Tap each part of the time in turn to set hours, minutes, and seconds. Tap the up and down arrows to adjust the values. The "00..." button zeros the minutes and seconds; the "00" button zeros only the seconds. "Now" sets the date and time to the current date and time. "Revert", "Cancel", and "Done" work as they did in the Angle Entry Screen. Enter 17:20:35 for the time, and tap "Done".
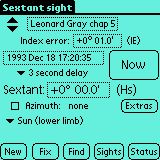
You may, if you wish, enter an observed azimuth value. This information is not used currently, but a future release of CelestNav will allow you to match azimuth and height of an unknown body with the nautical almanac values so that you can identify the body. To enter an azimuth, tap the "Azimuth" checkbox and then enter a value into the selector trigger that appears. For this body, use 007°for the azimuth.
When you choose "Selected star:" from the upper popup, the lower one appears. It contains only the names of stars. Tap it, and choose "Regulus".
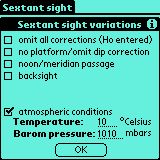
When practicing with problems from a book, you might have occasion to enter samples that already have all sextant corrections made, or that have already corrected for dip/height of eye. Check those items on the form if they apply.
A backsight is a sextant observation made to the opposite horizon. Turn your back on the body, and shoot it over your shoulder (this is useful if you can't see the horizon below the body itself). Check "backsight" if you made your observation this way.
CelestNav assumes standard atmospheric conditions of 10° Celsius, 1010 millibars. If you have observed other conditions, enter those here for a more accurate correction.
A "noon/meridian passage" sight is made when a celestial body (usually the Sun) reaches its highest point in the sky. This sight gives you a latitude value only, but does not require accurate timekeeping. At present CelestNav allows you to record that a sight was made at local apparent noon, but still treats the sight as a timed sight.

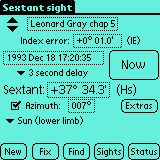
Tap the "Sight edit" button to enter the rest of the example.
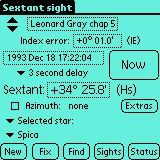
Here are the sextant observations you made (including the first two, which we have already entered). Create new entries for the rest of them.
| Body | GMT | Hs (sextant reading) |
|---|---|---|
| Regulus | 17:20:35 | 37°34.3' |
| Spica | 17:22:04 | 34°25.8' |
| Procyon | 17:23:44 | 35°31.2' |
| Canops | 17:25:16 | 53°09.9' |
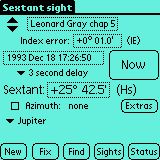
| Jupiter | 17:26:50 | 25°42.5' |
| Sirius | 17:29:01 | 42°46.9' |
Note that Jupiter's entry is a bit different, since it is a planet and not a star.
Now tap the "Sights" button to see all of your sextant sights.
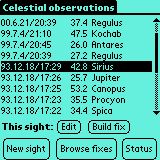
This page lists date and time of observation, sextant reading in degrees and tenths, and the name of the body. The most recent fix you entered (Sirius, at 17:29:01) should be highlighted. If not, tap its entry once to highlight it. Then tap the "Build fix" button.
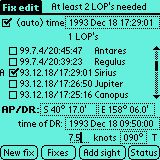
Enter the last known position as "AP/DR", using the two Angle Entry Forms that will pop up when you tap the selector triggers. Enter the time of that fix as "time of DR", using a Date and Time Entry form. Enter the speed to the left of "knots" as a normal PalmOS field; use Graffiti for this entry. Enter the course in the lower right using an Angle Entry Form.

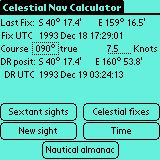
Tap "Celestial fixes" from the Status Page, and you'll see your newly-created fix in the database.

Switch to the "Almanac data" page.
At 20:45:47 UTC, June 21 2000, your dead reckoning position is N 31°56.1', W 14°56.8'. Enter those values in the two DR fields.
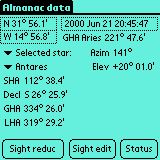
You want to observe the star Antares. CelestNav's perpetual nautical almanac tells you that the uncorrected height should be 20°01.0'. Tap the "Sight reduc" button to switch to the HO229 page.
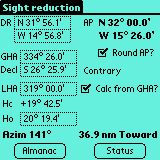
After making your observation and correcting for index error, dip, and atmospheric conditions, you calculate a height Ho of 20°19.4'. Enter that value for Ho.
Check the "Calc from GHA?" box to enter your GHA and have CelestNav compute your LHA. Antares's GHA and declination have been pre-entered for you from the Nautical Almanac page. Since your DR latitude is north and the star's declination is south, CelestNav displays "contrary". Your LHA, as computed by CelestNav, is 319°00.0'.
Check the "Round AP" box This will display an AP (assumed position) of W 15°26.1', N 32°00.0'. AP is rounded to give a whole integer latitude and a whole integer LHA.
CelestNav displays a value of 19°42.5' for Hc, and azimuth of 141°, with an intercept of 36.9 nautical miles "toward".
To plot this LOP on your paper chart, begin from the displayed AP position. Draw a line from your AP on bearing 141. At a point on that line 36.9 nm from the AP, place a dot, the intercept point. Draw a perpendicular to your first line (the azimuth line), through the intercept point. Your position was somewhere along that line.
Now turn to volume 3 of HO 229, page 85 (the page that lists LHA of 319, contrary latitude/declination names). Look under the column for latitude 32°. Interpolation between the values for declination 26 and 27 gives an Hc of 19°42.1', and both Z and azimuth of 141.4°.
CelestNav uses a registration code based on your HotSync name. You can find the HotSync name in the upper right corner of the screen in your Palm HotSync application, or in the upper left corner of CelestNav's "Register" page. Go to the "Register" page by choosing "Register" from the Setup menu.
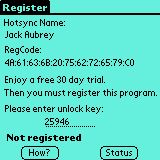
Purchase CelestNav through PalmGearHQ or Handango. When you buy it, you will need to provide your HotSync name. You may also provide the RegCode, which appears in the middle of the screen. The RegCode is helpful if your name uses international characters; it is simply a different way of recording your HotSync name.
Online
with realtime fulfillment, by phone (817) 640-6558, or by fax (817) 640-6614.
Online
with realtime fulfillment
When you buy CelestNav, you will receive a temporary unlock key immediately, and a permanent key in 1 or 2 business days. The temporary key will work for 60 days. The permanent key will not expire.
Feel free to beam CelestNav to your friends. CelestNav will function as a demonstration version for 30 days, just as if they had downloaded CelestNav from a PalmOS software vendor.
The algorithms for the nautical almanac calculations for the Sun and planets are taken from Jean Meeus's book Astronomical Algorithms. The star positions are given by a modified version of the NOVAS vector astrometry package, from the U.S. Naval Observatory.
The algorithms for sight reduction and fix computation come from the 2000 edition of the Nautical Almanac.
The project would have been a lost cause without Rick Huebner's MathLib.
CelestNav was developed on MacOS using the Metrowerks CodeWarrior development environment for PalmOS. It is written entirely in C.
Finally, a heartfelt thanks to everybody I sailed with on the Søren Larsen.