PenScript 3.0 User's Guide for Palm Computing® Devices
Copyright © 2000 Marathon Development Corporation. All Rights Reserved. Patent Nos. 5220649, 5231698, 5590257, 5953735. Patents Pending.
PenScript is a trademark of Marathon Development Corporation. Palm Computing and Graffiti are registered trademarks of Palm Incorporated. All other trademarks and registered trademarks are the property of their respective holders.
Marathon Development Corporation website: www.marathondc.com
Please read the ReadMe.txt and License.txt files included with PenScript.
What is PenScript?
PenScript is the most powerful ink-oriented notetaker available for Palm Computing® Platform devices. Handwritten or Graffiti® written memos can be edited with the power of a word processor. Sketches can be incorporated into a memo using the provided drawing tools. An efficient handwriting (ink) compression method allows memos to span many pages without consuming a lot of memory (a typical page uses about 500 bytes).
System Requirements
Removing PenScript
It is recommended that earlier versions of the PenScript program and any PenScript memos be removed before installing the latest version of the program. Make certain that you no longer need the PenScript memos held on your device and then do the following to remove them along with the PenScript program:
To install PenScript
Double-click on the PenScript.PRC file included in PScript.zip package and follow the instructions on the screen. You will be informed that PenScript will be installed during the next HotSync operation. When you try to run PenScript for the first time, you will be asked to enter a product key code. You should have received the key code in an email following the purchase of PenScript. Do not lose the key code. Should you ever need to reinstall PenScript you might need to enter it again. It is not necessary to write the dashes when entering the code. Once the code has been accepted on your device, there will be approximately a 15-second delay before the PenScript screen appears. If PenScript repeatedly refuses your code, it could be that the Palm Desktop User Name specified during the purchase of PenScript was incorrect or that we erred when generating your key code. If there is a problem, send us an email containing a Palm Desktop User Name identical to what is shown in the Palm Desktop application. We will then generate a new key code for you.
Using PenScript
The PenScript user interface consists of two screens - the Memo List Screen and the Memo Edit Screen. The Memo List Screen appears when you tap on the PenScript icon after having installed PenScript.
Memo List Screen

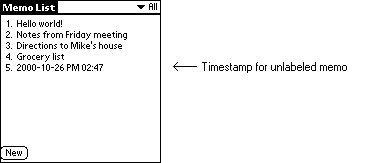
The Memo List Screen displays a list of all PenScript memos available on your palm-held computer. Tapping a memo list entry will cause the corresponding memo to be opened and displayed in the Memo Edit Screen. The first time PenScript is used, only the 'PenScript Tips' memo will be shown in the memo list. The tips provide basic information necessary to operate PenScript. Pressing the New button at the bottom of the Memo List Screen (or entering any Graffiti character) will cause the Memo Edit Screen to appear. Note that each memo in the memo list is identified by Graffiti (font) text that has been extracted from the first line of the corresponding memo. Memos that do not have font text on their first line are identified in the memo list by a timestamp giving the memo creation date and time.
Memo Edit Screen

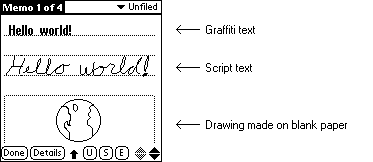
The Memo Edit Screen contains a number of user interface components that you should become familiar with before creating your first PenScript memo. The ruled lines are similar to those that would be found on a sheet of tablet paper. If you intend to use word processing features to edit your handwriting, you should try to write using the ruled lines as a guide - making sure that each word generally falls within the line area where you want the word to reside. It is normal to have descenders, such as the tail on the letter g, extending beneath the line that you are writing on. It is best to keep writing for a particular line beneath the preceding ruled line. The small open areas to the left and right of a ruled line are the margin areas. Placing the pen in the left margin will select lines or drawings. Pen actions or 'gestures' in the right margin are used to perform a number of functions as described below. In addition to a writing/drawing surface, the memo edit screen contains the following buttons and menus:
-Buttons-
Done - Closes the memo and returns to the Memo List Screen.
Details - Provides information about the filing category for the memo.
U (Undo) - Causes the latest writing/drawing stroke to be removed from the screen. When used immediately following a deletion or erasure, the removed item is restored. This button must be pressed immediately after the edit that you want to undo, before any further edit actions, including selection or scrolling. The Undo button can also be used to clear the text cursor, deselect a selected area, cancel Space Gesture mode, cancel Eraser mode.
S (Space) - Pressing this button causes the pen to be placed in Space Gesture mode. The pen can then be used to shift writing/drawing in order to open/close blank space.
E (Eraser) - Pressing this button causes the pen to become an eraser upon contact with the screen. Ink touched by the eraser rectangle will be permanently erased. The pen will act as an eraser only as long as it remains in contact with the screen.
-Menus-
Record menu
Edit menu
Options menu

Ink menu
* New memos are created using the latest setting for this option.
-Gestures-
PenScript uses pen taps and straight-line pen motions or 'gestures' to facilitate edits. Some common edits include selecting text, changing the position of text, altering paragraph boundaries, and opening space within text for writing.
The Selection Gesture
To select some text, hold the pen to the screen until the selection prompt (a vertical bar) appears. Once the selection prompt is visible, selection is extended to other words by moving the pen across the screen. When the pen is lifted, the selection will be deemed complete and the entire selected area will continue to be displayed in reverse video. To quickly select a single word, double-tap on the word. Once selected, text can be cut, copied, or operated on in some other way.
To select entire ruled lines or drawings touch the pen in the left margin next to the item that you want to select. You can then drag the pen up or down to select additional items. If the pen is dragged to the top or bottom of the screen, the document will scroll to reveal items in the corresponding direction. Items brought on-screen by the scrolling are selected as the scrolling occurs.
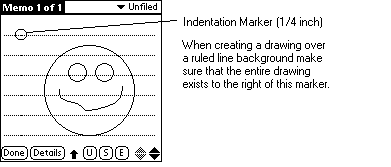
For a drawing made over a series of ruled lines (rather than within a blank paper or graph paper drawing area) you should always select the entire drawing, not portions of it. If Smart Select is enabled, selection of the entire drawing will be automatic. If Smart Select is disabled, selection of the drawing is accomplished by placing the pen in the left margin next to the first line of the drawing and dragging it downward until all ruled lines touched by the drawing are selected. Operations then applied to the selection will operate on the drawing as a whole.
The Space Gesture
In order to open or close blank writing/drawing space, text and drawings can be shifted from their current positions. A space gesture is used to perform the shifting. To begin a space gesture, press the Space (S) button at the bottom of the screen and then touch the pen to the first word that needs to be moved. Drag the pen to the right or downward in order to open space. Drag it to the left or upward to close space. All text at and following the pen will move with the pen. Note that when closing space, text cannot be shifted into positions occupied by existing text.
Entire ruled lines and drawing areas can be shifted up or down by performing a space gesture in the right margin next to the item that you want to shift.
The fastest way to perform a space gesture is to avoid using the Space button. This can be done by tapping the pen on the word that you want to shift and then immediately touching and holding the pen to the same location. A space gesture prompt (circle) will appear beneath the pen indicating that the space gesture can be made.
-Editing Features-
Tap to Open Writing Space
Although a space gesture can always be used to open writing space, there are a couple of quicker ways to open blank writing lines while writing:
Entering Graffiti® or Clipboard Text - Setting the Cursor Position
On a ruled line hold the pen to the screen until a selection prompt (vertical bar) appears. Lifting the pen will cause a blinking cursor to replace the selection prompt. The cursor is used to indicate the location within a PenScript document where a text editing action should take place, such as the location for pasting clipboard data, inserting the date/time, or entering Graffiti text. The fastest way to position a cursor between words is to double-tap between the words.
Moving Text and Drawings
The standard way of moving text/drawings from one place to another is to select the relevant items, Cut/Copy the selected items to the clipboard, set a target cursor position, and then Paste the clipboard items to that position. An easier way is to select the items that need to be moved, touch the pen to any location within the selected area, and then drag the pen to the desired destination. If the destination is off-screen, the document will automatically scroll as the pen reaches the upper or lower boundary of the screen. When the pen is lifted, the selected items will be inserted at the indicated position near the pen tip. If the pen is lifted in the left margin area, the item being moved will be inserted as a paragraph distinct from the existing contents of the line.
Splitting A Word Into Two Words
Occasionally PenScript will assume that two words are a single word because the words were written more closely together than normal. If this happens a lot, automatic word detection should be adjusted by choosing Word Boundaries from the Options menu. For less frequent occurrences, select the erroneous word and make a downward vertical stroke within the selected area at the position where you would like the word to be split. The word will be split into two words, with the appropriate amount of space being inserted between the words.
For delicate word splitting, a special space gesture is available. To perform the gesture, touch and hold the pen to a word at the position where you would like the word to be split. A cursor will appear indicating precisely where the word will be split. If the split position is satisfactory, lift the pen and then touch and hold the pen again at the same position. A space gesture prompt will appear enabling you to drag the right portion of the word with the pen. If the split position indicated by the cursor is not satisfactory, press the Undo button and try again.
Joining Two Adjacent Words
Sometimes PenScript splits a single word into two words because more space than usual was left between characters when the word was written. If this happens a lot, automatic word detection should be adjusted by choosing Word Boundaries from the Options menu. Less frequent occurrences can easily be corrected with one of two methods:
Splitting A Paragraph Into Two Paragraphs
When entering handwriting, PenScript will automatically assume that you have started a new paragraph if you skip a line, indent a line more than one quarter of an inch, or leave more than an inch of open space at the end of one line and continue writing at the beginning of the next line. There might be times when PenScript's automatic paragraph detection does not identify the beginning of a paragraph or you decide to split a paragraph into two paragraphs. At times like this the space gesture can be used to indicate the beginning of a paragraph. This is accomplished by dragging the first word of the intended second paragraph away from the first paragraph to the beginning of a subsequent line. If the first word of the intended second paragraph is already positioned where it should be (at the beginning of a line), shift the word slightly to the right. This will indicate to PenScript that the word is not part of the first paragraph.
Joining Two Adjacent Paragraphs
There are a few methods available for connecting two paragraphs in order to create a single paragraph:
Removing Undesired Writing
The eraser is always available to erase writing or drawing ink, but there are more powerful methods, such as deletion and erasure edits:
It is appropriate to use deletion in those cases where you want to get rid of some writing and to use erasure in those cases where you want to replace writing with new writing.
In addition to the Edit menu options Cut and Clear, two simple gestures can be used to cause a deletion or erasure. After having selected some writing, make a straight horizontal stroke from the right to the left within the selected area in order to perform a deletion. A straight horizontal stroke from the left to the right within the selected area will perform an erasure. Alternatively, pressing the Eraser (E) button will cause a selected area to be erased. A deletion or erasure can be undone by pressing the Undo button before performing any other edit action, including selection or scrolling.
Creating Drawings
PenScript allows you to write/draw anywhere between the left and right margins - at any time. It tries to understand the layout of your document as you write. In order to assure that a drawing made over a series of ruled lines is not interpreted as the continuation of a paragraph of writing, you should make sure that your entire drawing resides at least 1/4 of an inch to the right of the beginning of each line. A dark spot (tick mark) appears on each line to give you an indication of where 1/4 of an inch is. Do not enter writing that you expect to edit later onto the ruled lines where a drawing resides.

The best way to add a drawing or sketch to a PenScript document is to create a drawing area using Blank Paper or Graph Paper. First, select a series of ruled lines and then choose the desired paper type from the Options menu. Some benefits of drawing areas created with blank/graph paper are:
You can convert from one type of paper to another at any time. To do this, select the area that you want to convert and then choose a new paper type from the Options menu.
Special Scrolling Gestures
In place of a scrollbar PenScript has provided two special scrolling gestures:
For people who prefer to use scrolling buttons, PenScript provides page oriented and line oriented scrolling buttons in the lower right corner of the screen. The leftmost up/down arrows are used for page scrolling; the rightmost for line scrolling.
Using the Palm OS Global Find Feature
When a search is requested by tapping the Palm Find icon, PenScript searches only its memo titles for the given text string. PenScript memos can be relatively long, causing significant delays if the entire text of multiple long memos were to be searched.
The PenScript Memo Find Feature
Within individual memos, searches for font text are supported through the PenScript Find feature. Selecting Find from the Edit menu will cause a popup window appear. A case-sensitive search string and a search direction can then be specified. Each time the search string is found, a cursor will be displayed next to the found text. If the search string cannot be found in the given direction a distinctive beep will be heard.
Let PenScript Sleep
When finished creating a memo it is best to press the Done button on the Memo Edit Screen rather than just turning off the computer. This will allow PenScript to sleep soundly, saving battery power.
-Feedback-
Please email any comments to support@marathondc.com. Thank you!