The patchbay is the black canvas that you can see in Bidule. This is where you build the layout/patch to create/manipulate sounds and songs.
Right-click in the patchbay to pop up a menu that contains all available bidules (modules) you can use. The bidules are classified into different categories: Audio Devices, Audio File, Building Blocks, Effects, Groups, Instruments, MIDI, MIDI Devices, Misc, Mixing, Routing, Spectral, VST and VST Instruments.

Once the bidule is in the patchbay, you can double-click it to pop up its GUI (only available if the bidule has any realtime parameters)
A bidule has input and output connectors. The little squares on the top of the bidule are the input connectors and the one at the bottom are the output connectors.

Each connector/cable colour specifies a different type of signal.
- Blue is for audio/data signals
- White is for MIDI signals.
- Yellow (frequency vector) and Orange (amplitude vector): Spectral Processing. These contain not the raw FFT results (complex vector), but actual properly phase vocoded and overlapped signal vectors.
Building a layout is easy. Just choose which bidules you want and connect them graphically. one at the time.
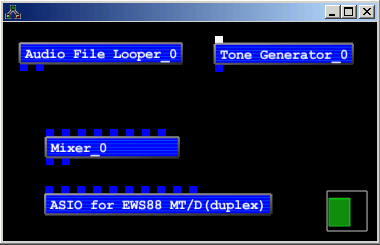
To connect two bidules together, you need to select a connector (it will become bigger when you place the mouse pointer over it), press the left mouse button and then move the mouse to another bidule's connector ( it will also become bigger). Once you have selected the correct one, let go of the left mouse button and a cable linking the two bidules will appear.

To connect multiple connectors from one bidule to another, create the first cable while holding the CTRL key - Bidule will try to create as many cables as possible.

You can also have multiple cables coming out of one connector or multiple connectors leading into one of the connectors (the signals will be mixed/duplicated automatically).
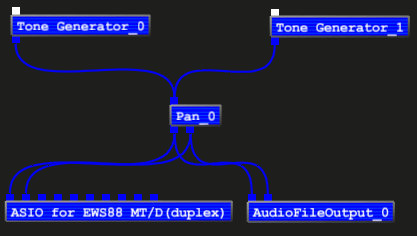
You can repatch an existing cable by first selecting it (clicking on it when it's highlighted or by lassoeing), then by clicking on one of the connectors at the end of the cable and holding the left mouse button until you have selected the new connector.

You can of course send outputs signals back to the inputs signals (provided there is at least another module in between) to create a feedback loop.

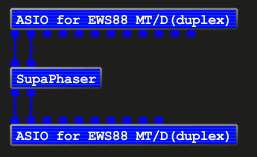
To process live audio (ASIO devices only), just connect both bidules representing your duplex device to the processing module (in this example - SmartElectronix's SupaPhaserVST) as shown.
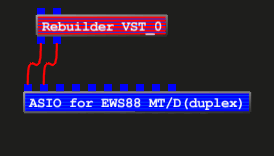
If you ever encounter a red bidule when you load a .bidule file, it means that the saved file contains a reference to a module or plugin that cannot be found within your current configuration. This is usually the case if there is a VST plugin you didn't own or if you are trying to open a layout that had an Audio or Midi Device having a bigger index then the number of available devices in your system. The following picture is an example a patch loaded that requires a missing Plogue Rebuilder VST.
To bring up a Bidule context menu, first left click it to highlight (should turn yellow.. not translucent blue), then hit the right mouse button.
Deletes the selected bidules (and puts them in the undo stack). You can also simply hit the "Del" key, once the bidule is selected.
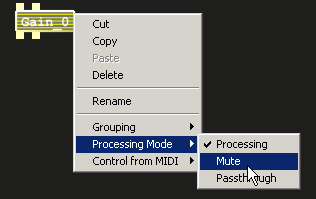
Sets the way the current bidule is behaving in the patchbay (choices are Process/Mute/Passthrough).
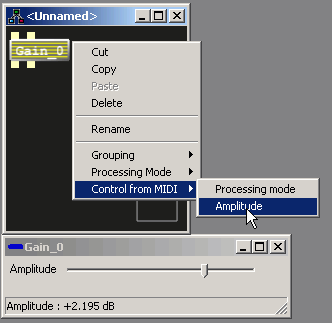
Allows selection of the current Bidule internal parameters to be mapped to a MIDI Controller. Only available if a MIDI Device is connected to the current graph. (This will be sorted out in a future version...)
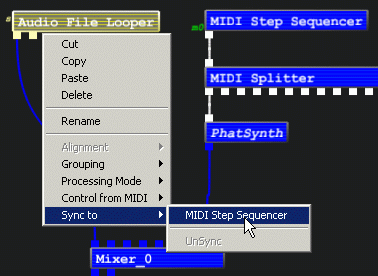
Certain Bidule modules have the possibility to either be slaved or be a master generator of sync information for others.
As a simple example, you might want an AudioFile Looper to be automatically in sync with a certain sequencer, (at least as far as tempo and bar position are concerned).
In most hosts this is no problem, as there is often only one transport control center, which resides in its toolbar. So every plugin "feeds" on info coming from the host's "master timeline".
But in Bidule there is no enforced "master timeline" because you can have many sequencers all free running in parallel. It's up to the user to decide exactly what should be synched to what (as you would do in a real studio). This allows for easy crossfading between different tempoed tracks in a live situation, for instance.
As with many things in Bidule, there are graphical cues to give you a clue of what's happening "under the hood".
If a newly allocated bidule possesses the intrinsic support to be synched, then a small grey "s" (for Slave) letter will appear left of its patchbay representation, meaning it "knows" how to deal with extra sync information.
Similarl, a sync generator bidule (Bidule's Step Sequencer, for instance) has a small green "m" (for Master), followed by a unique identifier, saying it can provide sync information on this sync ID.
If you sync a slave-able bidule to this one, its letter "s" will turn green and the number of the unique master ID will also appear beside it.
- Grey means "available for sync" (currently free running)
- Green means active (masters are always active)
- Most ReWire devices (Reason/Rebirth/Live) can simultaneously be masters and slaves
(*)VST Developers note: a VST plugin should return "1" when asked about canDo "receiveVstTimeInfo" for this option to work.
Allows alignment of selected bidules in the patchbay. The six modes of alignment are:
- Top
- Center Horizontally
- Bottom
- Distribute Horizontally: Spaces selected bidules evenly along the vertical axis
- Left
- Center Vertically
- Right
- Distribute Vertically: Spaces selected bidules evenly along the vertical axis
- Group Selected Object(s): Selected bidules and cables are grouped together. Internal connections between selected objects are preserved. External connections are lost.
- Save selected group: Save the selected group in a file. If the file is saved in the "groups" subdirectory of bidule's installation directory it will appear in the "Groups" category in the Palette.
- Edit group property: Allows editing of the number and type of connectors, the author's name, the group version number, and the name of this group.
- Parent group: Display the parent of the visible group (if it is not the top level group). The keyboard shortcut for this feature is BACKSPACE.
- Expand selected group: Make the selected group the visible group. The shortcut for this feature is CTRL - DOUBLE CLICK.
Mouse:
- Left Mouse Button permits moving bidules, adding connections, etc.
- Right Mouse Button in black patchbay pops up a bidule selection menu.
- Right Mouse Button on a bidule, pops up a contextual menu.
Keyboard:
- Arrow Keys pan through the patchba.
- CTRL-Up and Down/Mouse Wheel zoom in and out of the patchbay.
- Home to get back to default pan/zoom settings in the patchbay.
- Highlighting a bidule or connector + "Del" deletes it.
- Backspace to go back to the parent group.
- CTRL-double left click to explore a group.
- CTRL-C, V, and X for your usual cut and paste needs.
You can select multiple bidules/connectors by pressing CTRL while selecting or by using the left mouse button to lasso.