|
|
| This is a small example on how to set up Ad-aware, creating a backup, excluding items and finally
| |
| removing detected spyware components.As you'll see, Ad-aware is pretty easy to use.
| |
| During the installation, an icon group has been created in your start menu.
| |
| Please run Ad-aware by clicking the appropriate icon.
| |
| The Ad-aware titlescreen shows three buttons which lead to different sections:
| |
 ..For a quick start using your default scanning settings, click this button. ..For a quick start using your default scanning settings, click this button.
| |
|
| |
 ..Use this option to organize, restore or delete your backups. ..Use this option to organize, restore or delete your backups.
| |
|
| |
 ..Click this button to open the preferences menu. ..Click this button to open the preferences menu.
| |
| · | Setting the scanning options
|
| When you start Ad-aware 5.0 the first time, no sections to scan are specified.
| |
| Select which sections you want Ad-aware to scan in the list at the left side(see the image below).
| |
| For the beginning, you should select the memory-scan, both registry scans and the drive where your windows installation resists.
| |
| It is not necessary to always scan all drives, but recommended from time to time.
| |
| Your scanning settings will be stored and used the next time when Ad-aware is started
| |
| If you have Ad-aware autostarting with windows, the same settings will be used.
| |
|
| |
| Note: The only exception is, if you run Ad-aware from the explorer by right-clicking a drive or folder.
| |
| In this case only the particular drive\folder will be scanned, but your scanning settings will not be overwritten and used again when Ad-aware is started regulary the next time.
| |

| |
| A grayed icon means that some, but not all subsections are selected.
| |
| For example, check the "My computer" icon to quickly set Ad-aware for a complete system scan.
| |
| To start scanning, press the appropriate Button in the titlescreen..
| |
| · | While scanning..
|
| Depending on your selection, the scan may take from a second up to a few minutes.
| |
| The progressbar indicates the remaining time for the current operation.
| |
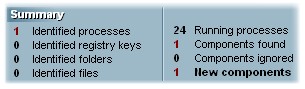
| Watch the "summary" section while scanning, it gives you an overview about detected spyware components.
| |
|
| |
|
| |
| |
| In this example, a known spyware component was found active in memory, you'll see the type
| |
| and name later in the resultlist when the scan is finished.
| |
|
| |
| Ignored items will be listed under "Componentes ignored" and mentoined in the logfile, but not further processed.
| |
| Most important is the counter reading "New components", it shows only unexpected components which are not in the ignorelist.
| |
| Once the scan is complete, you should take a look in the logfile Ad-aware has generated.
| |
| If spyware has been detected, it is recommended to save it to disk for later analysis.
| |
| Click the "continue" button to obtain a list of all detected components (if any).
| |
| Note:To abort scanning, click the "Abort" button to return to the titlescreen immediately.
| |
| · | If new spyware components have been detected on your system..
|
| If no (or only ignored) components are found during the scan, a message box will appear after clicking the
| |
| "continue" button, indicating that no new components have been detected.
| |
| |
|
| |
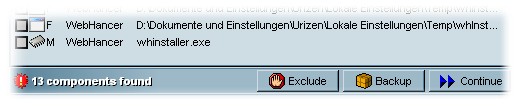
| But if (as in the above example) spyware components have been recognized during the scan, a new window will
| |
| appear after pressing continue, featuring a list showing all detected components.
| |
|
| |
| Each item in the list features 3 fields:
| |
|
| |
| Type : the type of resource, where M = module, K = registry-key, V = registry value and F = folder.
| |
| System : the advertising system to which this component belongs.
| |
| Details : details about the particular item, can be a path-name, registry value etc.
| |
|
| |
| Move and hold your mouse over an item to get more details, like the rootkey and position in the list.
| |
| To select\deselct an item, use its checkbox at the left.
| |
|
| |
| Note:To sort the list according to a categorie, click the appropriate column tab.
| |
|
| |
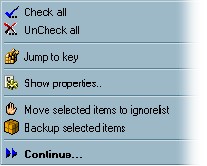
| Right click in the result list to open the following popup-menu :
| |
|
| |
|
| |
| |
|
| |
| The options have the following functions:
| |
|
| |
| · | Check\Uncheck all - selects all or none items in the list.
| |
| · | Jump to key - if RegHance 2.0 or later is installed, you can jump directly to the selected registry key using this item.
| |
| · | Show properties - shows the file-properties tab if an file is selected.
| |
| · | Move sel.items to ignorelist - chose this option if you want to IGNORE an advertising system in the future
| |
| · | Backup selected items - create a backup and include all selected components.
| |
| · | Continue - continue cleaning your system, all selected components will be removed.
| |
|
| |
| Note: the Backup,Exclude and Continue options have appropriate buttons at the screen bottom.
| |
|
| |
| To open a selected registry key with RegHance, make sure you have specified the RegHance installation folder on the
| |
| configuration\paths page.
| |
| When you decide to make a backup, you will be asked for a filename first, then the backup will be created.
| |
| The progressbar indicates the remaining time for creating the backup.
| |
| This may take a few seconds, as all items will be compressed. Read more about backups below.
| |
|
| |
| If you want to ignore certain components, select all items you want to ignore and click the "exclude" Button.
| |
| Ignored items will be removed from the resultlist.
| |
|
| |
| Finally choose the items you want to remove, and click the "continue" button.
| |
| Ad-aware will now remove the selected components- and you are done.
| |
|
| |
| Note:Sometimes it is not possible to remove an component without rebooting first.
| |
|
| |
|
| |
| · | Reinstalling components from a backup
|
| If you wish to re-install components you previously removed using Ad-aware, open the backup-manager from the
| |
| Titlescreen (use the button shown below), and choose the desired backup in the following list.
| |
| After selecting the backup, click the "Restore" button to start the installation.
| |
| (As the backups are compressed, decompressing + installing might take a few seconds)
| |
|
| |
|
| |
| The "Backups" button in the titlescreen opens the backup manager.
| |
| |
| Note: When started, Ad-aware scans the specified backup-folder for valid backups to build this list.
| |
| If you change the backup-path using the configurtation menu, you should move your backups to the new path in order
| |
| to access them with Ad-aware.
| |
|
| |
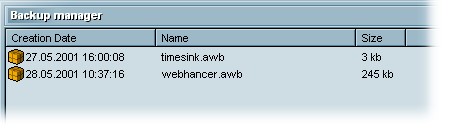
| The following example shows two backups.
| |
| Notice that the size of the "timesink" backup is significant smaller then the webhancer backup as it only contains registry keys.
| |
|
| |
|
| |
| |
| To delete a backup, click the "delete" button at the bottom of the window, or use the appropriate menu item.
| |
| Right-click on an item to open a popup-menu, featuring options to restore and delete backups.
| |
| To return to the titlescreen, click the "ok" button.
| |
|
| |
|
| |
|
| |
|
| |
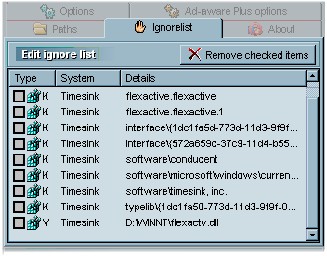
| · | Editing the "Ignorelist"
|
| Sometimes you want to keep an particular snoopware system remaining on your system, and don't want Ad-aware to detect
| |
| its components over and over again.For this purpose an ignorelist has been implemented in Ad-aware 5.0.
| |
| You find the ignorelist under configuration\ignorelist.
| |
|
| |
|
| |
| ..Click this button to open the preferences menu.
| |
| When you first start Ad-aware, this list will be completely empty.
| |
| To add items to the ignorelist, follow these steps:
| |
| First scan your system, continue until the scan result-list.
| |
| Check all items you want to be ignored by Ad-aware in the future, and click the "exclude" button. (or use the appropriate menu item).
| |
| |
|
| |
| Any item in this list will be treaten seperately by Ad-aware, it will still be recognized, but not show up in the scan-result list or
| |
| getting removed when you run Ad-aware in the automatic mode.
| |
| Ignored items will be listed in the logfile with a remark, and counted during the scan as beeing ignored.
| |
|
| |
| To remove items from the ignorelist, open the ignorelist-tab in the configuration window,
| |
| check the items in question and click the "remove checked items" button.
| |
|
| |
| Note:Ad-aware shares the ignorelist (and the referencefile) with Ad-watch.
| |
|
| |
| The ignorelist will be saved in the Ad-aware folder under the name "ignorelst"
| |
|
| |
|
| |
|
| |
|
| |
|
| |