4.4 Building VCDs from Mixed Mode CDs
To create a Mixed Mode VCD, open the Build VCD dialog box by 5 methods.
(a) Click on the Build VCD button
![]() on
the toolbar.
on
the toolbar.
(b) Select File from the menu bar and choose Build from the drop menu.
(c) Right click on the VirtualDrive icon in the System tray and selects Build.
(d)
Using the shortcut key Ctrl+B.
(e)
Open Windows Explorer, right click on the inserted physical drive and
select Build VCD File from the popup menu (Figure 4-4).
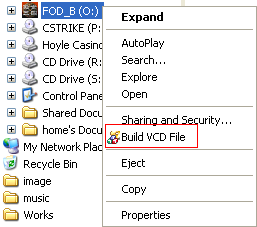
(Figure 4-4)
Then follow the steps as described below.
Step 1. Select the physical CD drive then click on Next.
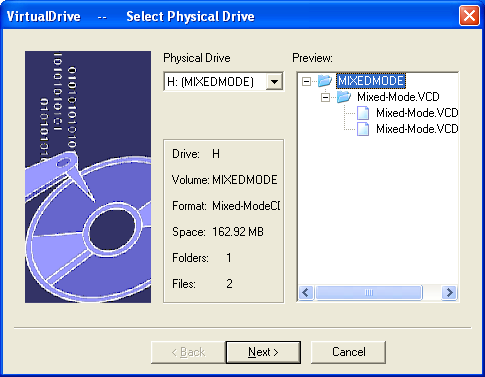
Step 2 Check that selected hard drive has
sufficient ‘Free Space’ (Figure 4-4a) to store the new VCD, Then use the
File Browser to select a location to save the VCD and give the new VCD file a
name. If no new name is entered then the new VCD will use the name of the folder
in which it is to be stored, as the VCD file name.

Figure 4-4a
Step 3 Select the CD Read method and the CD Record method (Figure 4-4b).

Figure 4-4b
The default read method is 'Normal' and is successful for most CD formats however, because some CDs contain inaccurate volume information, use the 'Intelligent extraction' method if a VCD has been successfully built but does not run properly. Using Data Compression will save hard disk space but will require a longer VCD build time.
If only selecting ‘Record Data Tracks’, Will build the Data Tracks of the selected Mixed Mode CDs only. If only selecting ‘Record Audio Tracks’, Will build the Audio Tracks of the selected Mixed Mode CDs as background music only. If selecting both ‘Record Data Tracks’ and ‘Record Audio Tracks’, Will build the Data Tracks and Audio Tracks of the selected Mixed Mode CDs.
Step 4 Set the Preview track
As long as you have selected ‘Record Audio Tracks’ and click Next button, will open ‘Select Tracks’ box (Figure 4-4c). If only selecting ‘Record Audio Tracks’, will skip step 4 and enter step 5.
If you don’t need all Audio tracks, you can click on the
Preview track play ![]() button to select which track you
like to build and click on the Volume
button to select which track you
like to build and click on the Volume![]() button to set the Preview track’s
level. When you select one track and click on the Preview track play
button to set the Preview track’s
level. When you select one track and click on the Preview track play![]() button, you can see the track’s
playing progress bar from Progress.
button, you can see the track’s
playing progress bar from Progress.
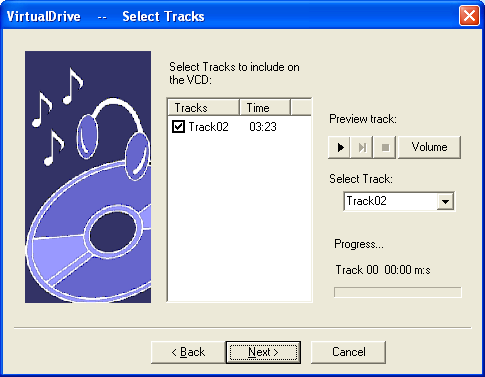
Figure
4-4c
Step
5 Enter a Description of the new VCD in the Description box (Figure 4-4d)
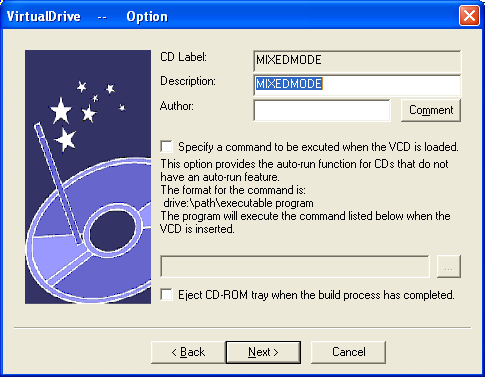
Figure 4-4d
Step 6
(optional) If the CD does not have an Auto-Run then
you can specify a program to run when the VCD is inserted.You
can use the Browse ![]() button to locate the executable program.
button to locate the executable program.
Step
7 (optional) Choose whether or not to eject the CD from the CD drive once
the Build is complete by checking the ‘Eject the VCD on completion of the Build
process’ box (Figure .4-4d above). Click on Next
to continue.
Step
8 Virtual Drive will then display the attributes of the VCD about to be
created. Click on Next to
open the Build window.
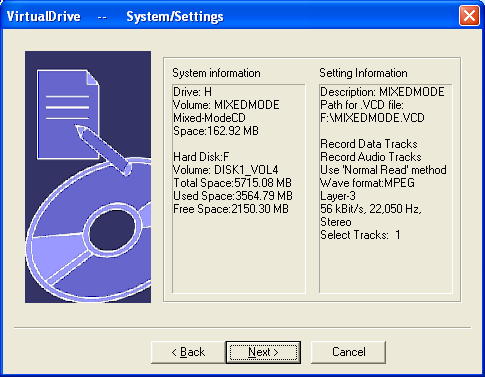
Figure 4-4e
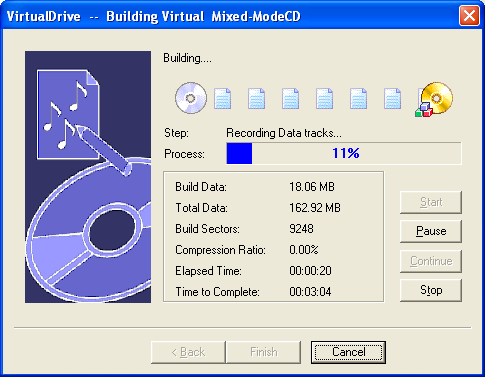
Figure 4-4f
Step
10 With the
VCD is successfully built, click on OK
to exit the Build popup then click on Finish to close the VCD
Build window (Figure 4-4g).
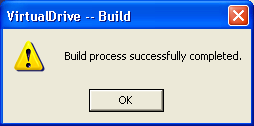

Figure 4-4g