 |
|
DVDx allows you to convert DVD to VCD2.0 , SCVD1.0 or AVI (DivX...) in one step (Including multiplexing, splitting). It produces good quality movies in AVI , MPEG1/2 format and you don't need to have 5GB or more free on your hard disk. DVDx has been designed especialy for inexperienced users, it is a simple and intuitive program. All you need DirectX8.1 or higher, Adaptec ASPI driver (highly recommended) and a tool to write your VCD,SCVD like VCDeasy or Nero.
Content:
- How to convert a DVD to VCD2.0 compliant files
- How to convert a DVD to SVCD1.0 compliant files
- Using DVDx with Tsunami Mpeg encoder (TMPGEnc)
- Resizing , cropping and working with aspect ratio.
- How to convert a DVD to DivX (using DivX and Lame MP3 encoder) in one go.
- How to split your MPEG / AVI files by chapter.
 |
1. How to convert a DVD to VCD2.0 compliant files
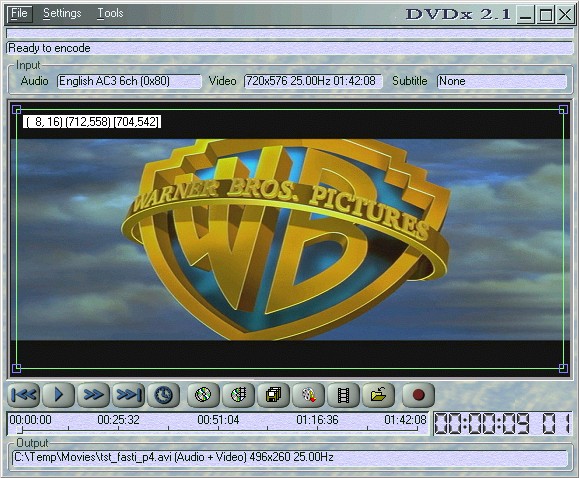
Fist, launch DVDx.
STEP1: Select Open IFO or Open DVD root
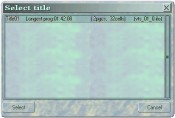 You have to choose one IFO file. There is no rule to know in which
file the movie informations are. The DVD root window shows you the longest
program found in each ifo files. It help a lot to see which IFO must
be choosen.
You have to choose one IFO file. There is no rule to know in which
file the movie informations are. The DVD root window shows you the longest
program found in each ifo files. It help a lot to see which IFO must
be choosen.
STEP2: Now you should get the following window
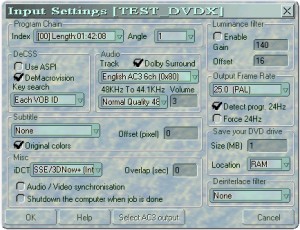 Program Chain: Select the apropriate program chain index
and the angle you want to rip. Most of movies are stored in angle 1.
Note that DVDx doesn't support all DVD features so you may get the "MPEG2Dec:
Error during initialisation" error when opening some index.
Program Chain: Select the apropriate program chain index
and the angle you want to rip. Most of movies are stored in angle 1.
Note that DVDx doesn't support all DVD features so you may get the "MPEG2Dec:
Error during initialisation" error when opening some index.
DeCSS: Keep default setting for DeCSS, ASPI is needed for the drive authentification and allows to read file bigger than 1GB sometimes found on DVD. Change the key search mode if you get scrambled picture or invalid block error. The "Each VOBID" setting shoud work in most of cases. The Demacrovision flag remove the macro vision protection.
Audio: Select audio track Note that only AC3 , Mpeg Audio Layer
1 et 2 , LPCM (44.1KHz or 48KHz) format are supported. The default value
of 2.5 for volume should give a normal volume with most of movies but
sometimes sound may be low. You can use the sound normaliser to find
the optimal volume. The Dolyby suround downmix allows to preserve better
5.1 FX in stereo.
48KHz to 44KHz: Allow to convert 48KHz sound to 44.1KHz. Select
44.1KHz(no conv) when the input is a 44.1KHz stream. Select 48KHz(no
conv) when you want to encode a 48KHz AVI or PLUGIN sound stream.
Subtitle: Select subtitle. Original color preserves colors from the IFO file. Uncheck the flag if you get bad looking font. Vertical offset allows you displace the subtitle verticaly on the screen.
Frame rate: This is the output frame rate. This value is not automaticaly set and if input and output frame rate are different a pull up/down will be performed. For PAL choose 25Hz, for NTSC choose 23.97 or 29.976Hz . Avoid conversion between NTSC and PAL. The detect 24Hz flag enables 24Hz progressive NTSC dvd detection. The force 24Hz force the input to be a 24Hz progressive. Use it if you think the detection isn't correct (when getting "Too much samples ...." error). I'm not sure if it works. I never experimented this problem personaly. The detected input frame rate is shown in the front panel.
Luminance Filter: This allows you to increase the luminosity of the movie. Offset increase the ambient light. Gain is a fixed point value (0=0.0 128=1.0 256=2.0 ....)
iDCT: is the inverse discrete cosine transformation. MMX is fastest, FPU provides the best quality.
 Overlap: Allow you to make an overlap when the movie is cut
(when making volumes). When the volume size is reached (see output setting)
the decoder will go backward of the specified amount of time.
Overlap: Allow you to make an overlap when the movie is cut
(when making volumes). When the volume size is reached (see output setting)
the decoder will go backward of the specified amount of time.
Audio/Video Synch: Resynchronise periodicaly video and audio. This is usefull when you get the "samples not found" error message. With this flag, audio blanks are automaticaly filled and resynchronised. This might generates crackling sound.
Deinterlace Filter: Use this when your picture is interlaced (like beside). The interpolate mode always works but you can lose a bit quality when making SVCD (due to even field interpolation). Warning the first image is always interpolated so you cannot be sure that you have selected the good field. Make a small clip to see if you're right. ( This filter works on PAL DVD only , Inverse Telecine is an other thing )
Save your DVD drive: Use this to preserve to DVDROM drive, if you use a small buffer the DVD drive will be swithced on/off a lot which can damage the motor. So for long rips you can use a large HDD buffer. If you want to make overlap avoid big buffer (>20MB) you may get unwanted result with multi angle DVD. Concerning performance RAM buffer is faster , if you set a large RAM buffer disable the virtual memory (Windows system settings) to get more speed.
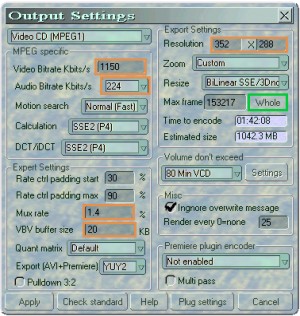
STEP3: Let's have a look at Output setting for VideoCD
 In order to make a 100% VCD complient MPEG1 file you have to set
up the following values:
In order to make a 100% VCD complient MPEG1 file you have to set
up the following values:
MPEG Specific: Choose VideoCD (MPEG1)
Video birate: For Video CD the bit rate must be between 650 and 1150KBits. The quality is better with high bitrate.
Audio Bitrate: For Video CD the audio bit rate must be 224 KBits
Capture: For NTSC Video CD the resolution must be 352x240, For PAL one the resolution must be 352x288
Whole: Click on this button to encode the whole movie. This will compute for you the movie frame number.
Volume don't exceed: This allow you to split the output file.
You can set the type of volume you want (74,80Min VCD,ISO Data CD) ,
you can also set a preffered size or even split by chapter (Look at
How to split your files by chapter).
NB: On a VideoCD you can write volume up to 730Mb (may be a
little bit more but if you increase this value, data will fill the entire
CD up to the side which is a more fragile part ). DVDx creates the first
volume with the specified output name and all following volume will
be named as name_XX.mpg/avi where XX is the volume number.
You can make an overlap (see input setting overlap parameter).
Max frames: This is the number of frames to encode. See the text box below to know the corresponding time.
3:2 pulldown: Converts 23.97fps NTSC to 29.97 by performing a 3:2 telecined pulldown. This has not been tested a lot. so if you get troubles you may demultiplex and remultiplex the output file.
Orange settings are automaticaly set when you select VideoCD or Super Video CD.
Now click on the Check Standard button to see if your
setting are correct. If it's the case now you're ready to go to step
4.
Rest of parameters are described in the built in help.
STEP4: Now You're PC is ready for a long long job
Check the output file name. Now click on the encode button and go to bed for a while. Note: Avoid render every frame. Rendering is slow and has not be optimized for compatibility reasons. Render every 25 frame is a good choice.
STEP5: MPEG files done, now launch Nero Burning ROM
Select the icon "Video-CD" . Click "New"
- From the Explorer on the right, choose your first generated volume, and drag it into the list on the left.
- Nero will check whether the MPG file is VideoCD compliant or not.
- When the test is ready, click
File...burn CD - Enter a volume descriptor Click "
OK". - Nero burns the CD
- Repeat (1) to (5) for each other volume.
Now you've got 100% VCD2.0 standart compliant.
2. How to convert a DVD to SVCD1.0 compliant files
Step 1 and 2 and identiqual to VCD creation process
STEP3: Look at Output setting for Super Video CD
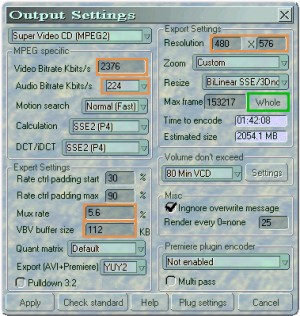 In order to make a 100% SVCD compliant MPEG2 file you have to set
up the following values:
In order to make a 100% SVCD compliant MPEG2 file you have to set
up the following values:
MPEG Specific : Choose Super VideoCD (MPEG2)
Video birate: For Super Video CD the bit rate must be lower than 2600KBits. A value of 2376Kbits is highly recommanded for compatibilty with most of home DVD player. The quality is better with high bitrate.
Audio Bitrate: For Super Video CD the audio bit rate should
be 224 KBits (Other values are standard compliant 32-320Kbs but you may get
troubles with the multiplexer Audio/Video Unit Buffer Full ).
Capture: For NTSC Video CD the resolution must be 480x480, For PAL one the resolution must be 480x576
I never made test to know which is the maximun volume size for a Super Video CD. It should be similar to VideoCD.
Now click on the Chek Standard button to see if your setting
are correct. If it's the case now you're ready to go to step 4
Rest of parameters are described in the built in help and/or in the VCD help above.
STEP4: Now You're PC is ready for a long long job
Check the output file name. Now click on the encode button and go to bed for a while. Note: Avoid render every frame. Rendering is slow and has not be optimized for compatibility reasons. Render every 25 frame is a good choice.
STEP5: MPEG files done, launch Nero Burning ROM
Select the icon "Super Video-CD" . Click "New"
- From the Explorer on the right, choose your first generated volume, and drag it into the list on the left.
- Nero will check whether the MPG file is Super VideoCD compliant or not.
- When the test is ready, click
File...burn CD - Enter a volume descriptor Click "
OK". - Nero burns the CD
- Repeat (1) to (5) for each other volume.
Now you've got 100% SVCD1.0 standart compliant.
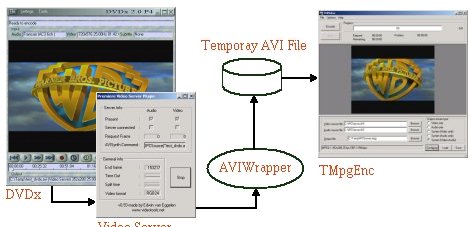
3. Using DVDx with Tsunami Mpeg encoder (TMPGEnc)
You can connect DVDx to TMPGEnc via the AVIWrapper frame server.The Video Server (via AVIWrapper) is able to create a small AVI file that can be opened by an standalone encoder. (here tmpgenc). The scheme below illustrates the processus.
 |
1) Installation of the Video Server (IPC Frame server)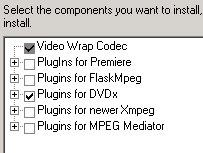
- Run the setup in the
VideoServerv093.zipfile (This will install the Video Server plugin for DVDx and the AVIWrapper). Don't worry about the error, choose continue installation. - Select Plugins for DVDx and make sure that the file
cm-videoserver.prmis well copied into this directory.
 For more informations: visit the official site
2) Launch DVDx and select the Video Server Plugin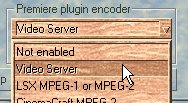
- Open the output setting window and select the Video Server
- Select the Multi Pass flag if you want to make a 2Pass VBR.
- Click on the Plug Setting button and set up the plugin like below:
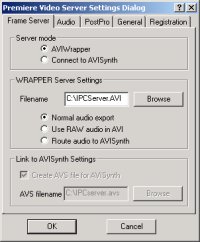 |
4) Return to the DVDx front Panel and click on the Encode Button
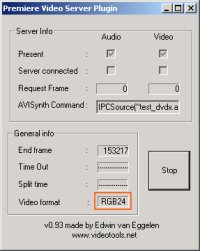 |
Important: The number of frames to encode must be set in the
DVDx output setting window. Tmpgenc does not support YUY2 or
YV12 format , Use RGB24 (Export parameter
in the DVDx output setting)
Note: CCE and LSX plugins for premiere support only RGB32
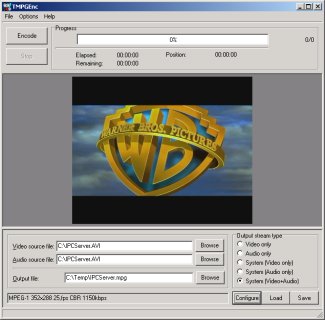
5) Launch TMPGEnc and open the .avi file for audio and video (here c:\IPCserver.avi)
 |
Note: It is also possible to split the output file. Have a
look at the Plugin settings.
4. Resizing , cropping and working with aspect ratio
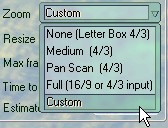 DVDx allows you to define how you want to resize and crop the
source. First you have to select the custom zoom mode in the output
setting window. Then it is important to understand how DVDx do the
job. The following figure shows the process. On this figure the aspect
ratio hasn't been preserved to understand better how it's work. We
can understand that to get a correct ratio we need to increase the
output width or decrease the crop area width.
DVDx allows you to define how you want to resize and crop the
source. First you have to select the custom zoom mode in the output
setting window. Then it is important to understand how DVDx do the
job. The following figure shows the process. On this figure the aspect
ratio hasn't been preserved to understand better how it's work. We
can understand that to get a correct ratio we need to increase the
output width or decrease the crop area width.
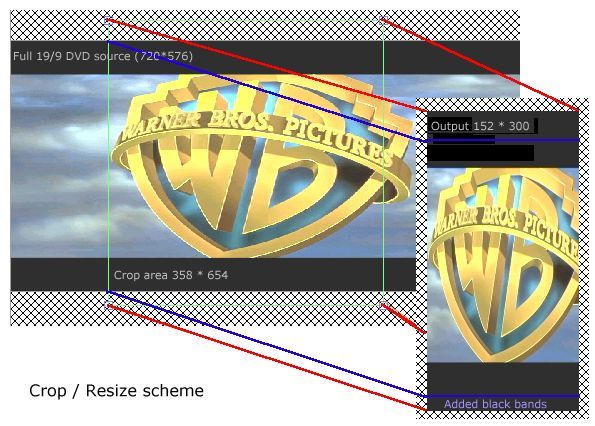
To capture an area an keep the original aspect ratio you have first to select the source area (green box) then adjust the output resolution to selection ( Output Setting => Crop => Adjust output resolution => Selction ) then if your DVD is 16/9 do a 4/3 correction ( Output Setting => Crop => Adjust output resolution => Correct 4/3 ). No you get an output resolution which preserve the original ratio. Now if you want to change the output dimension, You have to preserve the output width/height ratio. That's all.
5. How to convert a DVD to DivX (using DivX and Lame MP3 encoder) in one go
1) Installation of DivX5.0 Video Codec
Just run the setup program :)
2) Launch DVDx and open the DVD (See VCD Step 1 and 2)
3) Crop the source, set the output resolution (See aspect ratio) or use a predefined zoom.
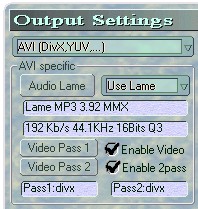
4) Now let's have a look at output setting for DivX (1 Pass)
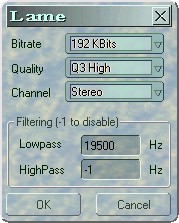
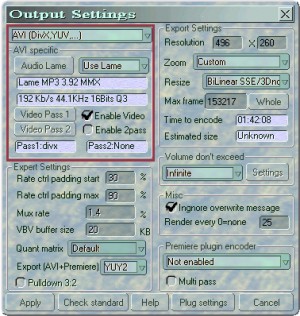 Audio Lame: Click on the Audio Lame button and set up
the Lame encodeur. You can choose Join Stereo to get a better quality.
192 KBits is near CD quality.
Audio Lame: Click on the Audio Lame button and set up
the Lame encodeur. You can choose Join Stereo to get a better quality.
192 KBits is near CD quality.
Video Codec: You can select the vidieo codec by clicking on the "Video Pass 1" Codec boutton. Lot's of video codec works with DVDx. If you change the output resolution ou the Export format (RGB,YUV) you have to reselect the codec. Use the YUY2 format to make good DivX and it is faster !
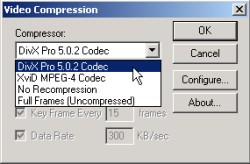 For DivX settting (Configure button) you go can read other
guides. In few words: Just increase a bit the DivX bitrate if you want
to get a best quality. Other default settings work fine.
For DivX settting (Configure button) you go can read other
guides. In few words: Just increase a bit the DivX bitrate if you want
to get a best quality. Other default settings work fine.
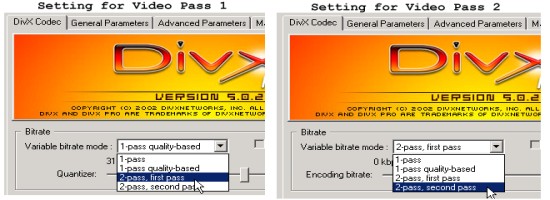
5) Making 2 Pass DivX (Best quality)
 The process to make 2Pass DivX is not different than making 1 Pass
Divx. The main difference is that you have to step up two codecs. The
pictures below show how to set up pass 1 and 2 for DivX. Note that you
cannot split AVI files by size when making 2 Pass but you can use the
custom splitting by chapter. The output AVi file will be invalid
during all the first pass.
The process to make 2Pass DivX is not different than making 1 Pass
Divx. The main difference is that you have to step up two codecs. The
pictures below show how to set up pass 1 and 2 for DivX. Note that you
cannot split AVI files by size when making 2 Pass but you can use the
custom splitting by chapter. The output AVi file will be invalid
during all the first pass.
6) Now click the encode button and go to bed.
Good night :)
Now, you should get AVI file that you can play with your favorite media player.
6. How to split your MPEG / AVI files by chapter.
 You can select chapter you want to extract and rip them in
one or several MPG/AVI files. To do this select Custom chapters in Volume
don't exceed. Then click on the setting button , you should get
the following window.
You can select chapter you want to extract and rip them in
one or several MPG/AVI files. To do this select Custom chapters in Volume
don't exceed. Then click on the setting button , you should get
the following window.
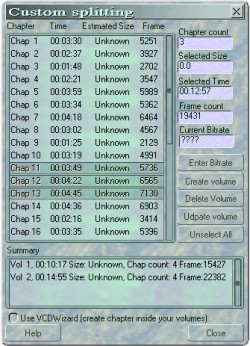 To create a volume, select chapter(s) in the chapter list
and click create volume, To remove a volume, select the volume
in the summary list and click delete volume. To see selected chapter(s)
in a volume click in the summary list. Volumes will be output as (Vol1)
filename.mpg(avi) (Vol2) filename_02.mpg(avi),...
To create a volume, select chapter(s) in the chapter list
and click create volume, To remove a volume, select the volume
in the summary list and click delete volume. To see selected chapter(s)
in a volume click in the summary list. Volumes will be output as (Vol1)
filename.mpg(avi) (Vol2) filename_02.mpg(avi),...
Hint: To select quicly chapters use the keyboard.
(space to select, cursor keys to move )
Note that the overlap (input setting) is ignored when splitting by chapter.
You can use VCDWizard to add chapter in your mpeg files. DVDx will create a input.ini file containing chapter timestamps . This file is created in your Temp directory. VCDWizard is not in the DVDx setup. You have to install it separatly.
Have fun with DVDx :)))
Disclaimer
DVDx is a tool to backup DVD-Video on CD-R and DVD-R, it is authorized on French territory (if you own the original DVD-Video) but may not be allowed in all countries. Check the local law you must respect before downloading and using this software.
Related links
Credits
Special thanks to:
Mijo Rebic aka Okami for testing, suggestions, help and DVDx guide page.
PX3 for his speed optimization.
Alex Klimovitski for the P4 routines
Oliver DERVYN for the new fullsearch algorithm
Dragongodz for the FAQ, his intensive participation in the forum and his help with DivX
Author (Guide and Program): Jean-Luc (Updated January, 2003 - Version 8)