Rendering HQ (Highest Quality) Effects
Some effects have two rendering options, the standard hardware-assisted render and the HQ (Highest Quality) software-based render. HQ rendering produces a superior image, but it takes longer than standard rendering.
The HQ button appears in the Effect Editor for effects that have an HQ rendering option. Use the HQ button to select HQ rendering for an individual effect in your sequence.
 | |
Not all effects have an HQ rendering option.
|
To select HQ rendering for an individual effect:
| 1. | |
In Effect mode, move the position indicator to the effect you want to
select.
|
If HQ rendering exists for the effect, the HQ button appears in the
Effect Editor.
The button turns green.
To select standard rendering for an individual effect:

|
|
Click the HQ button again.
|
The button turns black.
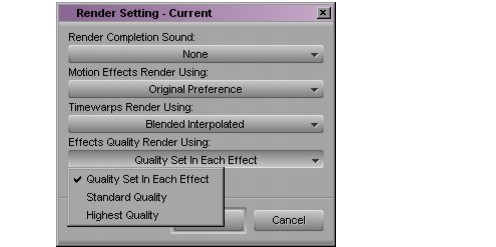
The HQ button has a global setting in the Render Settings dialog box. The Effects Quality Render Using menu lets you override the selection you made in the Effect Editor for individual effects.
You can easily change from standard rendering to HQ rendering for your entire sequence, once you are satisfied with your draft version, by using the Render Settings selection. You can also choose to set all effect rendering to standard if you want to decrease rendering time. For more information, see
Creating and Using Render Settings.
| |
Once the application begins rendering, it changes all affected HQ settings
to the Effects Quality Render Using value in the active Render setting. If
you cancel the render, HQ settings for individual effects do not revert to
their previous values.
|
For example, suppose you apply several effects to a sequence and use the HQ button in the Effect Editor to select HQ rendering for some but not all the effects. In the active Render setting, you set Effects Quality Render Using to Highest Quality. You set an IN point and an OUT point, and select Clip > Render In/Out.
When you start the render, the application immediately changes all the effects between the IN point and the OUT point to HQ rendering, if the HQ render is available for a given effect. If you cancel the render, the HQ settings that were changed will not be changed back. You must reset the HQ settings individually.
high qual