Determining the Pulldown Phase
It is easiest to determine the pulldown of a sync point (or pulldown phase) if you ask your film lab to keypunch (cut a small hole in) the sync frame at the zero frame in the original film footage before transferring the film to video. Many film labs or transfer houses can also provide a pulldown frame indicator displayed at the far right of the burn-in key numbers, depending on the equipment available. Ideally, the A-frame pulldown coincides with timecode ending in 0 and 5 (:00, :05, :10, and so on).
If the footage has not been keypunched, you can determine pulldown according to clapsticks or any other distinctive frame at the beginning of the clip. Determining the pulldown is easier if the frames depict motion.
To determine the pulldown phase:
| 1. | |
While viewing the video transfer on a monitor, go to the keypunched
(or clapsticks) sync point for the beginning frame of the clip you're
logging.
|
| 2. | |
Step (jog) past the sync point frame field-by-field, using the step wheel
on the tape deck. You will see either two or three keypunched fields. If
the footage is not keypunched, look for two or three fields with little or
no motion.
|
| 3. | |
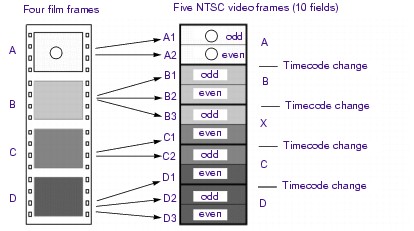
If there are two fields, the pulldown is either A or C. Step through the
fields again, and note where the timecode changes:
|
| – |
|
If the timecode does not change from the first to the second field,
the fields came from an A frame.
|
| – |
|
If the timecode changes from the first to the second field, the fields
came from a C frame.
|
The following illustration shows a keypunch on the A frame. Notice
where the timecode changes.
| 4. | |
If there are three keypunched fields, or fields without motion, the
pulldown is either B or D. Step through the fields again and note where
the timecode changes:
|
| – |
|
If the timecode changes between fields 2 and 3, the fields came
from a B frame.
|
| – |
|
If the timecode changes between fields 1 and 2, the fields came
from a D frame.
|