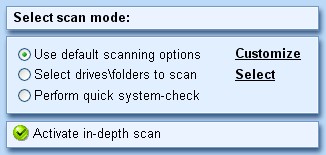
To perform a scan, you must choose one of these three scan modes
|
First scan set-up
| [Previous] [Main] [Next] |
To perform a scan, you must choose one of these three scan modes
|
| |
| · | Use default scanning options - using the default settings you will enter during your initial configuration. To make last minute configuration changes you can use the "Customize" hot-link to reenter the settings dialog
| |
|
| |
| · | Select directory \ drive to scan - You can choose to scan specific folders and drives without performing an entire system check. Just select the "Select" hot-link to enter the "Select folders to scan" dialog and then manually choose what you would like to scan.
| |
|
| |
| · | Perform quick system check - This mode will scan your memory, registry and Windows folder.This is the fastest scan, but also the least comprehensive. We recommend that you use this as a quick "test" to determine if you need to perform additional checks on the rest of your system.
| |
| · | "Automatically save log-file" - This will force Ad-aware to make and store a copy of the log file for any scan and/or scan/removal process. If you need technical support following an incomplete or improper removal, we will need to see the details of this file as a starting point to help you determine what may have happened and where to begin formulating our support response. It is important that you have a copy of this file.
| |
|
| ||
| · | "Automatically quarantine objects prior to removal" - THE most important new feature we have added to version 6! It will backup and store all the files prior to removal automatically. You will no longer have to create your own backups, let Ad-aware do it for you.
| |
|
| ||
| · | "Safe mode" - This option forces Ad-aware to ask for and obtain your explicit permission prior to initiating any action or procedure. Please use this option as it will help you to understand WHAT Ad-aware is doing at all times.
| |
| · | "Scan within Archives" - This option will allow Ad-aware to check your compressed or backed up files. It is a good idea to allow Ad-aware to do this the first time you scan so that any suspicious material that has been stored for later installations or may be part of an old backup can be detected and dealt with.
| |
|
| ||
| · | "Skip non executable files" - is a real time saver, but should not be used with an initial scan. Your first scan should include all files and folders. You can adjust this later, but always be aware that some files will be skipped if this option is set.
| |
|
| ||
| · | "Skip files greater than [x] KB" - One of the biggest requests for improvement we have had to date. This will allow the user to define file size limits. First time users should not select this option until they have had time to become familiar with Ad-aware and are comfortable with the nature of the content they are exposed to.
| |
|
| |
| · "Scan active processes" - This option allows Ad-aware to scan active processes.
| |
| · "Scan registry" - This is a normal scan of your registry. It should be used in conjunction with the next option:
| |
| · "Deep Scan Registry" - This will allow Ad-aware to scan registry sections recursively, and use the in-depth scan-engine for detected file-references. This is essential to an initial scan.
| |
|
| |
| · "Scan my IE Favorites for banned URL's" - We include many new targeted sites for users of Internet Explorer. This option will allow Ad-aware to locate and remove suspicious content from your favorites.
| |