|
Windows and dialogs
|

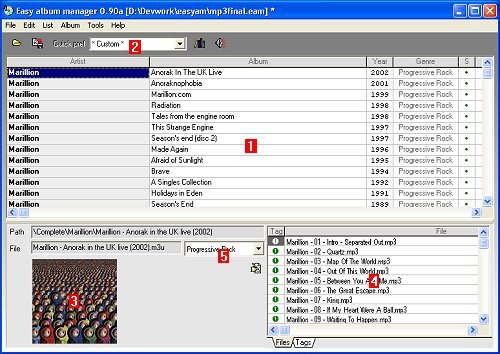
- Albums list : Displays all albums listed by the scan. Information are Artist name, Album name, Release year and
Genre. You can edit all these information (and Genre directly or with the combo box 5). The
last two colums indicate the album status in the list (when red, you should
tag the mp3 files or save info to
Ini file) and if a cover image exists or not.
- Quick preference : to set a saved preference. Have a look at Filter & sort to learn about preferences.
- Album cover : Displays the selected album cover image. To change an image, either drop a file on this zone, either CTRL + Right-click
on it if you have an image in the clipboard.
- Tracks : Displays the selected album tracks. The first tab shows the files, the second tab the "title" mp3
tag of each track. You can edit this title with the Edit button at the left of this window.
|

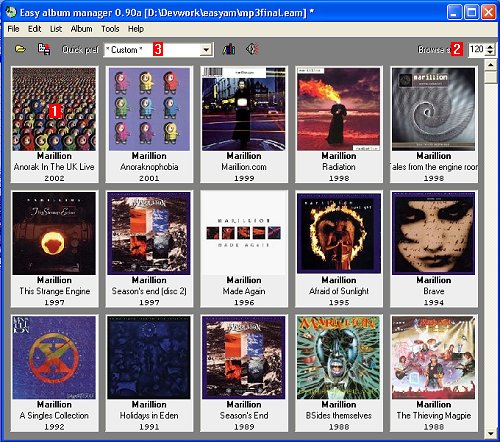
- Album : Each album panel displays the album cover, the artist, album name and release year. Double-click
to launch it with your default mp3 player.
- Layout options : You can change each album panel width, height, color and font (click on the Options button), and
also the space between album panels.
- Quick preference : to set a saved preference. Have a look at Filter & sort to learn about preferences.
|

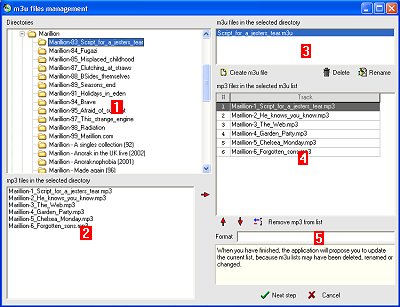
- Directories : root is the directory you defined as the root directory when you created your list.
- mp3 files : in the selected directory.
- m3u files : in the selected directory. With the buttons you can create a new m3u file (by default with the mp3 files
of the selected directory, and artist, album, year read from these mp3 tags. You can also
delete a m3u file.
- Tracks : of the m3u file selected in the 3 list box. You can move tracks up and down, remove tracks and
add tracks from the current directory.
- m3u creation default file name : %artist = artist name, %album = album name, %year = release year.
|

- Filter by genre : Check the box to activate.
- Filter by artist : Check the box to activate. Displays all artists if filter by genre is not activated,
else displays only artists of the selected genres.
- Filter by year : Check the box to activate.
- Sort : Choose the sort priorities. Release year can be ascending or descending.
- Preferences : Once you have a filter and sort configuration you would like to reuse, you
can use the 6 buttons to manage a list of preferences presets. New creates
a new preference (a name will be asked). Write will overwrite the selected
preference. Read will get the selected preference and put the parameters in
the left window part. Use the 7 buttons to manage your presets.
|


