This program is intended for designing room interiors. It allows you to place furniture, items and other objects. You can additionally move and rotate objects, change their colors and dimensions. But you can also plan your entire flat, one floor of the house or a new garden.
This file serves as a help for the program and we recommend you to print it and eventually read it. Pressing F1 anywhere in the program will show this help focused on the appropriate section.
The program is freeware and it can be distributed only free of charge. Using of the program is free of charge as well.
The program is provided "as-is", and no warranties of any kind (including implied warranties of merchantability or fitness for a particular purpose), express or implied, are made as to it or any medium it may be on. Under no circumstances will we provide any other remedy for direct, indirect, special, consequential, punitive, incidental or other damages arising from it, including such from negligence, strict liability, or breach of warranty or contract, even after notice of the possibility of such damages.
Installing and using the program signifies acceptance and agreement to the terms and conditions of this license. If you do not agree with the terms of this license you must cease to use the program and remove the program from your storage devices.
The program is distributed with an installation program. Leave "Additional Languages" checked if you want to install other languages (not only English) and then select the directory to install in. You can launch the program from the Start menu. If you already have an older version, you should not uninstall it.
In order to uninstall the program you must launch the Uninstall command from the Start menu (Start-Programs-Room Arranger) or select the corresponding item in Start-Settings-Control panel-Add/Remove Programs.
Every new version brings new features that can markedly improve drawings created by previous program version. You should adjust the catalogue as well; the installation program does not do it automatically. You can find the list of all new features in the file "What's new" accessible from the Start menu.
Rooms up to version 2.20
Catalogue up to version 2.10
At first, you should look at the example. Open it
using the menu command Room
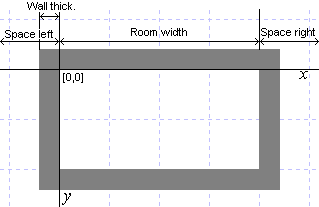
At the beginning, you should define the dimensions of the room.
You can do it in the window Room
The room dimensions are displayed on the status bar. You can find there also the mouse position relative to the upper left corner of the room and used zoom factor (see menu View). You can measure the distances in the room using the mouse after pressing button on the toolbar or hitting M key. Holding Shift during Measurement measures line with rotation in 45 degrees multiples. If you don't wish to see the result after the end of the measuring, fix the second point of the line with the right mouse button.
You can temporary change the origin of the coordinates in the room
(View
Windows and doors are the first objects to be added to the room. You should place them very precisely.
Objects are added in two possible ways: either from menu
Objects
If you can't find the object in the library, button Add basic object will bring the dialog where you can select the shape and other properties of the new object.
If you place the mouse cursor over the object in the room and wait a moment, a brief info about it will appear. And using a right-click, you can select one of the following commands from the pop-up menu:
Last performed change of position or properties of objects and the room
can be undone by the command Room
Menu command Objects
There are many objects in the main library, but you would like to add your own objects and remember their definition for later use. The User library is here just for this purpose. You can find it as a first library page when adding new object and you've certainly spotted it on the right side of the Object properties window, which serves for creating of the user library as well.
If you select some predefined object on the right side and press Load button, its properties will be transferred into the object from the room that you are currently modifying.
Similarly, pressing Save button will add (or update) the object to the library. Object is saved with some name, so try to input something reasonable, accurate and general at the same time.
The User library is stored in the file named Catalog.msk in the program directory.
You should not edit it manually. It is much better to use menu command
Objects
There is a special object, which can be added to the drawing. It's Label. You can create new label similarly to any other object either from menu or using right mouse button. Unlike object captions, label can stay anywhere in the room. It can also carry more lines of text and, especially, you can select its font, which size is changed according to the zoom level in the room.
It is strongly recommended to save your drawing into the file from time to time. There are several commands in the Room menu for this purpose. You can open the files also using a double click in Explorer or any other file manager, or dragging the file into the program window.
You can also print your work (Room
Tip: if you want to print in scale 1:50 and the image doesn't
fit the page, try to reduce the page border, switch off all
texts or rotate the paper in Printer setup.
Furthermore, you can save the result as an image (Export submenu)
or copy it into the clipboard and subsequently insert it into a text editor
(like MS Word), add some comments and then print it.
As a default, 100% zoom is always used for printing and export (the most
accurate drawing). You can change it in
Configure
In order to make any use of 3D view, you should set height and z-position for all objects in their properties. Furthermore, you will need some external VRML viewer; it is not part of the installation program. Two of them are described below, both of them use Internet browser's window for the viewing.
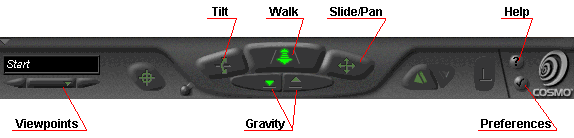
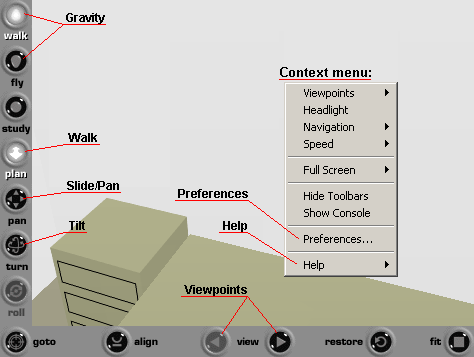
Please, study their help, navigation in virtual worlds is quite difficult (before you get accustomed to it). All moves are performed with mouse (press left mouse button and drag). There are three exploring modes: Walk, Slide (including panning and flying), Tilt (rotating the view), you can switch among them using the buttons in the viewer (see images). If you switch off gravity you can fly.
Room Arranger generates several sights of the room for you. They are accessible in the Viewpoint list and you can go through all of them (in case of Cosmo Player) using keys Page Down and Page Up (recommended). The first viewpoint is the start position you choose in the program and it can be saved into to the room file.
Since version 1.11, the program is distributed also in other language mutations, not only in Czech. Translations are provided by normal people (like you) who find this program useful and they want to support it.
If you want to join them and help with the translation into some non-translated language, you already saw any program in that language, contact us using e-mail jadamec@bigfoot.com. You will have to translate only one text file (all translations are in the Language directory) and insert correct constant into the LanguageID line (I will provide it). Just keep the same sense, the rest is fully up to you. Conversion of this help file is optional and not recommended.
Detailed instructions: