From the main program menu and from context menus you may run almost all command line features with some additions: playing/enqueeing files (works well with WinAMP and Sonique audio players), playing/enqueeing folder contents, rename or delete any file or folder, customized advanced encoding/rename/update, massive and advanced tags update, audio CDs copy & compress... Moreover, OSMPX remembers a number of user options, last used encode mode, last browsed folder, 10 folders history, it can add an icon to system tray, load with Windows, add some shell extensions and more.
View and edit information tags
You can view and edit MP3 and MPEGplus properties and ID3v1/ID3v2 tags by choosing "Properties" option of "Compressed audio" menu or from a context menu at a compressed file. Any tags values can be reviewed, changed and then saved by click on OK button. For your comfort we provide an exchange mechanism between ID3v1 and ID3v2 tags. Note: this refers to MP3 and MPEGplus files only.
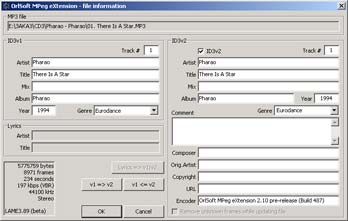
Ogg Vorbis file properties has a little bit different appearance. Moreover, you may only review properties and tags data, you can't edit and save new info, this feature haven't been implemented yet.

Massive and advanced tags update
Massive tags update is an excellent tool for updating some tags in a large number of files. This batch mode lets you tape common values for one or more tags. After you press the OK button, OSMPX will update all corresponding tags for all selected files in the main form. Clean fields means "no change" for corresponding tags, such tags in files will remain unchanged.
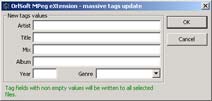
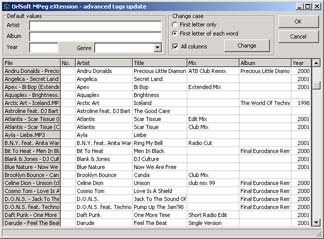
Advanced tags update is more powerful version of batch update. In addition to processing common values for some tags, you may change any tag of any selected file. You may also change tags case for current or all columns to "First letter of the first word" or "First Letter Of Each Word".
Try this! But don't forget that this operation can't be undone! After you press the OK button, OSMPX will update all selected files with new tags values.
Advanced rename
Advanced rename is the complete GUI implementation of the powerful command line "rename files by tags data" feature.
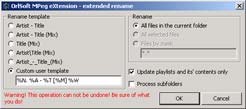
User may choose from one of the following 5 preset file naming formats or set your own rename template as a combination of codes listed below. Default user template could be set up in program options dialog.
1: Artist - TrackTitle.MP3All these codes may be taped in any order and could be expanded with any allowed filename symbols. All empty pairs of round "()", square "[]" and brace "{}" brackets, duplicated spaces will be removed.
2: Artist - TrackTitle (Mix).MP3
3: TrackTitle (Mix).MP3
4: Artist\TrackTitle (Mix).MP3
5: Artist_-_TrackTitle_(Mix).MP3 (special formatting for Internet - no special symbols, no spaces)
6: Use custom user template (firmware setting is "%N. %A - %T [%M]").%N - track number like 01..99
%A - artist name
%T - track title
%M - mix/version/comments
%L - album title
%Y - publishing year
%W - post-formatting like mode 5
It is possible to enable search in subfolders and playlists update while renaming files. If you enable automatic playlists update, only those files will be renamed which are included in at least one playlist in the current folder. All playlists will be correctly updated with new filenames, even if some files are included in more than one playlist.
Advanced encoding
Encoding in OSMPX could be done in different ways. The easiest way is to select some files in the main form, then choose desired encoder and encoding mode in context menu. This mode is the most quick and the easiest but when you use this mode, all result files won't have any information tags.
The most complex tool for encoding some files at once with tags creation is "Advanced encoding" mode. With this tool you may quickly and handy choose the encoder and the desired encoding mode, encode lots of files at once and immediately create all the needed information tags. Just select some files in the main OSMPX form and choose "Advanced encoding..." in the context menu, and you'll see the form like this:
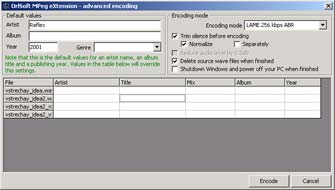
Select encoder and encoding mode, enter common information for all files, track titles for each file and the differences from common values.
This tool has heavy features for files processing. You may turn on the pre-processing: trim silence at the beginning and at the end of files; normalize volume level, including channel-separated normalization (useful for different volume level of channels). In addition to this you may choose options to delete all source wave files and power off computer after the encoding process finished.
After all changes were made, all that you need is to click on "Encode" button and stand by while OSMPX is processing your files.
Audio CDs copy & compress
OSMPX has a special extra powerful batch mode intended for copying audio compact discs and conversion them to compressed audio formats. In "Tools" menu choose "Compress Audio CD" or just press F11 key.
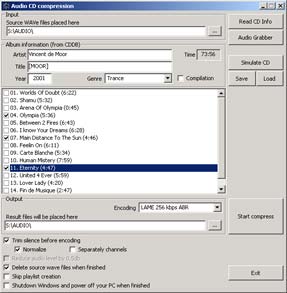
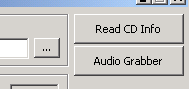
First of all you need to enter the information about your CD. This could be made in two ways. If you have connected to Internet, insert CD into your first CD drive (if you have more than one device of this type), press "Read CD Info" button. Then after some time, CD info will be filled up from Internet CD database.
Attention! CD info are reading from CDDB.COM. If you have an active Internet connection but get the "timeout" error, please contact your network administrator, because your server may have a firewall-like program preventing from unauthorised access. OSMPX needs an access to cddb.cddb.com address via port 8880 for reading CD database.
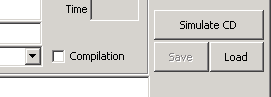
Another frequently recieved error "no exact match" means that your CD was not found in database. In this situation you may use the second way to enter CD information - manual input. Press "Simulate CD" button and enter CD tracks count in the dialog.
Then you have to input CD info such as artist name, album title, publishing year and genre into the proper fields. Enter all tracks titles by pressing Enter or making mouse doubleclick on the proper track in the list. All information will be written to result compressed files' information tags later.
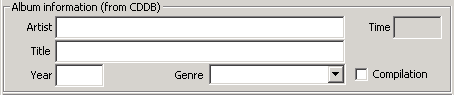
OSMPX has the special ability to process compilations encoding. Set up "Compilation" checkbox and input tracks titles by the "Artist / TrackTitle / Mix" template. All unnecessary quotes will be ignored i.e. names like "Artist" / "TrackTitle" / "Mix" are correct.
All entered information could be saved to a special-format MXC file for any future purposes (for example, if you will encode this CD later or for using CD information in OrlSoft Music DataBase application) - press the "Save" button. For loading information from MXC file press the "Load" button.
CD compression is the two-step process. First step is to copy tracks from CD to your hard drive. This operation can be done with Audio grabber tool (CD DAE 99 grabber is included in OSMPX), press the "Audio grabber" button. The temporary folder for copied files could be entered into field "Source WAVe files placed here" or selected in "Browse for folder" window after pressing the "..." button.

Audio grabber copies audio tracks from CD to audio files in WAVe (PCM) format. The tool look like this:
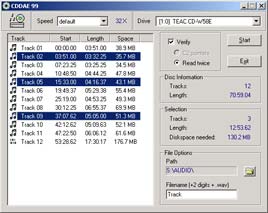
To start simply select the tracks and press the start button. CD DAE verifies the quality by extracting the tracks twice and comparing the audio data. During the extraction process the waveform is displayed. The first time the track is extracted this waveform is displayed in grey. When the track is extracted again to detect the errors, the color of the waveform shows the number of errors.
If all are green - the quality of the wave file is perfect, there's no need to listen to the wave file. The yellow parts shows that the wave file contains errors. However, if there are not many errors then the wave file sounds ok. Wave files with low number of errors sounds fine in most cases but it's always a good idea to verify the quality by listening to the bad sections. Note that CD DAE always shows the worst case. So even if there is only one error this will be shown in the graph. If you see red parts this tells you that this track is demaged, so it is very bad, full of pops, clicks and static noise. You can still see grey lines from the first time the track was extracted which means that the drive returned different data the second time.
Error Correction. If errors are detected you should slow down the drive (in the main screen) and extract the tracks again. If the tracks still contain errors you have to rely on the error correction of the drive. When the drive detects errors, the bad samples are not returned. Instead the average of the previous and the next error-free sample is returned. If there are too many consecutive errors, the drive returns digital silence. Note that not all drives use error correction with audio tracks. In this case the drive returns garbage and the faulty samples will be heard as load static noise.
Second step is, in fact, the encoding process, does in main window of "Audio CDs copy & compress" mode.
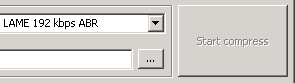
Before you start, please input these parameters: the path to a folder, where OSMPX would place result files, encoding mode (encoder and one of encoding mode presets plus 3 user presets for LAME encoder).
OSMPX lets you make some pre-processing before encoding: trim digital silence ("garbage" pauses) and normalize volume level. For activation of these and some more options please set the corresponding checkboxes.
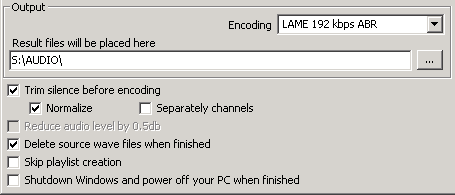
After doing all the descibed above operations simply press the "Start compress" button..
To prevent result files from duplicated names and for your comfort OSMPX does renaming of all result files by "Artist - TrackTitle (Mix).╠╨3" tempalte. Playlists will have names like "[Year] Artist - AlbumTitle.m3u".
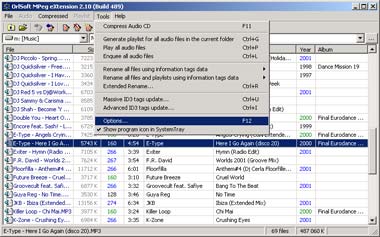
Options
I hope OSMPX has all rights to be named "true" multimedia application. Beeing a true GUI application OSMPX has the customized user options subsystem. Most of user parameters (windows size and position, fields and checkboxes values) are always saved and restored by the software. Moreover, OSMPX has some special options which are common for all the application. In the main form choose "Options..." from the "Tools" menu or simply press F12 key.
Options dialog consists of four tabs. At the first tab the most common parameters are placed .
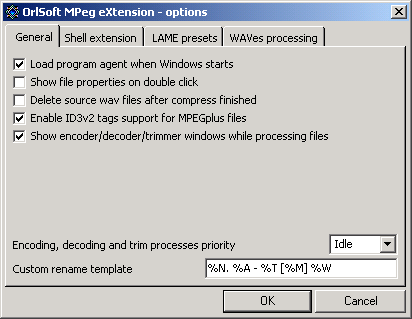
1 - load system tray agent together with Windows (speeds up your work and gives quick access to some features);
2 - when user double clicks on file, open file properties instead of playing the file;
3 - always delete source wave files after encoding process finished (this effects advanced encoding and audio CDs copy & compress too);
4 - enable native ID3v2 support for MPEGplus files (incompatible with old versions of MPEGplus decoder and plugins);
5 - show encoder, decoder and trim windows while processing (disabling this option is useful for lots of background processing in order to stop popping up windows disturbing you)
6 - set this process priority while endcoding, decoding and processing files (this doesn't effect GUI operations);
7 - custom user files renaming template for automatic and advanced files rename.
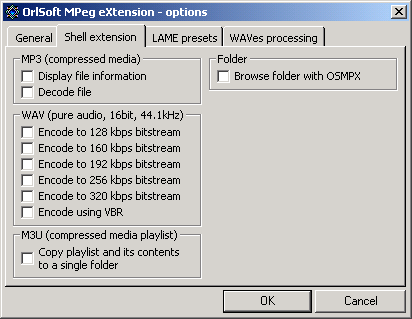
On the second tab there are some options for integrating OSMPX into Windows shell - adding some new options to Explorer context menus fro files and folders.
The third tab intended to LAME encoding - here you may set three custom LAME encoding presets. If you are professional in LAME encoding or you just miss some LAME modes, feel free to use this options. Your presets then be available in every encoding form.

The fourth tab gives you the control of trim and normalization processes while encoding and decoding files.
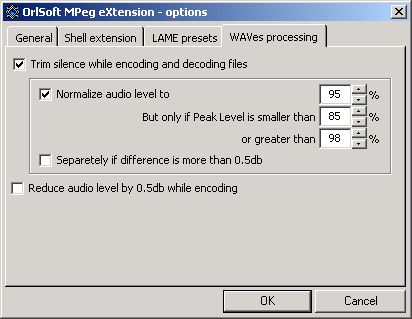
Digital silence trim is the recommended option, because it saves your tracks from having "garbage" - wasted silence(pause) at the beginning and at the end of track.
Normalization is the next useful option. Turn it on when encoding compilations to prevent files from having different volume levels. Normalization process will change volume levels to "Normalize audio level to" field value, but it effects only those files which corresponds to greater and smaller threshold levels. Channel-separated normalization intended for tracks with different volume levels of left and right channels. But if difference found will be less than 0.5db this option won't have any effect.
If you don't want to use normalization, the "reduce level by 0.5 db" option is for you! Use it on most tracks because it will prevent encoded files from strange clicks and digital distortion. Use it all the way!
Hot keys
OSMPX provides a wide range of hot keys for quick access to its features. In the main form you may use these keys:
F1 - this manuals;
Ctrl-F1 - some words about the program;
Alt-F1 - change drive (as in file managers like Far and NC);
F3 - browse for another folder;
F5 - refresh folder contents;
F6 - rename file or folder under cursor;
F8 - delete all selected files and folders including all subfolders;
F11 - audio CDs copy & compress;
F12 - options;
Ctrl-W - close the program and tray agent;
Ctrl-E - run advanced encoding for all selected files;
Ctrl-D - decode all selected files;
Ctrl-G - make playlist for all files in the current folder;
Ctrl-P - play all files in the current folder;
Ctrl-L - enquee all files in the curent folder to player (works well with WinAmp and Sonique);
Ctrl-R - advanced files rename;
Ctrl-U - massive tags update;
Ctrl-I - advanced tags update;
Ctrl-Enter / Alt-3 - file properties (as in Winamp);
Alt-Enter / X - play all selected files;
Shift-Enter - enquee all selected files to player (works well with WinAmp and Sonique);
Ctrl -, Ctrl +, * - select files (+/- to select/deselect one-type files, * to inverse selection);
Audio CDs copy & compress
Alt-F1 - browse for source wave files folder;
Alt-F2 - browse for target compressed files folder;
Ctrl-R - read CD info from CDDB.COM;
Ctrl-S - save CD info to MXC file;
Ctrl-L - read CD info from MXC file;
Ctrl-Enter - start compression process;
In most of all forms Ctrl-Enter equals to a click on begin buttons ("OK", "Encode", "Start compess", etc).