
RenderSoft CamStudio is a tool used for recording screen
activity into standard AVI video files. If you move the cursor, launch a new
program, type some text, click a few buttons, or select some menus -- anything
that you see on your screen -- CamStudio will be able to record all these and
allow you to play them back later on.
You can use CamStudio to develop videos to
demonstrate features of a new software, for creating movies used in user
training, for tracking the progress of a program that executes for a long time,
or for recording the sequence of steps that cause the occurrence of bugs in
faulty software.
Example Video
An
example of a video recorded with CamStudio can be accessed here: example.avi
- GETTING
STARTED
- SYSTEM
REQUIREMENTS
- INTRODUCTION
- USES
OF RENDERSOFT CAMSTUDIO
- RECORDING
A SCREEN MOVIE
- VIDEO
BASICS
- SETTING
VIDEO OPTIONS
- SETTING
REGIONS
- SETTING
CURSOR OPTIONS
- RECORDING AUDIO
- SETTING
AUDIO OPTIONS
- ENABLE
AUTOPAN
- PROGRAM
OPTIONS
- SOME
NOTES
- WEBSITE OF CAMSTUDIO
Getting Started
To start recording, click the red button. A rectangle
will appear for you to select the area you want to record.
![]()
When you want to stop recording, click the blue stop
button. A dialog will appear for you to name and save the file.
![]()
System Requirements
- Microsoft Windows 98,
Me, NT 4.0, 2000 or later.
- 400 MHz processor
- 64 MB recommended
- 4 MB of hard-disk
space for program installation.
Introduction
Moving images impact our
lives heavily nowadays. A changing image speaks much more than a stationary
snapshot. Any one who has watched a movie understands how the power of
animation can immensely enhance the process of communication. By capturing the
moving action faithfully on your computer screen, CamStudio is essentially
putting this power right onto your computer desktop.
The video files created by RenderSoft CamStudio are saved in the standard AVI
(Audio Video Interleave) format, which is used pervasively in many Windows
applications that support video, including MS Office. (You can effectively paste
an AVI file into an Office application just like pasting text.)
This ensures maximum compatibility with other software, and you can easily edit
the output of CamStudio with a third party video editor.
Uses of RenderSoft CamStudio
- You can create
demonstrations of programs by recording the movement of the cursor, the
selection of menus, the entering of text or the display of messages. These
demonstrations, when shown to users, can illustrate features and usage of
the program in a short period time with maximum clarity.
- The recorded movies
can be added to the accompanying help files of commercial software to make
them more professional.
- The recorded videos,
if converted to a stream-able format, can also be posted to your websites
to enliven them. With broadband becoming more affordable, including
multimedia to your site is not only practical but also quite necessary.
Recording a Screen Movie
To
start recording, click the red record button or choose File:Record from
the menu.
![]()
When
you want to stop recording, click the blue stop button or choose File:Stop from
the menu. A dialog will appear for you to name and save the file.
![]()
To pause a recording
to adjust your screen, click the pause button or choose File:Pause from
the menu. You can resume recording by clicking on the record button again.
![]()
Halfway into the recording, you can cancel the
capture operation by pressing the Escape key.
Video Basics
When you record a movie using CamStudio, you are
actually saving a sequence of bitmaps (known as frames), that, when displayed
in rapid succession, exhibit motion.
If more frames are recorded per second, the resultant
animation will also be smoother. However, this will also cause the file size of
the movie to be much larger.
In the process of recording, CamStudio allows you to
specify two video rates: the input rate and output rate. The input rate tells
your computer how many frames to record per second. The output rate tells your
computer how fast to play them back. Usually, these two rates are equal, so
that the time of playback is equal to the time used in the recording.
However, these two rates can also be different.
Normally, you do this only if you want to create a time-lapse movie. For
example, you can capture a frame once every hour and play the frames back at 20
frames per second.
The default value is set at 20 frames per second for
the output (playback) rate and 20 frames per second (corresponding to 50 milliseconds sleep time) for the input
/capture rate.
There is also a third rate: known as the keyframe
rate. When a frame is saved in an AVI file, they can either be saved as a full
frame, or only as a difference to the previous frame. This keyframe rate
specifies how often full frames are written to the AVI file. A high value means
you can fast forward/rewind to a particular frame in your movie much faster.
But it also means a higher file size.
Setting Video Options
(From the main menu,
choose Options->Video Options)
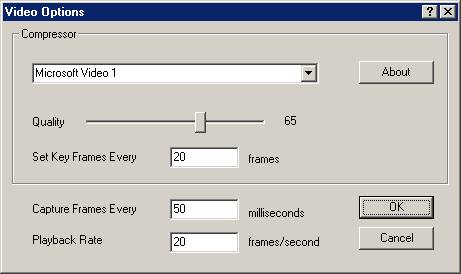
Setting
the video options allows you to optimize your video recordings by choosing
between the file size, quality and frame rates of your video files.
Compressor
The
Compressor select-box allows you to select the encoder for your AVI file. An
encoder compresses your AVI files to make them smaller in size and cause them
to play faster. The default setting is the MS Video 1 compressor.
Quality
The
quality setting determines how nicely your picture is saved. A lower value
means a lower picture quality but also a smaller file size. Only some
compressors use this value.
Set Key Frames Every
This
setting specifies the keyframe rate. When a frame is saved in an AVI file, they
can either be saved as a full frame, or only partially as a difference to the
previous frame. The keyframe rate specifies how often full frames are written
to the AVI file. A high value means you can fast forward/rewind to a particular
frame in your movie much faster. But it also means a higher file size.
Capture
Frames Every
This field determines the input frame rate. It dictates how long the CamStudio will ‘sleep’ after capturing each frame. One millisecond is 1/1000 of a second.
If
you set this to a large value (for example 1 hour, or 3,600,000 milliseconds),
you practically create a time-lapse movie. CamStudio will actually ‘sit and
watch’ for activities on the screen that takes a long time to occur and take a
snapshot (say, only once every hour).
Playback Rate
This
field determines the output frame rate. It specifies how many frames are played
back per second. A higher value means a smoother playback. Typical values of 20
– 30 frames per seconds are adequate for most purposes.
Setting Regions
(From the main menu,
choose Regions->Region or Fixed Region or Full Screen)
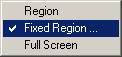
You
should set the Input Region before recording. This allows you to define the
area and type of video capture. From
the main menu, choose Region
There
are 3 types of regions you can choose:
Region
Before
recording starts, you can define an arbitrary rectangular region with the
mouse. The cursor turns into a pen on cross-hairs, which you use to define a
rectangular region on your screen by click-dragging the left mouse button.
![]()
To
cancel recording, you can press the Escape key.
Fixed Region…
You
can capture a fixed-size rectangular region. A dialog allows you to define the
size of the region in pixels. Before
recording starts, you can move the fixed-size region around the screen to
determine where you want the recording area to be.
To
cancel recording, you can click the right mouse button or press the Escape
key.
Screen
The
entire computer screen is captured.
Setting Cursor Options
(From the main menu,
choose Options->Cursor Options)
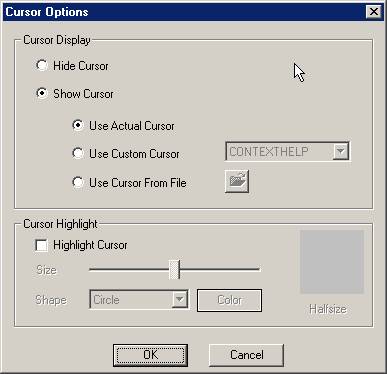
Setting cursor options can help illustrate the action you are recording
by drawing attention to the area where the action happens. The following cursor
effects can be selected:
Hide Cursor
The
cursor will be hidden during screen capture
Show Cursor
Use
Actual Cursor – The actual shape and
position of the cursor will be recorded during screen capture.
Use
Custom Cursor – Replace the recorded
cursor with a customized one.
Use
Cursor From File - Replace the
recorded cursor with a cursor that is loaded from file.
Highlight Cursor
When
this option is selected, the recorded cursor will have a highlight area around
it. This helps in calling attention to the movements of the cursor. You can set
the shape, size and color of the highlight area.
Recording Audio
(From
the main menu, choose Options->Record Audio)
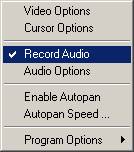
You can add a soundtrack to your movie by selecting
this option. When enabled, CamStudio will record your voice input from the
microphone while it is capturing video.
You need a sound card with an attached microphone to use this option.
Setting Audio Options
(From
the main menu, choose Options->Audio Options)
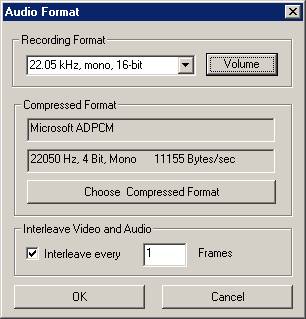
Use this dialog box to set the recording format
and compressed format of your audio.
Recording Format -- The recording format is the format your
soundcard use to record your voice from the microphone. Its main attributes are samples per
second (measured in kHz), mono/stereo input, and bits per sample
(usually 8 or 16 bit). Larger values for samples per second and bits
per sample will result in better recording quality, but at the expense of
the movie file size.
Compressed Format -- This is
the format that will be saved with your movie file. You can click on the “Choose Compressed Format” button to select
another compressed format. After recording your movie, CamStudio will attempt
to convert your audio from the recording format to the compressed one.
Your choices for the compressed format are determined
by the recording format. If you change your recording format, the compressed
format will also change automatically.
Interleave Video and Audio –
Interleave your audio and video for smoother playback on a slow device such as
CD-ROM. This will also allow better synchronization of your video and sound
content. The interleave factor determines the amount of interleaving in your
movie. The default is set to 1 frame
for full interleave. Larger values will mean less interleaving.
Volume - Use this to adjust the input
volume of your microphone if your recorded audio is barely audible. If
CamStudio is unable to locate your volume control, you will need to adjust the
volume manually through Start : Programs : Accessories: Entertainment : Volume
Control.
Please note that some configurations of the Recording and Compressed format will result in the audio recording becoming choppy or inaudible.
Some sound card disallows your system to record while another application is playing sound. In this case CamStudio will issue an error when you attempt to record with the “Record Audio” option being enabled.
Enable Autopan
(From the main menu,
choose Options->Enable Autopan)
If
this option is selected, the capture area will follow the cursor to wherever it
goes during recording. This has the effect of making the screen capture to
occur at the region with the most action.
Autopan Speed
(From the main menu,
choose Options->Autopan Speed)
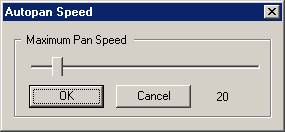
Use
this to control the maximum speed at which the capture area follows the mouse.
The value is measured in screen pixels.
Program Options
(From the main menu,
choose Options->Program Options)
Use
the program options to customize the way the program behave when it
starts/stops recording. A tick beside the menu items indicates that option is
enabled.
P Minimize
program on start recording
P Hide
flashing rectangle during recording
P Play AVI
file when recording stops
Some Notes on the Quality
and Performance of the Recording
CamStudio creates a movie by
sampling the screen on fixed-time intervals. If this sampling frequency is too
slow, it may not be able to pick up some cursor movements if the mouse moves
too fast. The result of this will be that the cursor will appear to jump,
become jerky or even cannot be seen in the recorded movie. It is thus advisable
to slow down your mouse movements during recording.
This sampling problem can also
happen when you are recording a fast animation. If CamStudio cannot record much
faster than the changes in the animation, CamStudio will miss out on some
important data and the playback will not be smooth.
Frame Rates
The speed of your computer will directly affect the performance
of CamStudio. A slow CPU will unquestionably mean slower frame rates. For the
best performance, use the fastest computer available for recording.
Apart from CPU speed, the following factors will also
affect the performance of the recording:
- Recording a movie
that covers a large area.
- Recording pictures
that contain many colors in.
- Running other
applications during recording sessions.
File Size
An AVI file usually has a very large file size,
especially for those lengthy and detailed videos. This is due to the fact that
a video file has to pack hundreds and thousands of images into a single file.
It is thus very common to have size exceeding one megabyte.
To reduce the size of the AVI file, you can do the
following:
- Limiting the area
of the region being captured.
- Limiting the
(input) rate of which video frames are captured. This can be set in the Capture
Frames Every field of Video Options
- Changing the
compressor and compression quality.
By changing the compression quality, you are essentially making a
tradeoff between picture quality and the file size.
![]()
Website of
CamStudio:
CamStudio
is an Open Source product. You
may obtain its source code at:
http://www.atomixbuttons.com/vsc
Credits:
This
product uses code from certain individuals. The authors of this product would
like to express their heartfelt thanks to:
- Joseph M. Newcomer
(Hooks and DLL)
- Chris Maunder
(Hyperlink)
- Franz Polzer (Transparent Window)
- Thomas Holme (How to
play and record sound, fister application)
- The author of the
article Concerning
Video For Windows API