HTML Help - Using Merge

| Overview | A Demo Project | Step 4? |
| Other Tips & Tricks | Linking Between Modules | Secondary Windows |
| Known Bugs | Others Say |

Last update: 12-Aug-99

Overview

This document will help you to get merged CHM files working.
The demo CHMs were tested under IE3.02, IE4.01 and Html Help V1.2.

Many thanks to Michael (the wiz) Mⁿller-Hillebrand in Germany for making it work when all the others couldn't. Also to Kate Pearson at Varian Australia for the word-smithing.

Modular help benefits

Modular help problems

Back To Top


A Demo Project

The following demo project will be used to illustrate how CHM files can be merged. The demo project consists of the following:

1x Master chm file (__Master.chm)
2x Slave chm files (__SiteA.chm & __SiteB.chm).

When you open the demo project, you should see the following:

Download the demo project.


Step 1 - Master Table Of Contents (TOC)

Lets assume you have already created three standard HHC contents files for each of the three modules. The first step is then to merge all of the 'slave' HHC files into the 'master' HHC file.. 

Step 1a:
To do this, open the __Master.HHC (master contents file) by double clicking it in Explorer. This will open the HH Workshop to enable you to edit __Master.HHC.

Step 1b:
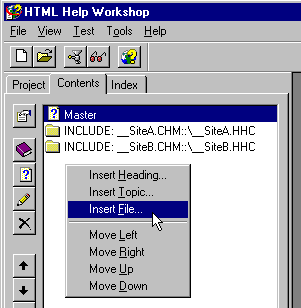
Right click on a TOC item and select "Insert File". Enter the SiteA contents file as "__SiteA.CHM::\__SiteA.HHC".

Step 1c:
Repeat Step 1b, this time adding the SiteB contents file "__SiteB.CHM::\__SiteB.HHC".

That's the master TOC done. The slave HHC files require no special changes.

insertfile.gif (6467 bytes)


Step 2 - The [MERGE FILES] statement

Step 2a:
Open each HHP project file and add a [MERGE FILES] section containing the names of all other CHM files, but do not add a projects own CHM file.

Example:
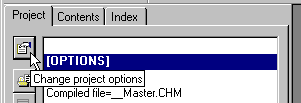
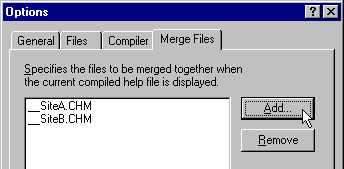
Open __Master.HHP in workshop. Open the "Project Options" dialog and select the "Merge Files" page tab. Using the "Add" button, add SiteA and SiteB CHM files to the list. Do not add Master CHM.

Step 2b:
Repeat Step 2a for all modules. Again make sure that you don't include a projects own CHM in its own merge list.

project1.gif (2114 bytes)

project2.gif (3112 bytes)


The 3 HHP project files should now all contain a reference to each of the other project's CHM files.
<__Master.HHP>
[MERGE FILES]
__SiteA.CHM
__SiteB.CHM
<__SiteA.HHP>
[MERGE FILES]
__Master.CHM
__SiteB.CHM
<__SiteB.HHP>
[MERGE FILES]
__Master.CHM
__SiteA.CHM


Step 3 - Slave Windows Definitions

Now you need to make it so that all modules share the same table of contents.

The master HHP is straight forward and has the following window definition:
[WINDOWS]
TP=,"__Master.HHC" ,"__Master.HHK", "Master.htm"....

The slave window definitions are the tricky part that Michael solved.  Get this right and you have conquered merge.

The slaves should all use the master HHC contents in the form
"masterCHM::\masterHHC". To use it without the "chmfile::" part would instruct the compiler to pull all the master files into the slave CHM.

windowtypes.gif (5268 bytes)

Master CHM window definition.

SiteA

We have given SiteA, two window definitions. The first,  "TP=",  is the default and uses the master CHMs TOC.

If you want to open the SiteA CHM using the SiteA TOC use the "TP2=" definition.


<__SiteA.HHP>

[WINDOWS] 
TP=,"__Master.CHM::\__Master.HHC", "__SiteA.HHK","index_a.htm"....

TP2=,"__SiteA.HHC","__SiteA.HHK", "index_a.htm","index_a.htm"....

SiteB

The SiteB default window definition displays the SiteB TOC.

To view the master TOC for SiteB you must open the SiteB CHM using the second window definition.

<__SiteB.HHP>

[WINDOWS]
TP=,"__SiteB.HHC", "__SiteB.HHK", "Index_B.htm"....

TP2=,"__Master.CHM::\__Master.HHC", "__SiteB.HHK", "index_b.htm"....


Summing Up

Remember the 3 steps.

  1. The master HHC file should "include" all other HHC files.

    Note: Each HHC file may include other HHC files (I guess it is not a good
    idea to try an infinite loop). Try to think of future additions, since it won't
    hurt to include them right now and may save you time later on.

  2. Each HHP project should have a [Merge Files] section listing all other
    CHMs you are currently using or plan to use in the future.

  3. Give each slave a window definition in the form
    TP=,"masterCHM::\masterHHC", "my.HHK", "myHomePage.htm"....

    That is of cause if you actually require slaves to show the full table of contents.

Back To Top


Step 4?

Q. In a merged help system, can I open a topic in a slave module via the master chm?
A. No.  You must specify the module that contains the topic.
EG. "slaveA.chm::/slaveA_topic.htm" .
The following wont work. "master.chm::/slaveA_topic.htm".
Q. How can I force all modules to open in a single window?
A. Prefix all window definition names with "$global_".
In the examples above we would use "$global_TP" not "TP".

This is what Ralph Walden from KeyWorks says about "$global_".
http://www.keyworks.net/keyhh.htm

<<<
Because of the way HTML Help 1.2 handles unnamed window types, you may still get multiple windows when HTML Help 1.2 is installed, particularly when working with multiple help systems (e.g., merged CHM files). To resolve this problem, declare a window type whose name begins with the prefix "$global_" in each CHM file. For example:

file1.chm::/file1topic1.htm>$global_task
file2.chm::/file2topic1.htm>$global_task

The $global_" prefix tells HTM LHelp that the window type can be used by any CHM file once the initial window type has been opened.
>>>

Back To Top


Other Tips & Tricks

General Tips

  1. All CHM files should be installed to the same folder.
  2. You can install any number of Slave CHMs but the Master CHM must always be installed if you want the slaves to reference the master Table Of Contents.
  3. Each project must enable the "Binary Index" in order for index merge to work.
    A binary index will not be created if you select 1.0 as the version in the
    Compatibility box > Compiler tab > Project Options dialog or if the Create a binary index check box is cleared.
  4. Similarly "Binary TOC" must be _disabled_ otherwise merge will not work.
  5. Include HHC works recursively, so you can have groups of optional modules.  I.E. HHC files including HHC files that include other HHC files and so on.
  6. Merging of Index and ALink keywords. This does _not_ work recursively,  because they do not know about the TOC inclusions. If you want to have a  unified Index or cross-module ALinks you have to tell every CHM file which others might be available belonging to the same project. Again: Do _not_ merge yourself.
  7. Another idea: If you have identical keywords from several files, HTML Help uses the <title> tags in the list of targets. We extended the title of each topic with the title of the module itself (the "book"), leading to:  <title>This fine topic title (This fine book title)</title>.
  8. An include statement in a HHC file can refere to a standalone HHC file. The HHC file should be placed in the same folder as the CHM files.

Back To Top


Linking Between Modules

| Simple Links | ALinksALinks Tutor | Related Topics | Related Topics Tutor |


Simple Links

Use the anchor link for simple inter-module links.

Example: <a href="ms-its:SiteA.chm::/Index.htm">Link Text</a>

Tip: IE3 developers should use the "mk:@MSITStore:" prefix

This method is OK if the CHM is definitely installed, however some modules of a merged help system may not be installed.

Back to Index


ALinks

Assign an identifier to any topic in your help system and link to the topic using that identifier.  If more than one topic shares the same identifier then the link will display a jump list. The real power of ALinks is that they do not require you to specify the name of the target CHM file. Nifty!

Advantages

Disadvantages

Summing up: Use ALinks to handle your See Also jump lists.  For single links, where the target CHM is known, use Related Topics (see below) which require simpler coding.

Back to Index


ALinks Tutor

1. To setup the target topic
  1. Open the target HTML document in Workshop.
  2. Position the cursor to where you want to insert the code.
  3. Select "Edit > Compiler Information" from the main menu.
  4. Select "ALink Names" page tab from the "Compiler Information" dialog.
  5. Click Add button and enter a unique text id for this topic. Example: "my_topic_id".
  6. Click OK and OK to accept these changes.

The following code is inserted into your document

<Object type="application/x-oleobject" classid="clsid:1e2a7bd0-dab9-11d0-b93a-00c04fc99f9e">
<param name="ALink Name" value="my_topic_id">
</OBJECT>


2. To create the link to the topic
  1. Open the HTML document in Workshop.
  2. Position the cursor to where you want to insert the link code.
  3. Select "Tags > HTML Help Control" from the main menu.
    Alternatively click on the Wizards hat in the toolbar.
  4. Select "ALink Search" from the dropdown and enter a unique name.
    EG. "my_alink"
  5. Click Next and fill in the other fields.  Make sure add the ALink name you defined in step one.

The following code is inserted into your document

<OBJECT id=my_alink type="application/x-oleobject"
classid="clsid:adb880a6-d8ff-11cf-9377-00aa003b7a11"
codebase="hhctrl.ocx#Version=4,73,8252,0">
<PARAM name="Command" value="ALink">
<PARAM name="Item1" value="">
<PARAM name="Item2" value="
my_topic_id">
</OBJECT>

Lastly if you chose to define a button link then the job is done. Compile, open and test your CHM.

If you want to activate the code from a link then use
<a href="javascript:my_alink.Click();">Some Hyper Text Here<a>

Special Note:

To divert the user to another page if the link fails then add the following optional line to the above code.

<PARAM name="Default Topic" value="filenotfound.htm">

This tip was provided by "Marta Arriazu" M.Arriazu@Lantek.es.
Thank goodness someone reads the documentation.

Back to Index


Related Topics

Don't let the name fool you.  These links are simple to code and are perfect for creating inter-module links.

Advantages

Disadvantages

The next section will show you how to code related topics.

Back to Index


Related Topics Tutor

Here's how to setup a Related Topics link using Workshop. Once you know what you are doing you can simply paste the code into any HTML editor.

1. To Add a Link
  1. Open the HTML document in Workshop.
  2. Position the cursor to where you want to insert the link code.
  3. Select "Tags > HTML Help Control" from the main menu.
    Alternatively click on the Wizards hat in the toolbar.
  4. Select "Related Topics" from the dropdown and enter a unique name.
    Example: "my_link"
  5. Click Next and uncheck options to use popup lists and dialogs
  6. Click Next.  If you are using a button link then enter the button text and click Next again.

From the add / edit links page. Click add to open the "Add/Edit Related Topics" dialog.

  1. Enter any title text. It will never be seen, since we are only entering one link and have disabled jump popups and dialogs (above).
  2. Enter the File/URL
    Example: "mk:@MSITStore:SiteA.chm::/Index.htm"
  3. Enter an Alternate URL and click OK to accept the changes.
    Example: "CHMFileNotFound.htm"
  4. If you want to display the topic in a secondary window then enter the window name. Note: The window definition must be set up in the target CHM not the calling CHM. Click Next and Finish.

The following code is inserted into your document

<OBJECT id=mylink type="application/x-oleobject"
classid="clsid:adb880a6-d8ff-11cf-9377-00aa003b7a11"
codebase="hhctrl.ocx#Version=4,73,8252,0" width=100 height=100>
<PARAM name="Command" value="Related Topics">
<PARAM name="Button" value="Text:Relative Topic Jump">
<PARAM name="Item1" value="This text never seen;mk:@MSITStore:SiteA.chm::/Index.htm;CHMFileNotFound
.htm">
</OBJECT>


2. Lastly if you chose to define a button link then the job is done. Compile, open and test the CHM.

If the target CHM file is not installed the help system will display the Alternate file "CHMFileNotFound.htm" where you can tell the user how to install the extra help module.

If you want to activate the code from a normal hyper link use
<a href="javascript:mylink.Click();">Some Hyper Text Here<a>

Back to Index | Back To Top


Secondary Windows

Secondary windows  are a snap when using Related Links and TOC Links. Simply fill in the name of the Window Definition you want to use using Workshop.

Note: Secondary window support broke in HH 1.2 for ALinks and KLinks. The word is that they are fixed again in HH 1.21.

Before reading further you should read the section above on Related Topics.

Q. Do secondary windows work in a standalone CHM?
I can only link to a secondary window if the target is a different CHM.
A. Always specify the target CHM file in the path, even if the source and the target CHMs are the same.

Example:

I want to link from a topic in master.chm to another topic in master.chm using the window defined as "TP2". The link path should be set to "ms-its:master.chm::/topic.htm".

<OBJECT id=mytopic5 type="application/x-oleobject"
classid="clsid:adb880a6-d8ff-11cf-9377-00aa003b7a11"
codebase="hhctrl.ocx#Version=4,73,8252,0">
<PARAM name="Command" value="Related Topics">
<PARAM name="Button" value="Text:Relatve Topic - Secondary Window in same CHM">
<PARAM name="Window" value="TP2">
<PARAM name="Item1" value="This text never seen;ms-its:master.chm::/topic.htm">
</OBJECT>


Q. How do I display my own error message when a link fails because the CHM is not found?
A. Fill in the Alternate URL field. 

With Related Topics and TOC entries you may specify an Alternate URL link. If the primary link fails because the module is missing then the Alternate file is displayed.

For ALinks and KLinks you need to add this line by hand. Workshop does not help you to do this.

<PARAM name="Default Topic" value="filenotfound.htm">

Q. Will the secondary window fall behind the main window?
A. No the secondary window will stay on top.
You may be able to effect the window behavior by changing the window definition style.
Q. Can I remove the button bar and/or the page tabs from the secondary window?
A. To remove the button bar go into workshop, edit the window definition and uncheck all button options. To remove the page tabs do the same and switch off the navigation pane.
Q. Where should I define the window definition. In the calling module or in the target module?
A. Always define it in the target chm containing the topic.
Q. I always get a "Window Type XXX not found" error?
A. Try prefixing all window type names with "$GLOBAL_".

<PARAM name="Window" value="$GLOBAL_TP2">

Q. When I click my create secondary window link a second time, the topic displays in the main window not in the secondary window. What's happening?
A. In some situations you need to first close the secondary window.

Back To Top


Known Bugs

1. HH 1.2 does not merge the Favorites tab items.
2. Merged help HHC and HHK items containing Bookmarks don't work.

There appears to be a problem with linking from HHC and HHK items that contain bookmarks (in merged help systems). Links from the TOC and Index tabs will open the file up in the right hand pane, but will not jump down to the specified bookmark.

I actually have no problems with the Index tab "as long as I do not have spaces in the bookmark name". Others report that all is OK when opening the CHM containing the bookmarks but if other modules
are opened then the links fail.

Hopefully fixed in HH 1.21

3. RoboHelp creates bad HHC and HHK files.

May or may not be a problem.

4. Window definitions

Leta Herman was getting errors whenever she clicked on TOC items. We found that if we removed lines like
<param name="WindowName" value="Main"> from all the HHC and HHK files it helped.

5. Adding HHC Include statements

There is a bug in HTML Help Workshop that makes editing a HHC file very difficult.
The bug is this. The Include items should be displayed one step to the right.

Example:

The following will pull the include file in at TOC level 3 instead of TOC level 2 as specified.

Folder
    Folder
    Include CHM::\HHC
Folder

The biggest problem here is that we cannot include files at TOC level 1.  It just doesn't work.

The Fix:

  1. To get includes to show at TOC level 1 you must edit the HHC in notepad and make sure that the include statement is outside the <UL> tag block.

    Example:

    <UL>
    ...
    </UL>
    merge info
    <UL>
    ...
    </UL>

  2. You can use a 3rd Party tool that does the job properly.

    Example: Virtual Media's HDK or FAR V2.0.5
    See http://helpware.net/FAR/index.html

Back To Top


Others Say

Great Tips from -- George Farkas <george@DRTAX.CA>
(Nice overview from George Farkas)

Great Tips from -- Sean Stagner <stagner@mediaone.net>
(How to setup context help with merge. Includes a RoboHelp 2000 perspective)


mailto:daniel.leigh@sterling.com
To: mailto:"'Info@Helpware.net'"%20<Info@Helpware.net>
Subject: Merged help file tip
Date: Wed, 19 May 1999 18:03:50 -0500

Robert,

A further refinement to your merged help file tips. Maybe you know this already, but I recently discovered that the [MERGE FILES] section accepts #include statements. So you can say:

[MERGE FILES]
#include MyFileList.txt

Now you only have to maintain one list of merged files and just #include it in each project.
(Your instructions on the web page explicitly state not to include a project's own CHM in its own merge list. I'm not sure why: I haven't discovered any problems with it so far).


mailto:daniel.leigh@sterling.com
Subject: Merged helps on Read-Only Media
Date: 07 Oct 1999 

When you open a merged compiled help file (.chm) for the first time, it creates in the same directory as the .chm file an index file with a .chw suffix. The .chw file contains merged kwords. The CHW file will not be created if HTML Help cannot write to that directory. Without the .chw file, your index tab will not display a merged index if you have multiple .chms, and your included TOCs will not include. Other things may not work properly either, but these are the most visible issues.

HOW TO PROPERLY PUBLISH READ-ONLY

1. You need to create the .chw file by opening the master .chm file. You can do this in multiple ways:

a. Open the master .chm in your development environment and move the generated .chw along with the new/changed .chms as part of your company's change management process.
b. Have somebody with write access to the network directory where the production .chms reside manually open the master .chm file to generate the .chw.
c. Write a program to automatically regenerate the .chw after any.chms get changed. This program just needs to call the HTML Help API to display the master .chm's index, and pause long enough for the index to generate before terminating.

2. The .chw must be regenerated any time any merged .chm is updated, no matter how trivial the update. If this is not done, your TOC includes  will fail, and your indexes will not merge.

<From Rob Chandler> 

A couple of things to add to this CHW discussion

1. If you do not have an Index tab or Keywords then chw files are not produced.

2. You must click on the index tab to create the CHW file.

3. If your slave CHMs contain klink/index merge then these must be run once as well to create their CHW files.

4. MS has made chw file uncompressed. However they can be compressed. KeyWorks KeyTools 2.0 utility will recompress ch* files. My 50MB MSDN CHW file was reduced to 5MB.


From:    Yuko Ishida <ishida@KEIYU.COM>
Subject: HH 1.3+CSS+multi-print
Date:    Sun, 20 Feb 2000 14:22:18 +0900

Robert Chandler:  Great tip from Yoko for getting multi page printing to work under HH1.3.

Toying with Windows 2000 Help, I noticed that the topic is linked to css files with MS-ITS syntax.

<LINK REL="stylesheet" MEDIA="screen" TYPE="text/css"
HREF="MS-ITS:ntshared.chm::/coUA.css">

Eureka! I created the following help and linked html files to test.css.

test.hhp
test.chm
         -html folder
             -topic1.html
             -topic2.html
         -css folder
             -test.css

<LINK REL="stylesheet" TYPE="text/css"
HREF="MS-ITS:test.chm::/css/test.css">

And css works in multi-page print mode. Apparently this only works with HH 1.3. When I try the same method with HH 1.21, multi-print fails. 

One of very few virtues of 1.3?


Back To Top


Want to contribute? Correct? Email us Info@Helpware.net

Return Home