| ExLife
version 1.53 build 1533, released on 3rd February 2000 |
 |
 |
Copyright: ⌐1996-2000 ORNIC Technologies, Inc. All rights
reserved.
ExLife for Windows 95/98/NT enhances the MS Exchange Client, MS Windows
Messaging and MS Outlook by adding useful features.
ExLife helps you manage your e-mail messages by using rules to automatically
or manually perform actions on messages. When you create a rule, it is a applied
when messages arrive in your Inbox, when you send a message or when a message is
created in a folder. For example, you can automatically:
- Forward all messages sent by Diana Murphy to your manager when they arrive
in your Inbox.
- Add all senders to your address book
- Print all messages with Order in the subject
main features
ExLife works in two basic modes: online and offline. In online mode the
actions are automatically performed on incoming, outgoing or created messages.
In offline mode the actions are performed on the messages in chosen folder.
online processing
- inbox assistant: apply these rules after the message arrives
- outbox assistant: apply these rules after the message is sent
- folder assistant: apply these rules after the message is created in
defined folders
offline processing
- folder assistant: apply these rules to the messages in chosen folder
standard and professional version
ExLife now comes in two modifications - standard and professional.
Limitation of standard version against professional version
- max. 3 virtual folders
- max. 3 folder assistant rules
features
actions
- move messages to different folders
- copy messages to different folders
- delete messages
- mark messages as read
- mark messages as unread
- reply - is possible specified text, attachments, subject, prefix, reply
to all, including original text, appending signature. Reply text can be
specified either in the dialog edit box or in the text file (RTF format is
supported)
- forward - forwarding to as many recipients as you want. It's possible
specified annotation, attachments, subject, prefix, including original
text, appending signature. Annotation can be specified either in the
dialog edit box or in the text file (RTF format is supported)
- redirect - message is sent to other recipients with keeping original
sender and recipients information (ExLife must be installed on both sides)
- address book manager - sender's and recipients' information can be added
or deleted from Contact folder or Personal address book
- print action - it's possible to print message's body and message's
attachments (with program which is associated with attachments'
extension). It means that it allows to print not only incoming faxes but
also doc, xls, txt and other files (if they are associated)
- save message - it saves message body to a defined directory with a
unique filename (either based on subject + time or on random number). The
text file format might be either plain or RTF. There is also possibility
to launch a program with the saved file as a parameter.
- save message's attachments - new feature to launch a program with the
saved attachment as a parameter.
- set sender name - set the sender display name with the sender email
address. This might be useful if you're going to import the messages to MS
Access and you want to know the sender email address.
- run a program - as a parameter is passed message's entry id in
hexadecimal format (extended MAPI format)
processing
- inbox assistant - the filter rules are automatically processed after
incoming messages are received
- outbox assistant - the filter rules are automatically processed after
outgoinf messages are sent
- folder assistant - the filter rules are automatically processed after
messages are added to defined folders
- read assistant - the filter rules are automatically processed after
unread messages are read
- offline assistant - the filter rules are manually processed on selected
folder
message's property
- from (sender) - searched in a display name or an email address or in
both
- to (recipient) - searched in a display name or an email address or in
both and in any combinations of To, Cc and Bcc Recipient Types
- address type (SMTP, FAX, COMPUSERVE, EX, MS, ...)
- header
- has attachments
- is unread
- subject
- message
- message size
others
- Boolean expression in filter rules
- three methods of comparison text Items and entered values: FullString,
SubString and Prefix.
- append signature to the end of a mail (It doesn't work with Microsoft
Office 95/97 WordMail Extension, since the WordMail forms don't correctly
support client extensibility). If ExSign add-ins is installed, ExLife's
signature feature is switched off. ExLife can co-operate with ExSign's
advanced signature.
- reply form with defined (e.g. ">") prefix (RTF is
supported)
- resend form - easy way how to resend sent message. All information are
taken from original message.
- virtual folders - show only messages which fit to entered condition
(e.g. unread messages, messages with attachments, ...)
- the change of a message's icon and remembering the reply date when
replying with ExLife reply form
- unlimited number of user defined filter rules.
- import/export filter rules and actions
- allow the user to show information about all recipients (To, Cc, Bcc) -
in archived messages.
- managing ExLife's buttons in toolbars (useful for Outlook)
- support for multiple exchange profiles.
- installation and uninstallation program
requirements
- MS Windows 95, 98, 2000, NT 4.0
- MS Outlook 97/98/2000, MS Exchange Client, MS Windows Messaging
purchase
ExLife is not a free software
You have the opportunity to try the program 30 days at no charge to see if
it meets your needs. If you continue to use the program after the evaluation,
please order a license. Credit card ordering and quantity discounts are
available. More details you can find on Purchase
a License page.
Also don't forget to visit the complete below or on our website
which inform you about various license types and quantity discounts.
ExLife is distributed as a self-extracting ZIP file. To install it, run the
self-extracting ZIP file. For example, if you received the program in the
self-extracting ZIP file downloaded as c:\download\exlife120.exe, activate the
Program Manager, choose Run from the File menu, type c:\download\exlife120, and
press the Enter key. The SETUP program will automatically be run (picture
2-1).
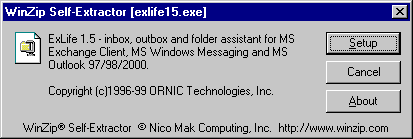
picture 2-1: Installation - Self-Extracting ZIP file
Now press the Setup button. This action, after unzipping all files, invokes
ExLife installation program (picture 2-2). Follow its
instruction which makes you for successful installation.
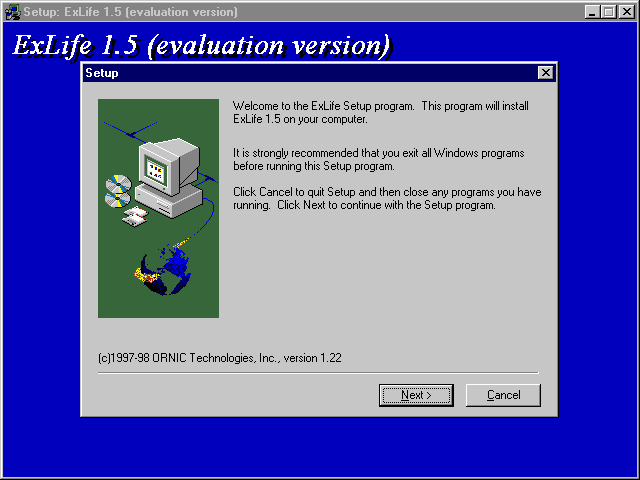
picture 2-2: ExLife installation program
possible installation problems
- Installation can't copy a file
Generally it's impossible to copy "system files" (e.g.
exlife32.dll) because older version of these files, which we are going to
overwrite, are in use. To correct this problem you should close MS
Exchange (Outlook) program or if it doesn't help, restart computer.
- Setup was unable to register extensions in windows registry
Try to register keys manually. Go to your ExLife directory where in
program subdirectory you find exlife32.reg file. Double click on it in
file manager to register keys defined in it.
Click the Add/Remove Programs Properties in Control Panel. In the
Install/Uninstall dialog box, click the item "ExLife 1.5" and then
click the Add/Remove button to remove it (picture 2-3).

picture 2-3: Uninstallation - Add/Remove Program Properties in
Control Panel
In this chapter I'm going to explain you how to create your first filter rule
and associated action for incoming messages.
For example we create a rule which moves all incoming messages addressed to
'exchange@mokry.cz' to 'ExLife information' folder. How to do it you can see in
the following instruction.
1. step - creating after delivery filter group
In the picture 3-1 you can see the main form for entering
filter rules. to invoke this dialog go to Exchange Options command in Tools
menu.
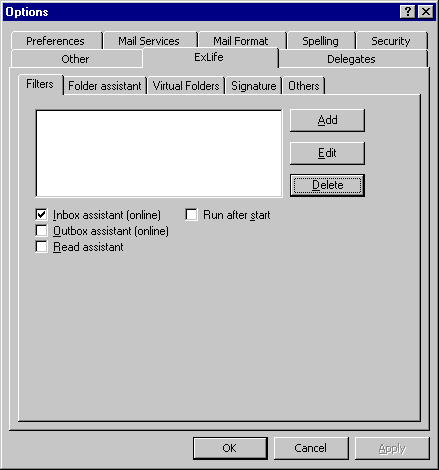
picture 3-1: ExLife options - filter property sheet
First, we have to click on æAddÆ button to create AFTER DELIVERY filter
group (it associates all filter rules for incoming messages). When you press
'Add' button, new dialog form appears (picture 3-2).
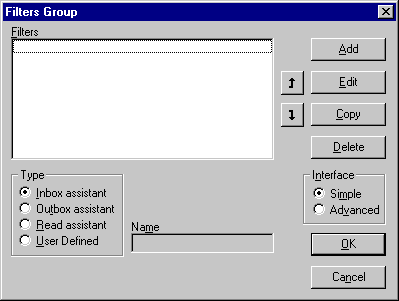
picture 3-2: ExLife options - Filters Group
Select 'after Delivery' filter type in Type radio button's group.
2. step - setting the filter rule
As I mentioned above we're going to create the rule which moves all incoming
messages addressed to 'exchange@mokry.cz' to 'ExLife information' folder.
Click on 'Add' button to pop the 'Filter Item' dialog box (picture
3-3). To field æFilter NameÆ we put name of this filter rule - in our
case itÆll be æExchange InformationÆ. Next, we have to type filter
condition. From æPropertiesÆ field we choose æTo (recipient)Æ item
(we want to filter by recipient email address). Also we need to determine type
of comparison between our email address and addresses in messages. Select in æContentÆ
field æSubStringÆ comparing method (IÆll prefer it before æFullStringÆ
or æPrefixÆ comparing method, but sometimes might also be these method
useful). And finally we fill in æValueÆ field with our email address. It
might be only æexchange@Æ, but again sometimes might be very useful to use
exact address - æexchange@mokry.czÆ. ItÆs depends on the situation.

picture 3-3: ExLife options - Filter Item (simple rule
definition)
Now we have to decide in which recipient area will be searched. We set it in
æSearch InÆ check group. We want the email address is looked for in æDisplay
NameÆ and æEmail AddressÆ fields. Therefore we have to check off these
check boxes. Also we have to check off æToÆ and æCcÆ fields (email
address will be searched in æToÆ and æCcÆ recipient type). To check æBccÆ
recipient type is for incoming emails useless. This type is not saved in emails
(its name is Blind Carbon Copy).
Finally, it is quite useful and necessary to check on æIgnore CaseÆ
field. Why? Because email addresses in incoming messages might be written in
many different ways.
3. step - setting the action for the filter rule
From 'Available actions' list box select a 'Move' action. When you click on
'Add' button, the 'Move' action will be copied to 'Chosen actions' list box (picture
3-4).
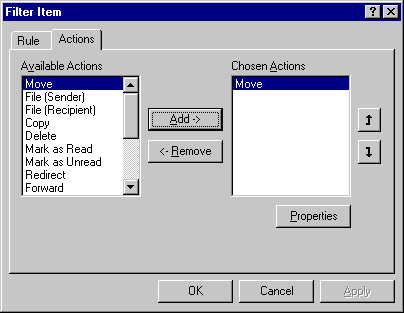
picture 3-4: ExLife options - Filter Item (actions)
To choose the folder where the messages will be moved click on 'Properties'
button ('Move' action in 'Chosen actions' list box must be selected). This
action invokes 'Choose Folder' dialog box (picture 3-5).
Select appropriate folder and click on 'OK' button. You will be back in 'Filter
Item (actions)' dialog box - picture 3-4.
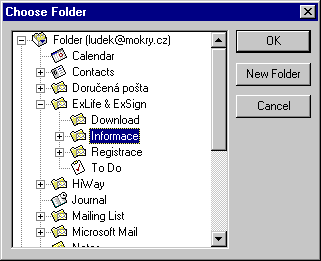
picture 3-5: ExLife options - Choose Folder
4. step - saving the filter rule
Save your first filter rule with 'OK' button. You are back in 'Filter Group'
dialog box (picture 3-2). In 'Filters' list box you see your
first filter rule called æExchange InformationÆ. Press again 'OK' button to
save 'after delivery' filter group. You're back in the main 'ExLife option'
dialog box (picture 3-1). You can see just defined 'After
delivery' filter group in the list box.
If you want to add next filter rule to 'INBOX ASSISTANT' filter group, click
on 'Edit' button to open this group.
To allow performing filter rules in 'Inbox assistant filters group' enable
'Inbox AssistantÆ check box.
In the same way you can define the filter groups for outgoing messages
(OUTBOX ASSISTANT group) and for execution filter rules after reading unread
messages (READ ASSISTANT group).
Now click on 'OK' button to close and save all defined rules to MAPI
profiles.
In this chapter I'd like to describe all ExLife's feature. At first I start
with description of ExLife options dialog box, then I mention variable types of
performing filter rules action and finally I state other feature of ExLife.
Filters property sheet is the main dialog box for defining rules and actions
which should be carried out when a message is received, sent or read (picture
4-1).
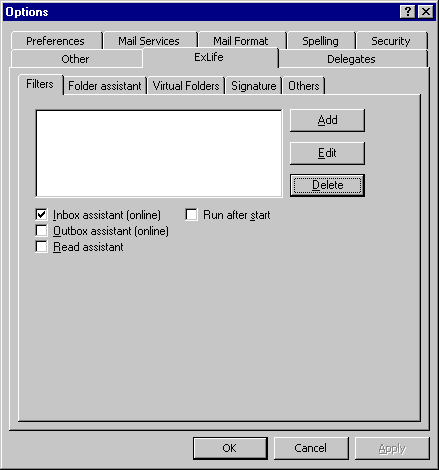
picture 4-1: ExLife options - filter property sheet
dialog box controls:
list box
- list of all filters groups defined in ExLife
check boxes
- Inbox assistant (online) - apply rules when the message arrives
- Outbox assistant (online) - apply rules when the message is sent
- Read assistant - apply rules when the message is read (doesn't work with
MS Outlook 98/2000)
- Run after start - apply inbox assistant rules on inbox folder when
ExLife is started
buttons
- Add - adds a new filters group to ExLife
- Edit - revises and corrects all filter rules in selected filters group
- View - shows all filters in selected filters group
- Delete - allows to delete selected filters group with all filter rules
in it
- OK - close dialog box with accepting all changes
- Cancel - close dialog box without accepting changes.
Filters group dialog box (picture 4-2) is the main station
for defining, editing and deleting filter rules in selected filters group.
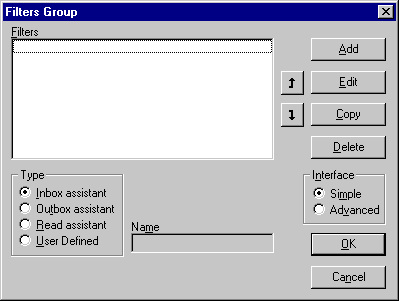
picture 4-2: ExLife options - Filter Group
dialog box controls:
list box
- Filters - list of all filter rules defined in current filters group
radio buttons - Type
- Inbox assistant
- Outbox assistant
- Read assistant
- User defined
radio buttons - Interface
arrows
- up and down - change order of performing filter rules and their actions
edit box
- Name - name of filters group if the user defined type is selected
buttons
- Add - adds a new filter rule to current filters group
- Edit - revises and corrects selected filter rule from current filters
group
- View - shows definition of selected filter rule
- Delete - allows to delete selected filter rule from current filters
group
- OK - close dialog box with accepting all changes
- Cancel - close dialog box without accepting changes
You're able to type a simple filter rule in this dialog box (picture
4-3). To get this dialog box you have to check off simple interface in
'Filters Group' dialog box (picture 4-2).

picture 4-3: ExLife options - Filter Item (simple rule
definition)
dialog box controls:
edit box
- Filter Name - name of filter rule
- Value - place for message property value (with what message property is
compared)
combo box
- Properties - to select message property
- Contain (Is) - type of comparison between message property and typed
value. Contents is dependent on property types (closer information in rules
(message) property chapter)
check boxes
buttons
- OK - close dialog box with accepting all changes
- Cancel - close dialog box without accepting changes
To type a filter rule with using a Boolean expression you have to check off
advanced interface in 'Filters Group' dialog box (picture 4-2).
Here is a small example how to define the Boolean expression. For example the
filter rule for recipients whose address contains either 'exchange@' or
'massmail@' string but also the sender address mustn't contain '@mokry.cz'
string. In the picture 4-4 you can see defined this example.
And now how to do it.
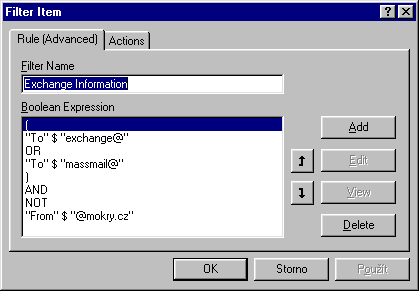
picture 4-4: ExLife options - Filter Item (advanced rule
definition with Boolean expression)
Click on 'Add' button to enter first row of the Boolean expression. This
action pops 'Choice part of Boolean expression' dialog box (picture
4-5).
For our example we first select 'Left bracket' line. Confirm a choice with
'OK' button. You're back in the 'Filter item - advanced interface' dialog box.
as first line of our expression you can see the left bracket in the 'Boolean
expression' list box. Now again click on 'Add' button and repeat selection. In
this case select 'Rule' line which invokes the dialog box for typing simple
filter rule (similar to picture 4-3). Type the first filter
rule - 'to (recipient)' contain substring 'exchange@'. Close the simple rule
dialog box with 'OK' button. You're again back in the 'Filter item - advanced
interface' dialog box. Use the same instruction to add the rest of Boolean
expression. You should get the same contents of the 'Boolean expression' list
box as in the picture 4-4.
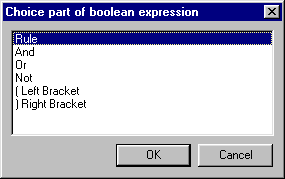
picture 4-5: Part of Boolean expression
dialog box controls:
edit box
- Filter Name - name of filter rule
list box
- Boolean expression - show the Boolean expression separated to its parts
arrows
- up and down - change the order of Boolean expression parts
buttons
- Add - adds a new part to Boolean expression
- Edit - revises and corrects selected simple filter rule from Boolean
expression
- View - shows definition of selected simple filter rule from Boolean
expression
- Delete - allows to delete selected part from Boolean expression
- OK - close dialog box with accepting all changes
- Cancel - close dialog box without accepting changes
from (sender) - message senderÆs information
- 'Filter item - simple interface' dialog box controls (picture
4-3):
- Contain (Is) (combo box) - option settings defining the level of
preciseness that the content restriction should enforce when checking for
a match:
- 'Fullstring' - to match, the searched string must be completely
contained in the 'from (sender)' property
- 'Substring' - to match, the searched string must be contained
anywhere within the 'from (sender)' property
- 'Prefix' - to match, the searched string must appear at the
beginning of the 'from (sender)' property
- Various (group of check boxes) contains 'Ignore case' check box. When
it's checked off, the comparison should be made without considering case.
- Search In (group of check boxes) - options defining with what the
searched string will be compared:
- 'Display name' - the search string is compared with sender name
- 'Email address' - the searched string is compared with sender email
address
to (recipient) - message recipientÆs information
- 'Filter item - simple interface' dialog box controls (picture
4-3):
- Contain (Is) (combo box) - option settings defining the level of
preciseness that the content restriction should enforce when checking for
a match:
- 'Fullstring' - to match, the searched string must be completely
contained in the 'from (sender)' property
- 'Substring' - to match, the searched string must be contained
anywhere within the 'from (sender)' property
- 'Prefix' - to match, the searched string must appear at the
beginning of the 'from (sender)' property
- Various (group of check boxes) contains 'Ignore case' check box. When
it's checked off, the comparison should be made without considering case.
- Search In (group of check boxes) - options defining with what the
searched string will be compared:
- 'Display name' - the search string is compared with sender name
- 'Email address' - the searched string is compared with sender email
address
- 'To' - the searched string is compared with 'to' recipient type
- 'Cc' - the searched string is compared with 'cc' recipient type
- 'Bcc' - the searched string is compared with 'bcc' recipient
type
address type - messaging recipientÆs email address type, such as
SMTP, COMPUSERVER, MS, FAX, ....
- 'Filter item - simple interface' dialog box controls (picture
4-3):
- Value (combo exit box) - edit box with predefined address types
header - transport-specific message envelope information.
- 'Filter item - simple interface' dialog box controls (picture
4-3):
- Contain (Is) (combo box) - option settings defining the level of
preciseness that the content restriction should enforce when checking for
a match:
- 'Fullstring' - to match, the searched string must be completely
contained in the 'from (sender)' property
- 'Substring' - to match, the searched string must be contained
anywhere within the 'from (sender)' property
- 'Prefix' - to match, the searched string must appear at the
beginning of the 'from (sender)' property
- Various (group of check boxes) contains 'Ignore case' check box. When
it's checked off, the comparison should be made without considering case.
has attachment - TRUE if a message contains at least one attachment.
- 'Filter item - simple interface' dialog box controls (picture
4-3):
- Value (radio buttons) - possible to select either True or False
is unread - TRUE if a message isn't read yet.
- 'Filter item - simple interface' dialog box controls (picture
4-3):
- Value (radio buttons) - possible to select either True or False
subject - the full subject of a message
- 'Filter item - simple interface' dialog box controls (picture
4-3):
- Contain (Is) (combo box) - option settings defining the level of
preciseness that the content restriction should enforce when checking for
a match:
- 'Fullstring' - to match, the searched string must be completely
contained in the 'from (sender)' property
- 'Substring' - to match, the searched string must be contained
anywhere within the 'from (sender)' property
- 'Prefix' - to match, the searched string must appear at the
beginning of the 'from (sender)' property
- Various (group of check boxes) contains 'Ignore case' check box. When
it's checked off, the comparison should be made without considering case.
message size (in bytes) - the sum of the sizes of all properties on
a message object.
- 'Filter item - simple interface' dialog box controls (picture
4-3):
- Contain (Is) (combo box) - option settings defining relational operator
to be used in the search. Possible values are:
- '== Equal' - the comparison is made based on equal values
- '<> Unequal' - the comparison is made based on unequal values
- '<= Lesser or Equal' - the comparison is made based on a lesser
or equal 'message size' property
- '< Lesser' - the comparison is made based on a lesser 'message
size' property
- '>= Greater or Equal' - the comparison is made based on a greater
or equal 'message size' property
- '> Greater' - the comparison is made based on a greater 'message
size' property
message - the message text.
- 'Filter item - simple interface' dialog box controls (picture
4-3):
- Contain (Is) (combo box) - option settings defining the level of
preciseness that the content restriction should enforce when checking for
a match:
- 'Fullstring' - to match, the searched string must be completely
contained in the 'message' property
- 'Substring' - to match, the searched string must be contained
anywhere within the 'message' property
- 'Prefix' - to match, the searched string must appear at the
beginning of the 'message' property
- Various (group of check boxes) contains 'Ignore case' check box. When
it's checked off, the comparison should be made without considering case.
Example of string comparison methods.
fullstring comparison
| Property (From: name) |
Content |
Value |
Result |
| MAPI-L Server |
FullString |
MAPI |
FALSE |
| MAPI-L Server |
FullString |
MAPI-L Server |
TRUE |
substring comparison
| Property (From: name) |
Content |
Value |
Result |
| MAPI-L Server |
SubString |
Server |
TRUE |
| MAPI-L Server |
SubString |
MAPIL |
FALSE |
prefix comparison
| Property (From: name) |
Content |
Value |
Result |
| MAPI-L Server |
Prefix |
MAPI |
TRUE |
| MAPI-L Server |
Prefix |
Server |
FALSE |
In 'Filter Item - Actions' dialog box (picture 4-6) you
can attach actions to the filter rule. These actions will be performed when the
message is fired by the filter rule.
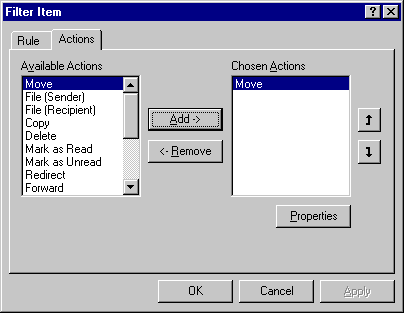
picture 4-6: ExLife options - Filter Item (actions)
dialog box controls:
list box
- Available actions - list of all actions which you can attach to the
filter rule (all actions are described in the following chapters)
- Chosen actions - list of all actions which are attached to the filter
rule
buttons
- Add - attach selected action from 'available actions' list box to the
filter rule. Action is copied to 'Chosen actions' list box
- Remove - remove selected action from 'Chosen actions' list box
- Properties - to invoke a action dependent dialog box to set action
properties
- OK - close dialog box with accepting all changes
- Cancel - close dialog box without accepting changes
Move the message to defined folder. Press 'Properties' button (picture
4-6) to invoke dialog box for choosing the destination folder (picture
3-5).
File messages to subfolders under selected folder. The subfolder names are
created from sender email address. e.g. if you get email from lmokry@ornic.com,
it will be filed in 'ornic.com (lmokry)' subfolder.
This action is useful for received messages.
File messages to subfolders under selected folder. The subfolder names are
created from recipient email address. e.g. if you send email to support@ornic.com,
it will be filed in 'ornic.com (support)' subfolder.
This action is useful for sent messages.
Copy the message to defined folder. Press 'Properties' button (picture
4-6) to invoke dialog box for choosing the destination folder (picture
3-5).
Delete the message. Beware! The message is definitely erased. If you only
want to move it to waste basket folder, use move action to do it.
The message is marked as read.
The message is marked as unread.
The message is sent to defined recipient in unchanged format. It's possible
to keep original sender and recipients information (including reply to address
if it's defined) - picture 4-7.
Attention:
ExLife must be installed on redirect message recipient side of too. If it's not,
the preserved original message information won't be restored. And also is
necessary to check off 'Set original sender and recipient addresses during
receiving messages' check box in the ExLife options - others property sheet (chapter
4.4., picture 4-16).
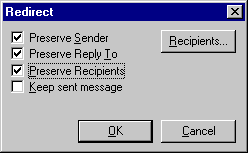
picture 4-7: Redirect properties
dialog box controls:
check boxes
- Preserve sender - the original sender information will be kept
- Preserve Reply To - the original reply to information will be kept
- Preserve Recipients - the original recipients information will be kept
- Keep sent message - the sent redirect message will be stored in sent
items folder
buttons
- Recipients - define recipients of redirect message (picture
4-8)
- OK - close dialog box with accepting all changes
- Cancel - close dialog box without accepting change
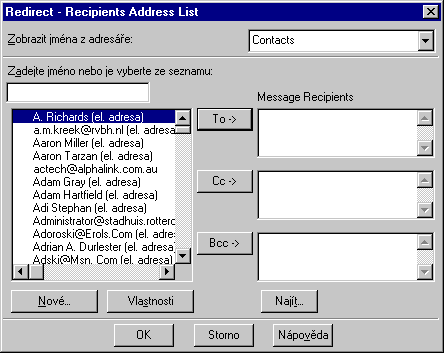
picture 4-8: Redirect - Recipients Address List
The message is forward to defined recipient. It's possible to customize the
forward message form - picture 4-9.
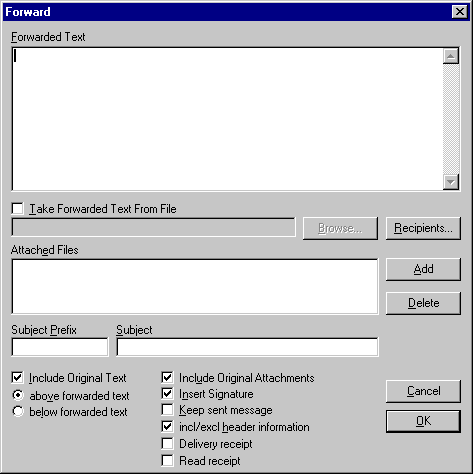
picture 4-9: Forward properties
dialog box controls:
edit box
- Forwarded text - type the text which is include as annotation to
forwarded message
- Subject prefix - you can define message subject prefix. If the field is
blank the default prefix (FW:) is used
- Subject - define forwarded message subject. Leave it blank if you want
to use the original message subject
check boxes
- Take forwarded text from file - take forwarded message annotation from
file
- Include original text - check off this box if you want to include the
original message text (with header)
- Include original attachments - check it off to forward the original
message attachments
- Insert signature - check it of to insert signature defined either in the
Signature property sheet or in the ExSign
extension
- Keep sent message - the sent forward message will be stored in sent
items folder
- Delivery receipt - request for a delivery receipt for the forwarded
message
- Read receipt - request for a read receipt for the forwarded message
list box
- Attached files - list of files which you want to attach to forwarded
message
radio buttons
- Above/Below forwarded text - put the original message text above or
below included annotation
buttons
- Browse - select the text file with annotation (also RTF file support)
- Recipients - define recipients of forwarded message (similar to picture
4-7)
- Add - attach new file to message
- Delete - delete selected attachment from attached files
- OK - close dialog box with accepting all changes
- Cancel - close dialog box without accepting changes
The message reply is sent to the original message sender (as choice also to
other original message recipients). It's possible to customize the message reply
form - picture 4-10.
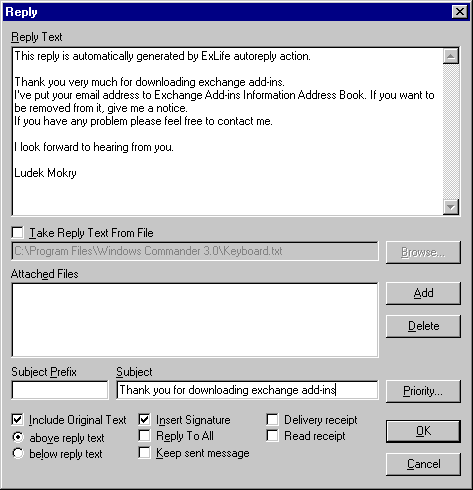
picture 4-10: Reply properties
dialog box controls:
edit box
- Reply text - type the text which is include as annotation to message
reply
- Subject prefix - you can define message subject prefix. If the field is
blank the default prefix (RE:) is used
- Subject - define forwarded message subject. Leave it blank if you want
to use the original message subject
check boxes
- Take reply text from file - take message reply message annotation from
file
- Include original text - check off this box if you want to include the
original message text (with header)
- Insert signature - check it of to insert signature defined either in the
Signature property sheet or in the ExSign
extension
- Reply to all - the message reply is sent to the original message sender
and recipients
- Keep sent message - the sent message reply will be stored in sent items
folder
- Delivery receipt - request for a delivery receipt for the message reply
- Read receipt - request for a read receipt for the message reply
list box
- Attached files - list of files which you want to attach to message reply
radio buttons
- Above/Below reply text - put the original message text above or below
included annotation
buttons
- Browse - select the text file with annotation (also RTF file support)
- Priority - set reply address priority (picture 4-11)
- Add - attach new file to message
- Delete - delete selected attachment from attached files
- OK - close dialog box with accepting all changes
- Cancel - close dialog box without accepting changes
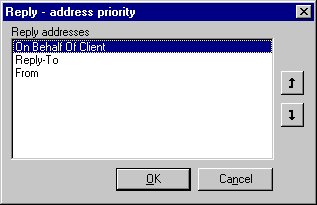
picture 4-11: Reply address priority
This action adds the message sender or recipients to MS Exchange (Outlook)
address book. As the address book you can choose either a Contact folder (MS
Outlook) or a Personal address book. The dialog box (picture
4-12) allows you to customize the address book manager.
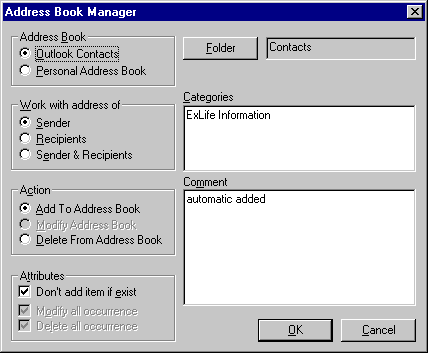
picture 4-12: address book manager properties
dialog box controls:
radio buttons: Address Book - choose with address book you want to
use
- 'Outlook contact folder'
- 'Personal address book'
radio buttons: Work with Address of - which addresses you want to
store in address book
- 'Sender' - the message sender's information is stored in the address
book
- 'Recipients' - the message recipients' information is stored in the
address book
- 'Sender & Recipients' - the message sender's and recipients'
information is stored in the address book
radio buttons: Actions - what action will be performed
- 'Add to address book' - address is added to the address book
- 'Modify address book' - not implemented yet
- 'Delete from address book' - address is removed from the address book
check boxes: Attributes - customize behaviour during managing
address book
- æDonÆt add item if existÆ - if itÆs checked off, contact is add
to a book only if it doesnÆt exist in the book
- æModify all occurrenceÆ - modification is applied to all occurrence
which are found
- æDelete all occurrenceÆ - if itÆs checked off, all items in the
address book which have the same email address as emailÆs sender are
deleted
edit boxes
- Categories - type categories (divide by semicolons) for this contact
(only available when Outlook contact folder is selected)
- Comment - type text which is stored in contact comment field (only
available when Outlook contact folder is selected)
buttons
- Folder - choose in which Outlook contact folder you want to store
addresses (only available when Outlook contact folder is selected)
- OK - close dialog box with accepting all changes
- Cancel - close dialog box without accepting changes
This action can print messages' body and attached files. If you want to print
attached files, they must be associated with programs which will print those
files (e.g. .doc files will print MS Word, .xls files MS Excel, .tif files
Imaging for Windows, ...). It means that you can also print incoming faxes with
this action. Picture 4-13 shows dialog box to customize
print action parameters.
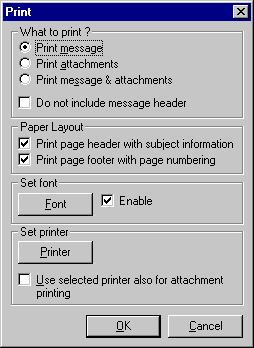
picture 4-13: print message properties
dialog box controls:
radio buttons: What to print ? - determine what from message will be
printed
- Print message - message's body is printed
- Print attachments - message's attachments are printed (with using
associated program to attachments' extension)
- Print message & attachments - both are printed
check boxes
- Do not include the header to the message - the message body is printed
without message header information
- Set Font - enable
- Use selected printer also for attachment printing - use selected printed
also for printing attached files. otherwise the default printer is used
- Print page header with subject information - page header will contain
message subject. Evaluation version will also contain the following text:
"(TRIAL VERSION OF EXLIFE)" and won't be possible to disable
header printing.
- Print page footer with page numbering - page footer will contain the
page number
buttons
- Font - select font for printing message's body if message is not in RTF
format
- Printer - select printer for printing message's body and attachments
- OK - close dialog box with accepting all changes
- Cancel - close dialog box without accepting changes
This action can save messages' attachments to defined disk folder and then
launch a program with save attachment as argument. Picture 4-14
shows dialog box to customize save attachments action parameters.
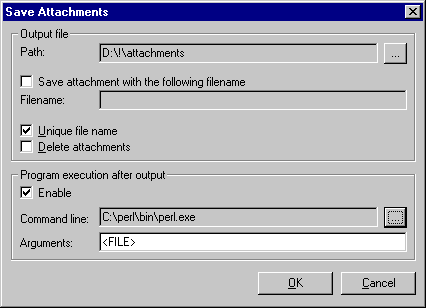
picture 4-14: Save attachments properties
dialog box controls:
check boxes
- save attachment with the following filename - use 'Filename' for saving
attached files
- unique filename - a unique suffix will be added to filename if the same
file already exists in output folder. if the checkbox is disable, then the
existing file will be replaced with the new one
- delete attachments - after successful attachment saving, the attached
file will be removed from the message
- enable - enable to run selected program after attachment saving
edit line
- Filename - fixed filename for saving attachment
- Arguments - program arguments, symbol <FILE> will be replaced with
saved attachment filename
buttons
- Path - select folder for saving attachments
- Command line - select program to run with the saved attachment as a
parameter
- OK - close dialog box with accepting all changes
- Cancel - close dialog box without accepting changes
This action can save message text to defined disk folder and then run an
application with saved file as argument. Picture 4-15 shows
dialog box to customize save message action parameters.
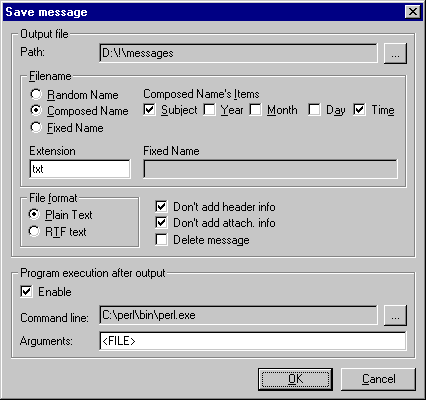
picture 4-15: save attachments properties
dialog box controls:
radio buttons
- random name - filename is created from random number (8 digits)
- composed name - filename is created from a subject and time
- fixed name - save text with the following filename - use 'Fixed Name'
for saving text files
- plain text/RTF text - type of saved text file.
check boxes
- composed name's items - select components of the filename ('Subject',
'Year', 'Month', 'Day', 'Time')
- don't add header info - if you enable this box, the message header
information won't be added to saved text file.
- don't add attach. info - if you enable this box, the information about
attached files won't be added to saved text file.
- delete message - if you enable this box, the message will be moved to
the waste folder after successful processing.
- enable - enable to run selected program after message text saving
edit line
- Extension - the extension of saved file
- Fixed Name - fixed filename for saving message text
- Arguments - program arguments, symbol <FILE> will be replaced with
saved text filename
buttons
- Path - select folder for saving text message file
- Command line - select program to run with the saved text file as a
parameter
- OK - close dialog box with accepting all changes
- Cancel - close dialog box without accepting changes
This action launch a defined program when the filer rule is fired. As a
program parameter is passed a MAPI entry identifier used to open the message
(which invokes this action) in the launched program. The entry ID is passed as a
hexadecimal string.
Press 'Properties' button (picture 4-6) to pop dialog box
for choosing launched program.
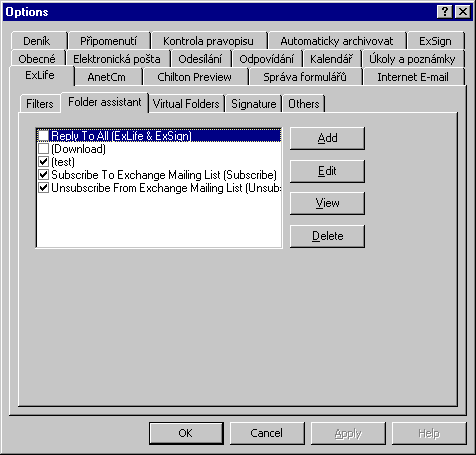
picture 4-16: ExLife options - Folder Assistant
For example you want to have a search folder which contain all messages
with words æInternetÆ and æMarketingÆ. Virtual folder is what you are
looking for. Their definition is the same as definition filter rules. (picture
4-17).
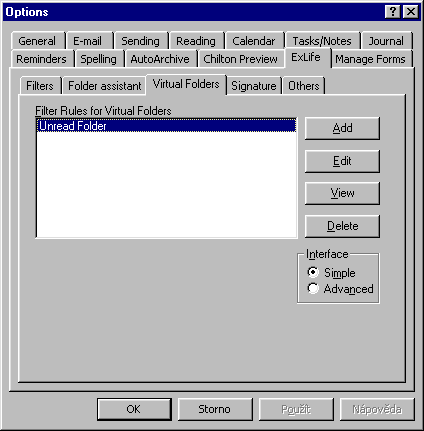
picture 4-17: ExLife options - Virtual Folders
In the next picture (picture 4-18) you can see definition
of æUnread message folderÆ. In this folder all unread messages are shown
from all personal folders (the messages arenÆt stored there).
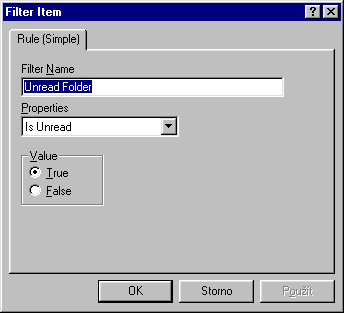
picture 4-18: Unread messages folder definition
ExLife also enables you to add a signature to outgoing messages. To define a
signature fill out the æSignatureÆ sheet in æExLife - optionsÆ dialog
box (picture 4-19). Also donÆt forget check the æEnable
signatureÆ check box.
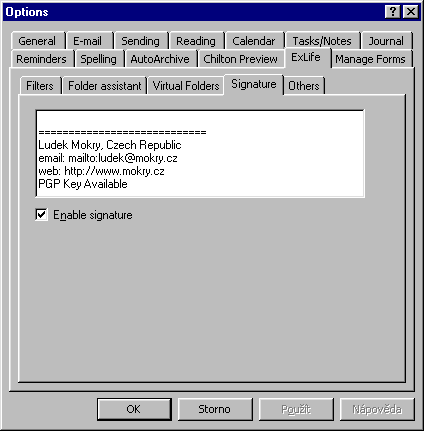
picture 4-19: ExLife options - Signature
The öSignature Featureö is not compatible with the WordMail extensions
from MS Word (when youÆre using MS Word for composing messages).
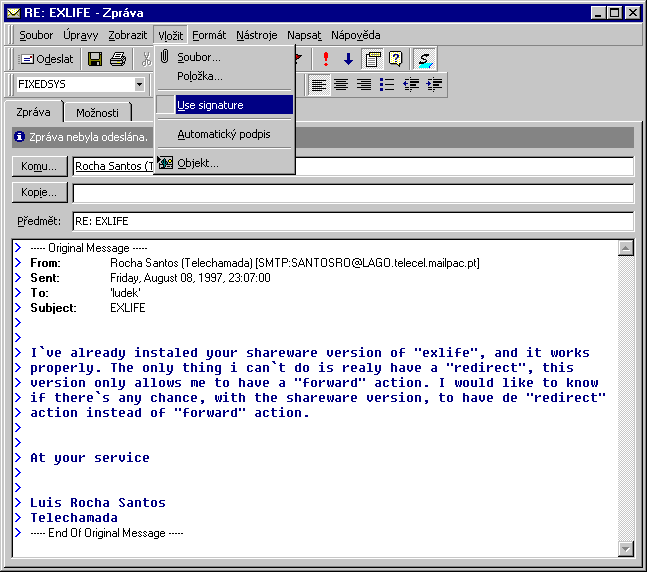
picture 4-20: Signature - Reply Message form
In message form (picture 4-20) you can impress signature
behaviour. To enable/disable appending signature use æInsert.SignatureÆ menu
command or æSÆ button from toolbar.
Attention:
If ExSign is installed, ExLife's signature feature is switch off. Instead of is
using advanced signature feature from ExSign
extension.
'ExLife options - Others' (picture 4-21) dialog box allow
you to set-up a lot of useful parameters. More information about them you find
below
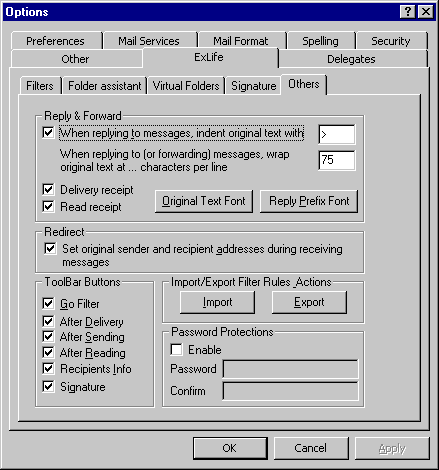
picture 4-21: ExLife options - Others property sheet
dialog box controls:
group Reply & Forward - set parameters for reply and forward
actions and reply message form
- 'Original font text' (button) - set original text font if original
message is not in RTF format
- 'Reply prefix font' (button) - set font for reply prefix
- 'When replying to messages, indent original text with' (check box &
edit box) - to allow quoted reply form and define prefix for it (prefix is
also used for reply action
- 'When replying to (or forwarding) messages, wrap original text at ...
characters per line' (edit box) - number of characters per line for
wrapping original text
check boxes Toolbar button
- to select which buttons appear in the toolbar you can use check boxes in
this dialog box. This choice is mainly useful for Outlook where is
impossible to manage add-onÆs buttons in the toolbar.
check boxes Redirect - set parameter for incoming messages generated
by redirect action
- 'Set original sender and recipient addresses during receiving messages'
(check box) - allow to return original sender and recipient information to
redirected messages (chapter 4.1.2.8.) after they
are received
- enable (passport protection) - enable password protection for ExLife
options
edit line
- Password/Confirm - password for protection of ExLife options
buttons
- Import/Export filter rules & action (buttons) - backup and restore
filter rules to file
- OK (button) - close dialog box with accepting all changes
- Cancel (button) - close dialog box without accepting changes
It's possible to process actions either manually (offline) or automatically
(online). More information you find in the following sections.
In this mode actions are carried out when incoming, outgoing or read message
fire the filter rule. Then is started corresponding actions which are defined in
that filter rule.
To allow online applying rules on messages you have to select which one you
want to perform (picture 4-1).
- inbox assistant - the filter rules are automatically processed after
incoming messages are received
- outbox assistant - the filter rules are automatically processed after
outgoinf messages are sent
- folder assistant - the filter rules are automatically processed after
messages are added to defined folders
- read assistant - the filter rules are automatically processed after unread
messages are read (doesn't work with MS Outlook 98/2000)
First select the folder you want to filter. Then select a menu item æTools.Filter - Offline Inbox AssistantÆ
(picture 4-22) or buttons from toolbar to start the
filtering process. Now you can choose suitable group of filters (if you select
æAll FiltersÆ menu command and if you have entered more than one group)
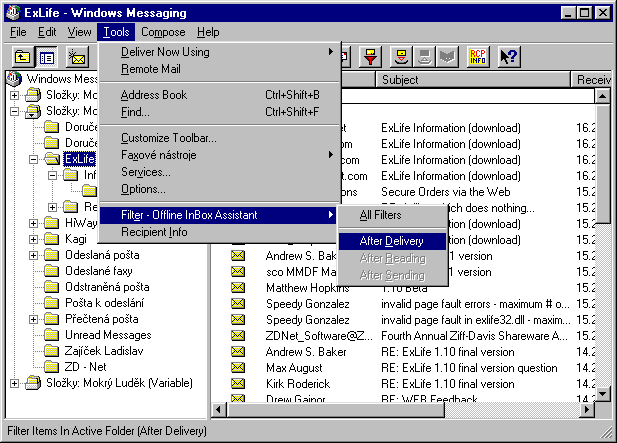
picture 4-22: Offline filtering
æRecipient InfoÆ is a very useful function to show information about æBccÆ
Recipients of sent messages (picture 4-23).
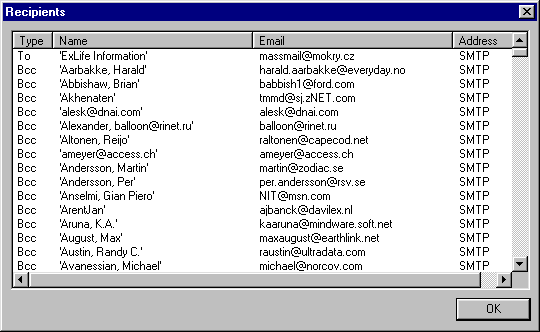
picture 4-23: Recipient information
To resend email use æCompose.ResendÆ command from the main menu. Resend
form appear and you can repair information in resend email and then send it in
the same way as a new email.
To use quoted reply form instead of standard MS Exchange (Outlook) you have
to check off 'When replying to messages, indent original text with' check box in
the 'ExLife options - Others' dialog box (picture 4-21).
ExLife is not a free software
You have the opportunity to try the program 30 days at no charge to see if
it meets your needs. If you continue to use the program after the evaluation,
please order a license. Credit card ordering and quantity discounts are
available. More details you can find on Purchase
a License page.
| product |
single
license |
site
license |
worldwide
license |
| ExLife Std |
US$29.95 |
US$399.00 |
US$899.00 |
| ExLife Pro |
US$39.95 |
US$499.00 |
US$1199.00 |
| - |
a single license covers one PC. |
| - |
a site license covers a single organization for an area of
up to 10 miles (16 kilometers) in radius. |
| - |
a world-wide license covers everyone in a single
organization. |
| product |
multicopies
discount |
| 1 |
2-5 |
6-10 |
11-25 |
26-50 |
51-100 |
101+ |
| ExLife Std |
US$29.95 |
US$20.96 |
US$18.27 |
US$15.57 |
US$12.88 |
US$10.18 |
US$8.98 |
| ExLife Pro |
US$39.95 |
US$27.96 |
US$24.37 |
US$20.77 |
US$17.18 |
US$13.58 |
US$11.98 |
PC User Groups and Shareware Distributors are welcome to add CaPrint to their
libraries under the following conditions:
- The program itself must be unmodified
- A diskette/copying fee of $5 or less is charged
- All documentation files MUST be included.
I would appreciate notification that you have added ExLife to your library.
IF YOU RECEIVED EXLIFE THROUGH EITHER A USER GROUP OR A SHAREWARE
DISTRIBUTOR, PLEASE REMEMBER THAT THE DISKETTE FEE YOU PAID DOES NOT CONSTITUTE
LICENSING THE SOFTWARE, AND YOU ARE STILL OBLIGATED TO REGISTER IF YOU DECIDE TO
USE EXLIFE.
The copyright owner disclaims all warranties and is not liable for damages of
any kind. By using ExLife you agree to this.
Please either visit download
page on our website or click on this download
exlife link.
| ExLife
version 1.53 build 1531, released on 24th November 1999 |
 |
 |
ExLife provides actions based on filter rules which are executed after message
is delivered, read or sent. Also it's possible to invoke them manually. The
actions are: moving or copying messages to different folders, deleting, marking
as read, redirecting, forwarding and replying messages, address book manager,
run a program, print a message, save message's attachments.
Another features are: Boolean expression in filter rules, attached files in
autoreply, virtual folders, import/export rules&actions, quoted reply form,
resend form, signature.
| ExSign
version 1.2 build 1200, released on 24th June 1998 |
 |
 |
ExSign provides advanced signature feature. Signature can be different for each
transport service provider (SMTP, MS, FAX, AOL, ...) and message type (new,
reply, forward, ...).
The signature source in text file is also supported. Text file can be in RTF
file format.
ExSign co-operates with ExLife.
| CaBook
version 1.1 build 1101, released on 20th October 1999 |
 |
 |
CaBook adds address book manager action to Rules Wizard or Inbox Assistant. It
can add sender's and recipients' email addresses to Outlook Contact Folder or
Personal Address Book. Also it is possible to delete these addresses from it.
| CaPrint
version 1.22 build 1220, released on 25th November 1999 |
 |
 |
CaPrint action adds to Rules wizard or Inbox assistant possibility to print
messages. Either message's body or message's attachments (faxes, doc, xls, gif,
...) can be printed.
| CaRedirect
version 1.2 build 1201, released on 29th September 1999 |
 |
 |
CaRedirect action allows Rules Wizard or Inbox Assistant to redirect (send)
message to defined recipients with keeping the original sender's and recipients'
information.
| CaSaveAtt
version 1.3 build 1300, released on 20th October 1999 |
 |
 |
CaSaveAtt actions adds to Rules Wizard or Inbox Assistant possibility to save
message's attachments to defined directory and launch exe with the attached file
as a parameter.
| CaSaveMsg
version 1.2 build 1201, released on 20th October 1999 |
 |
 |
CaSaveMsg actions adds to Rules Wizard or Inbox Assistant possibility to save
message body to defined directory either in plain or in RTF file format. There
is also possibility to launch exe with a saved file as a parameter.
| CaTrap
version 1.01 build 1014, released on 19th January 1999 |
 |
 |
CaTrap extension adds Message Extract Manager action to Rules Wizard or Inbox
Assistant. It can extract data information from an incoming message fields or
their segments and export it to the file or store it to any folder or to the
Personal Address Book.
| PopRoute
version 1.05 build 1050, released on 9th May 1999 |
 |
--- |
PopRoute picks up emails from POP3 accounts and routes them to MS Exchange
Server mailboxes.
| DeRedirect
version 1.1 build 1100, released on 19th October 1999 |
 |
--- |
DeRedirect is a decoding utility which decode received messages redirected
either by CaRedirect or ExLife. It is necessary to install this utility if
CaRedirect or ExLife is not installed in exchange/outlook client.
| RcpInfo
version 1.1 build 1100, released on 15th March 1998 |
 |
--- |
RcpInfo allows the user to show information about all recipients (To, Cc, Bcc) -
in outgoing messages.


