|
|
-
|
Switch to a front view (press "1" on the keypad).
It's always best to model stuff in orthogonal views or your modelling
will not be as precise as in a perspective view.
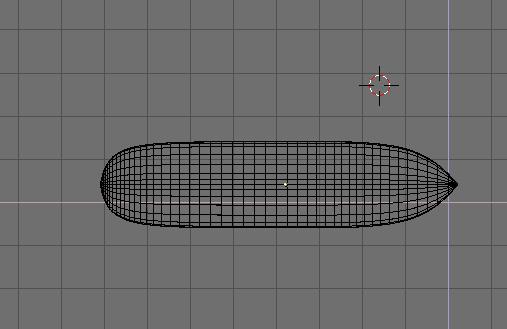
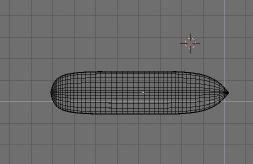
I originally designed the torpedo body out of a NURBS cylinder
with the end tapered down to zero. You can do this by select a
point on the end of the surface, hitting "Cntrl+R" which selects all
the points on a isoparm. Toggle the isoparm selection until you
get it around the torpedo. Then hit "s" to scale the points
to zero, while scaling its good to hold down the Cntrl key
which will snap the scale to a tenth of a unit. This will eventually
get you a zero'd set of control points. Do this on both ends.
Add isoparms as needed.
If you don't like using NURBS surfaces, use whatever you like,
you can make the torpedo out of metaballs or meshes (aka polygons).
because any of these primitives can be converted to polygons.
(Warning: A lattice is not a primitive, its a deformation tool)
|
-
|
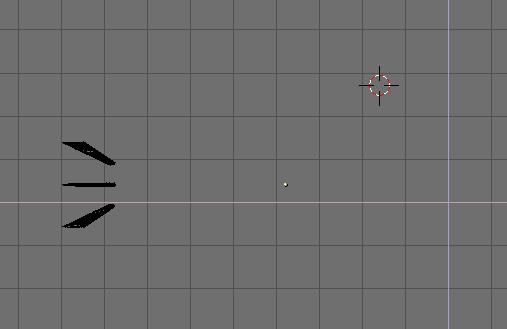
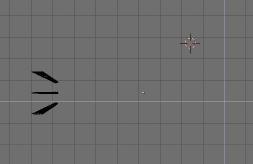
I made my rutter part(s) out of a single NURBS cylinder, rotated left, then with
a few isoparms selected from the long part of the cylinder, I moved
the isoparms to the left side to make a "fin" shape.
I confess, I actually
"duplicate linked" the cylinder three times and modifed the original,
going with what looked right, then I went around to each cylinder
and made them single users [unlinked the objects making them unique].
You can achieve the same by making the object, then duplicating and
placing, but its not as much fun. 8^)
|
-
|
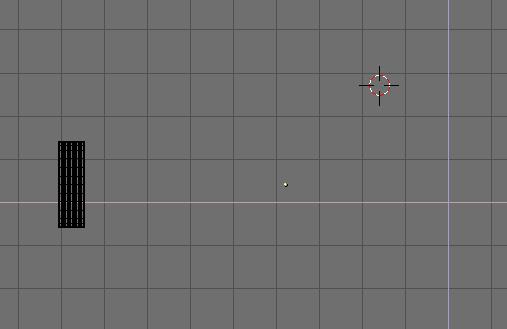
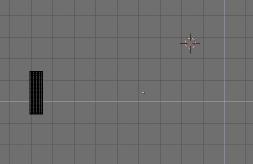
This one is easy, just make a cylinder surface, select all the
points in the surface, Go to the edit menu (hit the F9 key),
click the key with the "Weight 1.000" on it, then
tap "Set Weight". Your cylinder should become more box like.
Next, rotate this surface such that it looks like the diagram
(sorry this is a bad diagram, its a side view on the cylinder,
consult the other daigrams for visual reference).
To get pure 5 degree increments with rotation, hold the Cntrl key down.
Note: When circles are created in blender, they are made with a
square of 8 CV's, the corner CV's are given weights of about .5,
and this produces a circle.. The other way to make a square
with weights of 1.0 and moving the corner points closer to the center
of the object.
|
-
|
|
|
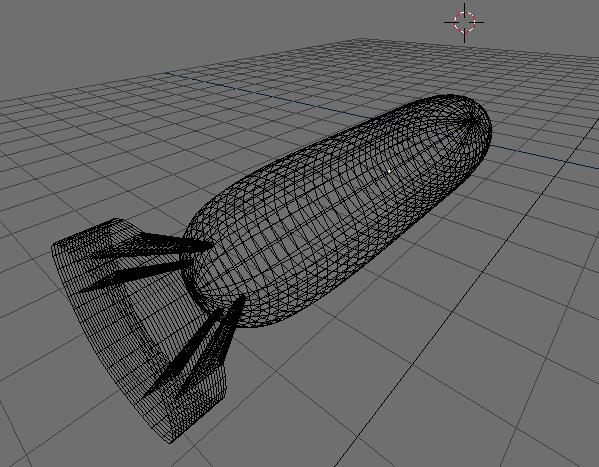
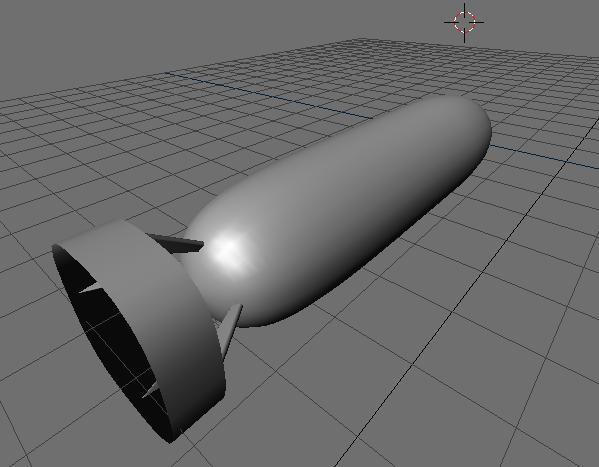
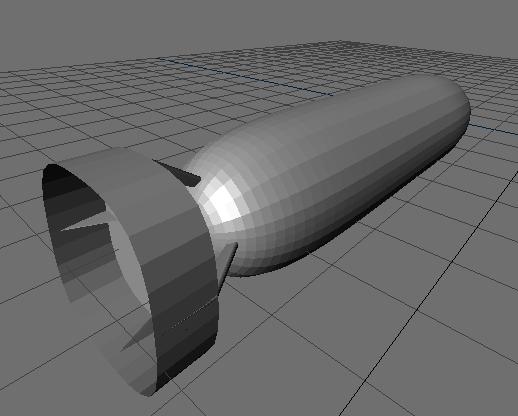
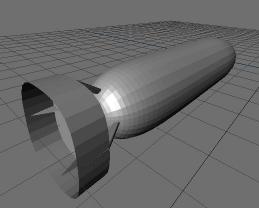
Assuming the three parts were created as seperate object,
orient them such that they look like what is shown in these diagrams.
Be as precise as you want, it doesn't matter.. If you want to make a
torpedo that looks like a nuclear bomb on drugs, that's okay, just as
long as it looks something like this.
To join the objects together, shift-select each part, selecting the main body of the
torpedo last. This insures that when we join the surfaces together into one object,
they'll share a common origin (at the center of the body object) making it easier
to direct. With the objects selected in this way, type Cntrl-J (Join). Answer, "Yes".
|
|
-

|
|
We are going to do a lot of unique duplications (I mean we don't
want linked duplication) so it will save you some keystrokes
to change the settings in the window that hides in the roof of blender.
Drag the edge of the blender window from the top down and you will
see a window such as the one shown above.
Select the buttons on the far right, like "Dupli Mesh" and "Surf"
such that they look like this figure. This determines whether
duplications by default are made linked duplicates or unique duplicates ,
and as you can see materials, textures, IPO motion Curves, Lamps,
and other objects can be linked or duplicated. Some are made unique
when duplicated by default.. Now you know how to change it!!
|
|
-
|
First make a duplicate of this torpedo and move it off somewhere
else. One way is to move
the object off the screen with the Cntrl key held down.. This snaps
movement to grid units. So you can precisely move the
object back where it was later.
Select the remaining Torpedo and do a Alt-c. This will convert
the NURBS surface to a mesh surface. I'm going to lead you through the
process of making a particle emitter for the torpedo.
|
|
| |
You can also move the torpedo to another layer. Layers are something
I or someone should cover in another tutorial because they are more complex than
I can describe here.
On snapping.. If you fail to make the object snap with the Cntrl technique,
hit the "escape" key and the last transformation will be undone.
If you are careful enough to do this before you confirm the
transformation it will be most
helpful.. It makes sense that if you don't want something you can
escape it by hitting teh escape key (* smile *)
If you have trouble moving the object,
sometimes blender hangs and the thing to do is twiddle the Shift
and Cntrl keys a few times.
|
-
|

|
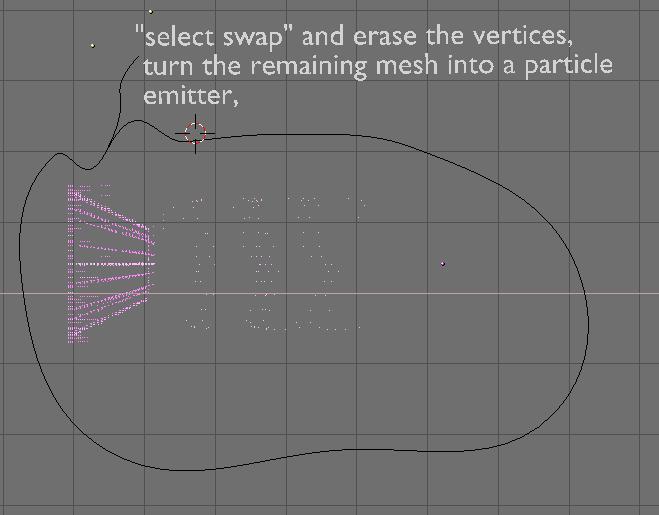
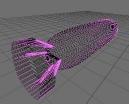
Go into edit mode and go to the side view.
Use the Border/Wand select tool to select only
points that should be emitting particles.. This is
where the bubbles (particles) will appear when the mesh is turned
into a particle emitter.
|
|
Use Cntrl key in combination with Border/Wand-select tool to deselect points.
The keypad's + and - keys, while in the Wand mode, allow you
to change the size of the Wand.
|
-
|
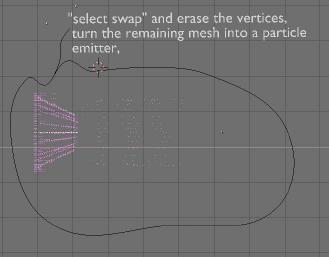
In the edit window (F9 key) prese "select swap" on the far-right.
Delete the vertices ('x' key).
Return from edit mode and make the mesh object a particle emitter.
To make the mesh object a particle emitter,
- hit the F7 key, that
gets us the motion window.
This window is generally used for creating particles
and editing the motion along paths. You should see a button in
this window that says "New Effect".
- With the mesh selected,
click on "New Effect", then you'll see a button menu appear
directly right of that button that says "Build", click on that
and change it to "Particles".
-
click and drag-right the Norm, Ob, Rand, Tex, Damp - each briefly..
This gives a random enough particle emission that we can tell
particles are being emitted from the mesh.
- Hit alt-a or shift-alt-a
to animate the particles.
- Hit escape (ESC) and reset the frame
number to 1. shift-left-arrow (hitting down-arrow a couple of times is okay).
If you want more particles you can increase "Tot:" or duplicate the
emitter several times.. I would prefer to duplicate the emitter.
I used 5 emitters in my original torpedo animation. What I did is I made
several emitters, three for the back rutters and two from the main body.
Tip: Particle Emission is especially nice in blender because it happens
almost instantaneously, so you can form the way the particles
move interactively with the particle emission paramters.
|
-
|
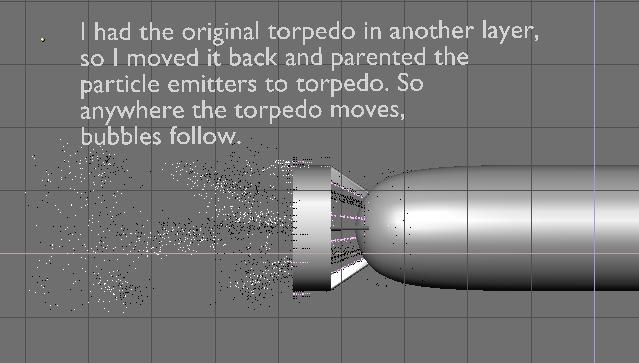
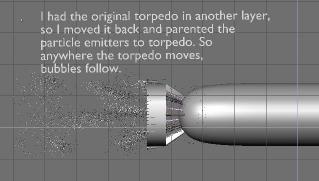
Retrieve the original Torpedo Surface ('g' and hold Cntrl key down
while moving the torpedo to where the particle emitter is).
Parent the Particle emitter to the Torpedo:
Select the Particle emitter, and shift-select the Torpedo,
then hit Cntrl-p, and answer "yes".
Anywhere the torpedo goes, the particle
emitter and the particles will.
It doesn't matter if the particle emitter is precisely on top
of the torpedo, it just has to look like its the same shape
an approximately in the right spot.
|
-
|
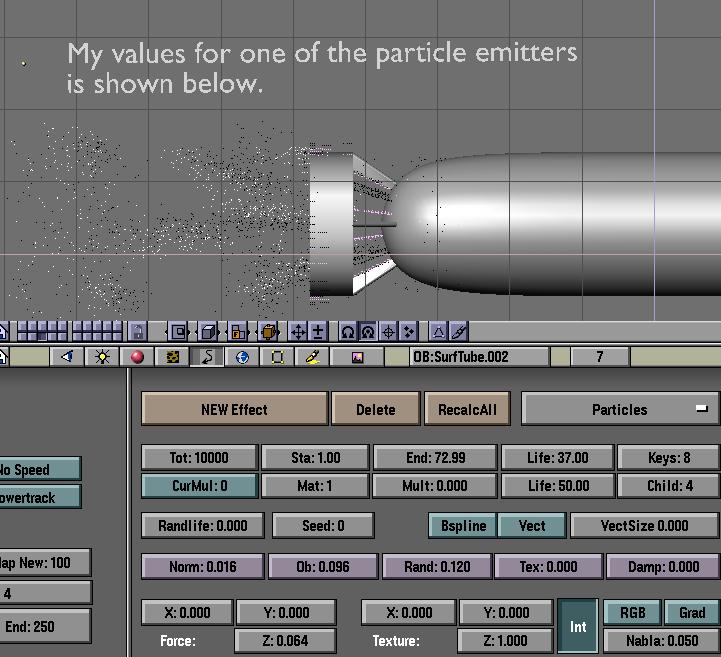
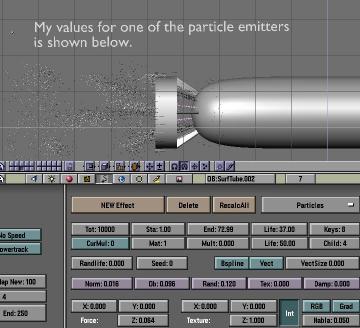
Select the particle emitter and copy these values down to get
the particles to respond like bubbles. Feel free to play around with
these values to see what effect they will have on the particles.
|
-
|
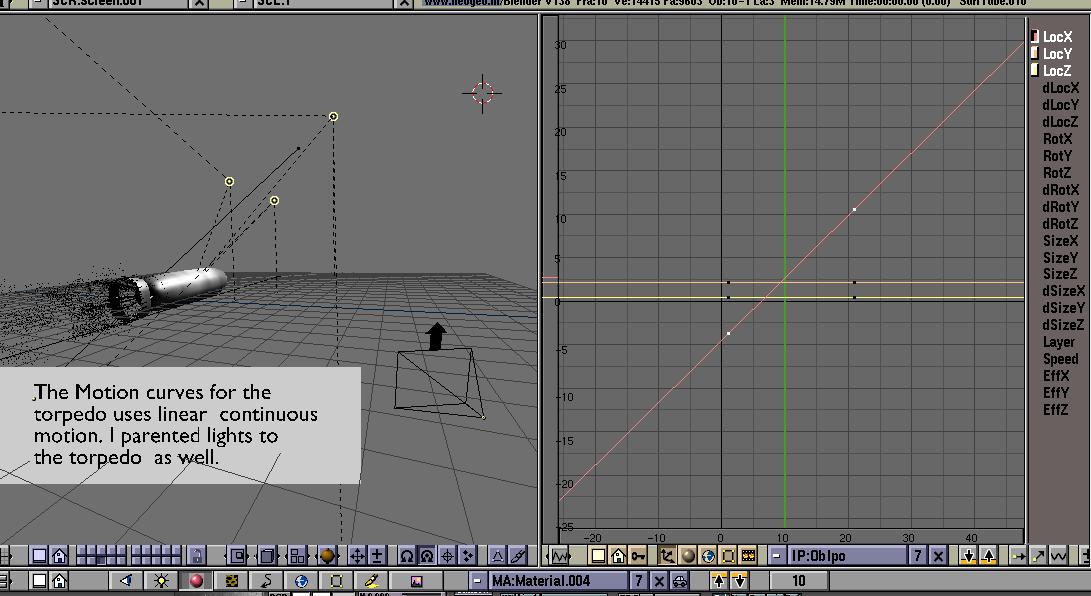
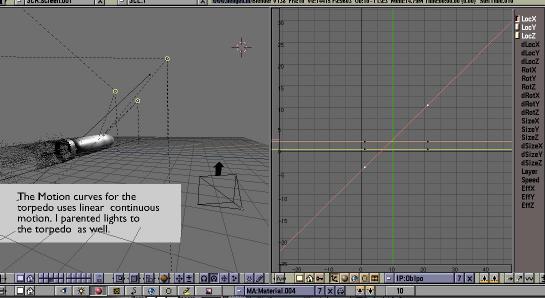
To experiment with particle motion with the torpedo,
you will need to create forward motion for the torpedo.
Change to frame 1 using the arrow keys. Select the torpedo
and set a keyframe for the location. Go to frame 30 (or 31).
Move the torpedo forward about twenty units
and set a keyframe
for the torpedo's location.
Go to the IPO Curve Window (Shift-F6), Click on the Home icon
 this will center the view on the
motion curves. Zoom out just a bit such that motion curves
are about half the size of the screen. Hit the 'a' key a few times
to toggle the selection of all curves. Usually a few curves are
selected, you hit 'a', that deselects them, then hitting 'a' a
second time selects all curves.
this will center the view on the
motion curves. Zoom out just a bit such that motion curves
are about half the size of the screen. Hit the 'a' key a few times
to toggle the selection of all curves. Usually a few curves are
selected, you hit 'a', that deselects them, then hitting 'a' a
second time selects all curves.
Hit the tab key to go into edit mode on the curves.
Hit 'a' a few times (again) to select all the edit points in all the
curves. Hit the 'v' key to break the control points so that
the curves are linear. To make the curves continue on infinitely,
press the  . .
Press Shift-F5 to get back to the object display, hit
alt-a to animate. Now the torpedo moves infinitely forward.
If you want to make the torpedo spin, go to the IPO Curve window (Shift-F6),
Select the "RotX" channel. Hit tab key to go into edit mode.
Hold down the Cntrl key and click the left mouse button, this allows
you to create/add points to a IPO Curve, so you can create any kind of
motion out of thin air, or in this case thick water. (* smile *)
|
-
|
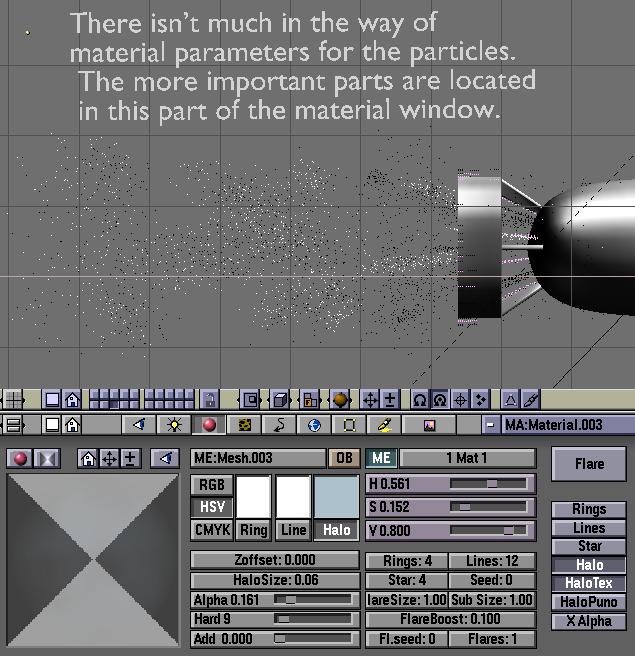
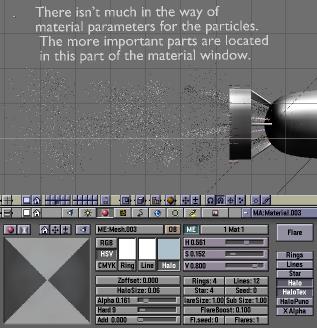
Download this image if you want material parameters for the particles.
To get precise setting, click left and middle mouse buttons on
a button in the window and enter in a value. This works with most
all buttons in the interface.
The bubbles aren't really bubbles, they are particle accumulations
that look like bubbles when composited. However, there is a way
to substitute objects that look like bubbles in for the particles,
but I didn't want to cover that in this tutorial.
|
|
-
|
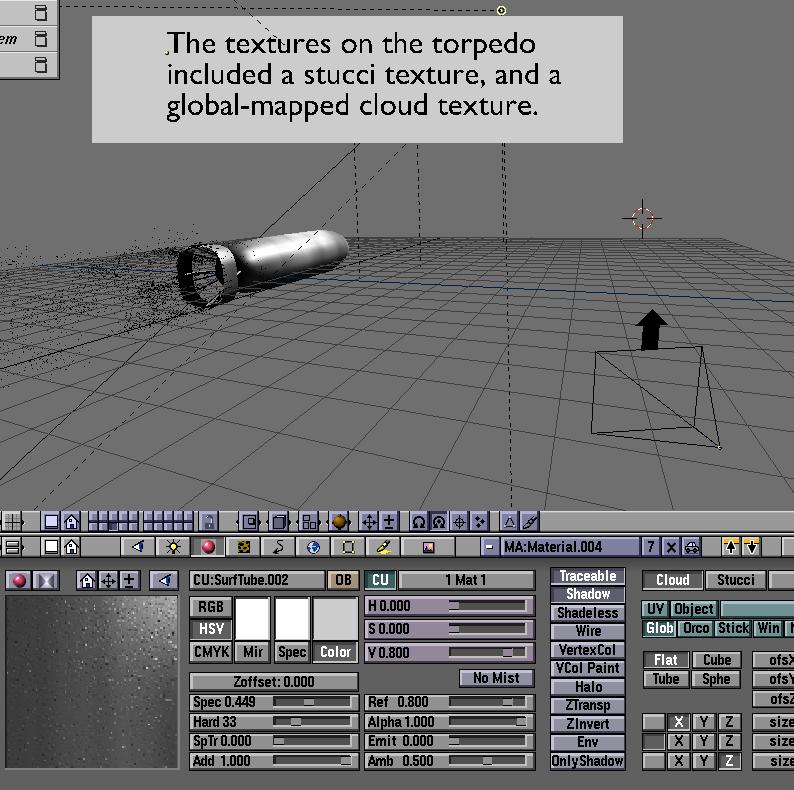
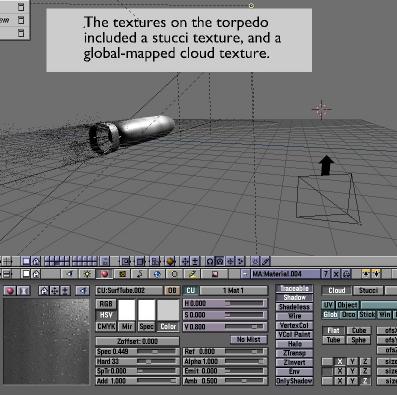
Download this image if you want material parameters for the torpedo.
Hit F9, press the "UV Orco" button (located on the far-left
in the edit window). This allows the torpedo to be mapped
about its surface (the UV).
I did two things with this material. I made a cloudy global
texture and a orco stucci texture. The cloudy texture
simulates the light passing through the ocean water onto
the torpedo. There is a way to animate this texture as well
by applying material curves to this material for the texture
but that's also for another tutorial.
The Stucci is used to give the torpedo some visible
metalic attributes, like nicks and scratches. If you reallly
really really want to make it look more like nicks and scratches,
subtitute teh stucci for a image map with its "NOR"
bumped up. If you don't know what I'm talking about, nevermind.
That's also for anotehr tutorial.
-

| |
Carsten Wartmann sent in these parameters for making the water foggy..
This makes it look even better!!
|
|
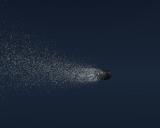
Closing Comments:
You have a torpedo now that emits particles, spins, has special material
properties, particles with special material properties, a motion graph
and you know how to navigate around the interface. I hope you can reuse
this experience and make more things. I incourage you to now make a
submarine, maybe a few mines floating in the ocean, add some fog
(F8, click the button menu and add a new World, then adjust the
parameters like you did with the materials).
Send me email at kholland@unm.edu
if you have any recommendations for this tutorial or questions..
|