Introduction
This course is designed as an introduction to programming using Visual Basic. For many people, this will be a new and powerful environment and, while it might take a bit of getting used to at first, the advantages and flexibility in design that it offers should soon become apparent. We also think that learning shouldn't always be deadly serious and so we'll be disappointed if you don't have some fun along the way....so, let's get started right now!
Running Visual Basic
Your system should be set up so that you can run Visual Basic from the program menu. For a typical installation, several windows should appear when you do this. The one at the top of the screen is the most important and looks like this:

This is the main menu and toolbar. We can see that the default name for the 'new' project is Project1 and we also notice that the title bar indicates that we are in design mode.
Also visible should be the toolbox. If it isn't, then click View on the menu bar then Toolbox on the drop-down menu. It should look something like this, but it may just have one or two more, or less, buttons on it:

Each of the buttons represents a control and if you hold the mouse over any of them, a small box should appear indicating which control it is. The one at the top middle, for example, should say 'Picture Box'. These small labels are called 'Tool Tips' and if you don't see them then click Tools on the menu bar then Options and in the dialog box that appears, make sure that the Show Tool Tips box is ticked - it should be under the General tab.
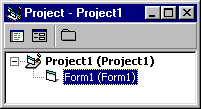
There should be a small 'Project' window similar to this:
 for VB5
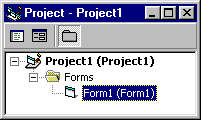
or
 for VB6
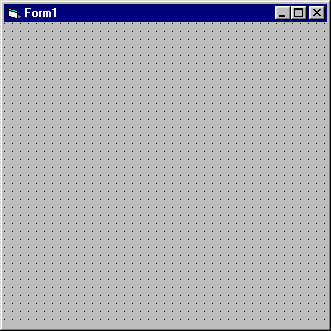
If you can't see the 'Form' window, then the click the View menu and choose Object - alternatively, click the middle icon in the Project window. It looks like this:

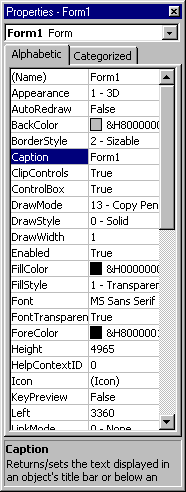
Finally, there is a 'Properties' window where you will set properties for the various controls that your projects will use. Right now, your project has only one control - namely, the form - that you can see. The window looks like this:

The window can be set to either 'Alphabetic' or 'Categorised' view - we'll use the Alphabetic view, so change it to this if it isn't already.
At the moment the form is called Form1, but you can use the Properties window to change the name of the form and, indeed, to change any of the other properties that you can see listed - the background colour is just one of several properties that affect the appearance of the form. You can also alter the size and position of the form on the screen. In fact you can do this in two ways; the first is by typing in numbers to specify Height, Width and so on, and the second is by using the mouse to reposition or resize the form which will then automatically alter the numbers in those properties - try it and see.
The numbers used to specify the height, width and position on the screen are measured in twips. What was that? Twips? Never heard of them, right? Don't worry. It's possible to set your system to use other units but we're going to stay with twips throughout this course. If you write programs that might be used on other systems which may have different monitors and/or screen resolutions then you'd need to give some consideration to this issue but it won't concern us here.
If you look near the top right hand corner of the title window, you'll see two small images with pairs of numbers, or coordinates, beside them. These tell you the size of the form and its position on the screen. If you resize the form or reposition it, you'll see how the numbers change. The position given by the coordinates, is the position of the top left corner of the form and it is measured from the top left corner of the screen.
That's given you a very quick tour of what Visual Basic looks like when you run it. You've probably got a lot of unanswered questions, but at his stage, it would be a little odd if you didn't have - start worrying when you stop asking questions!