TABLE OF CONTENTS
Hardware and Software Requirements
Setup and Encoding
...1. DVDDecrypter
...2. Using Auto Gordian Knot
...3. The Log Window
...4. Burning To Disk
Useful Links
INTRODUCTION
Hello, and welcome to Auto Gordian Knot (from
here on known as AutoGK). We hope you'll enjoy using it, and that you'll learn
to back up your DVDs easily and with good quality, to be played in your DVD/MPEG4
player, or on your computer, or perhaps from your computer to your TV set through
a TV out on your graphics card.
Before getting started, there are some things
you should know. First and foremost is that the laws of different countries
vary when it comes to backing up your personally owned DVDs. But almost no countries
allow the backing up of borrowed or rented DVDs. So please familiarise yourself
with the laws of your own country regarding the backing up of DVDs. Once more
to make this perfectly clear; this guide will take you through the process of
backing up your personally owned DVD disks and it was not written to be used
for piracy. The author assumes that you own the DVD and that you will be using
the copy for your own personal use. It is illegal to even give away copies of
movies with copyrighted material. The author does not take any responsibility
for the illegal use of this guide or of AutoGK.
Enough of that unpleasantness. We'll keep this as simple
as possible, and assume that you've never done this before. Next we'll tackle
the hardware and software requirements.
HARDWARE REQUIREMENTS
You'll need a computer with either a DVD-ROM
or a DVD burner. CD-ROMs can't read DVDs. In addition, you'll need lots of hard
drive space, up to as much as 10 GBs per movie. This will vary, depending on
the total size of the VOB files (the files that make up the DVD), the number
of CDs you're going for, whether or not you're converting the audio to MP3,
and a few other things. But nothing is worse than spending all that time to
do the encoding, and then running out of space when the final .avi is being
written.
So, how powerful of a computer will you need?
As powerful as possible. It's possible to do this with a 500 MHZ processor,
but the total time involved may be as much as 24 hours, depending on a number
of factors. A 1 GHZ processor may take up to 12 hours. An Intel 2.4 GHZ processor
may take a total of 6-7 hours or so, and the fastest of today's processors may
take 4-5 hours. But there are other variables involved, including the length
of the movie, the resolution at which you're encoding, how your system is set
up, so these are by no means hard and fast rules. In addition, the quality and
amount of RAM is an important factor. Make sure that your computer is as stable
as possible. Overclockers, especially, should be aware of this. The fact that
you can play Counter-Strike all day with no problems means nothing when it comes
to video encoding. There is very little that you can do on a computer that stresses
it as much as video encoding. One sign of an unstable computer is if the audio
or video encoding causes the computer to crash at random places; that is, at
different places during subsequent attempts. These crashes may take the form
of a complete freeze up, a blue screen, or a reboot. The cause is often heat
buildup, but it may also be brought about by CPU or memory problems, or something
more obscure. These problems don't just happen to those people that build their
own computers. Many "store-bought" computers may also have these problems.
It's not really our responsibility to diagnose and fix computer hardware instabilities.
If you suspect CPU problems, you might run Prime95 to test the CPU. If you suspect
memory problems, then you might run MemTest86 to test the memory. If you suspect
overheating, then take the case cover off of your computer and run a table fan
blowing towards the CPU while encoding. If you can get through the encoding
when doing that, but couldn't before, then heat buildup is probably the problem.
The solutions might include checking to see if the CPU is seated properly, putting
on some fresh heatsink paste, installing more fans, or, if overclocked, turning
down the OC or the RAM settings. Both Intel and AMD processors work well for
video encoding. Apple computers can't be used with AutoGK. In sum, use the fastest
CPU that you can afford, have high quality memory, and lots of it. Lockups and
crashes, if they occur, are almost certainly the fault of your computer. AutoGK
and the programs it uses have been tested thoroughly and used, in many cases
for years, by many thousands of people. These warnings aren't meant to scare
you away from video encoding, but just so you'll understand if something does
happen. The chances are excellent that you'll sail through this.
A note for those with standalone DVD/MPEG4 players
with ESS chipsets: they don't work with the matrices that AutoGK uses (you don't
have to understand what a matrix is, just follow the instructions). In the AutoGK
installer is an option to turn on support for ESS chipsets. Please choose that
option. Perhaps the problem will be fixed with a firmware upgrade, and perhaps
not. But you won't be loosing anything, or getting a movie inferior in any way
by choosing that option.
A note on Hyperthreading: evidently the new P4
processors with Hyperthreading enabled don't work with AutoGK. At the moment
we don't know why. Until we can get the issue sorted out, you'll have to set
AutoGK to Windows 98 Compatibility Mode in order to use your nice new Intel
CPU with Hyperthreading enabled.
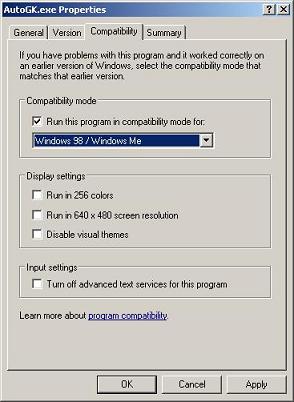 If
you have a P4 Hyperthreaded CPU, go find the AutoGK.exe and right click on it.
If
you have a P4 Hyperthreaded CPU, go find the AutoGK.exe and right click on it.
Go to the Compatibility Tab, and check the "Run this program in compatibility
mode
for:" box. I think that Win98 Mode should work OK. Hit "Apply"
in the lower right,
and that should be all there is to it.
SOFTWARE REQUIREMENTS
AutoGK comes with almost all that you'll need
to create excellent quality backups of your DVDs. One program it doesn't come
with is DVDDecrypter. This program puts the VOB files onto your hard drive,
and in the process breaks the encryption and Macrovision protection which DVDs
have, and which is illegal to disable in many countries. You'll have to get
it and install it yourself (link at the bottom of this page). Iif you choose
to use the DivX 5.1.1 Codec, you'll have to get and install that as well (link
at bottom). But the AutoGK Installer will install everything else that you need.
Just designate a folder for the installation, and everything will be taken care
of. Optional programs include the XviD Coder/Decoder, AviSynth, and VobSub.
If you already have the most recent versions of them, then you don't need to
install them again. If you don't already have them, aren't sure if you have
them, or have no idea what they are, then go ahead and install them. You'll
need them for your encoding. Note: as this is being written, a number of XviD
1.0 Betas have been released. Since AutoGK doesn't yet support them, you'll
have to install the older version included with AutoGK. You can expect AutoGK
to support XviD 1.0 final soon after it is released. Now comes the fun part.
SETUP AND ENCODING
1. Start DVDDecrypter,
and if using it for the first time, there are 2 things you must do. First, at
the top, set the Mode to IFO. Then, in Tools->Settings->IFO Mode->Create
Additional Files, make sure that Stream Information is checked, and also "Include
PGC and Angle Number". These settings will be remembered for later uses,
so you only have to set them once. Over on the right side of DVDDecrypter, you'll
see that the main movie has been chosen. It always chooses the longest PGC (Program
Chain). Ordinarily this will be what you want. If there are a number of episodes
or shows on the DVD, it'll choose the longest one. Look around in there and
you'll see the others (they're usually of a similar length). Then choose a Destination
folder, and start the decryption process. This may take anywhere from 10 minutes
to half an hour for a full length movie, depending on the read speed of your
DVD-ROM mostly. To insure that you get the fastest speeds, make sure you're
in DMA Mode, and not PIO Mode (if your computer supports DMA Mode). To check
this, in Windows XP, go Start->Settings->Control Panel->System->Device
Manager->IDE ATI/ATAPI Controllers->Secondary IDE Channel (if that's where
your DVD-ROM is located)->Advanced Settings->DMA if available. When done,
you'll have the VOB files, the Stream Information file, and the IFO.
 Here's
where you set DVDDecrypter to IFO Mode. Make sure that you're using DVDDecrypter,
and ONLY DVDDecrypter. Auto GK doesn't work with SmartRipper or any of the other
ripping software.
Here's
where you set DVDDecrypter to IFO Mode. Make sure that you're using DVDDecrypter,
and ONLY DVDDecrypter. Auto GK doesn't work with SmartRipper or any of the other
ripping software.
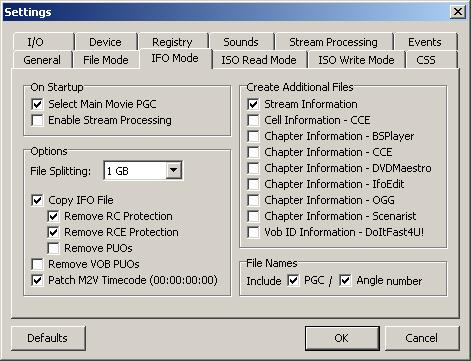 Make
sure that Stream Information is checked. At the bottom, be sure to check the
PGC and Angle number boxes. You can leave the rest alone.
Make
sure that Stream Information is checked. At the bottom, be sure to check the
PGC and Angle number boxes. You can leave the rest alone.
 This
is how most movies will look in DVDDecrypter. Nothing unusual here. The longest
PGC is selected by default. You choose the Destination folder by clicking on
the little Folder Icon (I'll set one up in advance), make sure you have enough
hard drive space,and hit the DVD disk picture to start the decryption process.
The other VTS/PGCs may contain such things as the Menu Screens, the FBI Warning,
Trailers, Music Videos, Making Of Documentaries, Deleted Scenes, etc..
This
is how most movies will look in DVDDecrypter. Nothing unusual here. The longest
PGC is selected by default. You choose the Destination folder by clicking on
the little Folder Icon (I'll set one up in advance), make sure you have enough
hard drive space,and hit the DVD disk picture to start the decryption process.
The other VTS/PGCs may contain such things as the Menu Screens, the FBI Warning,
Trailers, Music Videos, Making Of Documentaries, Deleted Scenes, etc..
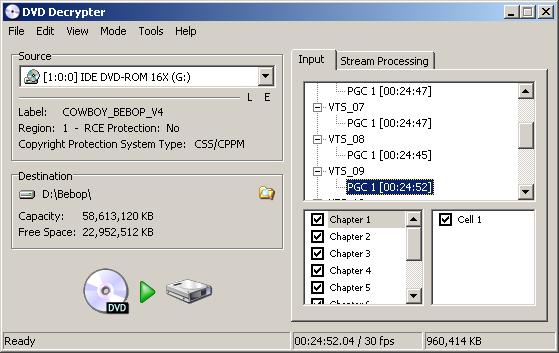 Here's
an anime DVD with 4 different Episodes in 4 PGCs. The longest one is chosen
by default, but you will want to open the other VTS's to track down the other
Episodes (as shown here), and perhaps decrypt them in a different order. You
should set up a different folder for each Episode.
Here's
an anime DVD with 4 different Episodes in 4 PGCs. The longest one is chosen
by default, but you will want to open the other VTS's to track down the other
Episodes (as shown here), and perhaps decrypt them in a different order. You
should set up a different folder for each Episode.
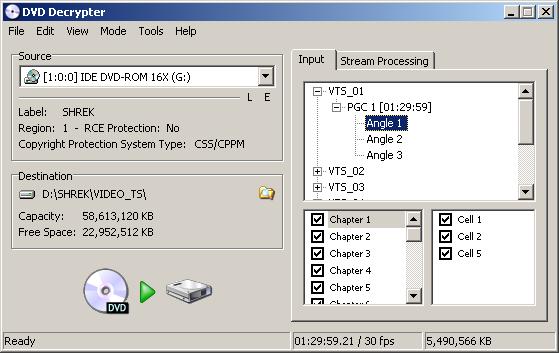 Here's
a DVD with Multiple Angles. The different angles may contain different things,
but for Disney/Miramax, the movie is exactly the same, but the Credits are in
different languages. In the case of Region 1 DVDs, the first angle is the English
version, but if you open the Stream Processing Tab (see the next pic), you'll
see what the other ones are.
Here's
a DVD with Multiple Angles. The different angles may contain different things,
but for Disney/Miramax, the movie is exactly the same, but the Credits are in
different languages. In the case of Region 1 DVDs, the first angle is the English
version, but if you open the Stream Processing Tab (see the next pic), you'll
see what the other ones are.
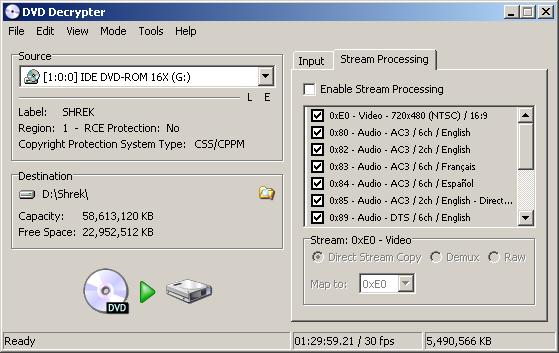 Here
are the Audio Streams available for the previous movie. There are 4 different
English Audio Streams, including the DTS track, which we can't use. And there
are also French and Spanish Audio Tracks. Further down (which we can't see)
are the English, French, and Spanish Subtitle Streams. Don't enable Stream Processing.
We'll take care of getting the Audio and Subs elsewhere. This is just to show
what's on the DVD. This information will also show up in the Stream Information.txt
file that DVDDecrypter will put on your hard drive. To repeat again; do NOT
enable Stream Processing, and do NOT extract the Audio or Subtitles that you
want. If you do this, because of the way that AutoGK works, you will wind up
with neither.
Here
are the Audio Streams available for the previous movie. There are 4 different
English Audio Streams, including the DTS track, which we can't use. And there
are also French and Spanish Audio Tracks. Further down (which we can't see)
are the English, French, and Spanish Subtitle Streams. Don't enable Stream Processing.
We'll take care of getting the Audio and Subs elsewhere. This is just to show
what's on the DVD. This information will also show up in the Stream Information.txt
file that DVDDecrypter will put on your hard drive. To repeat again; do NOT
enable Stream Processing, and do NOT extract the Audio or Subtitles that you
want. If you do this, because of the way that AutoGK works, you will wind up
with neither.
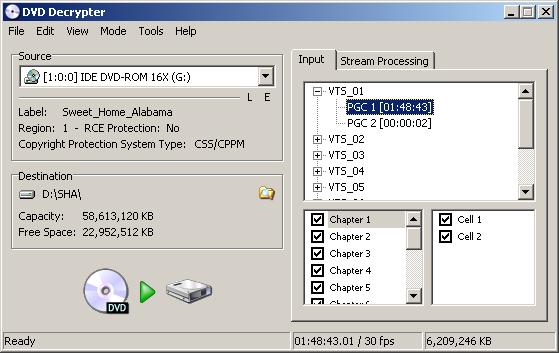
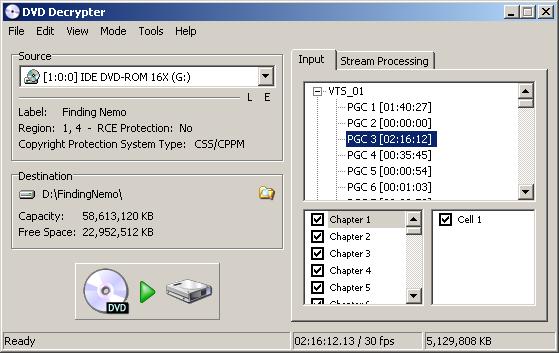 Here's
an unusual one. It's from the Region 1 Finding Nemo DVD. DVDDecrypter selected
the longest PGC as it always does. But this PGC has not only the movie, but
also includes places where the movie is halted from time to time to show some
video commentary by various people, and explanations of how various scenes were
created. In this example, the main movie alone is in PGC 1, and if you want
that one, highlight it instead.
Here's
an unusual one. It's from the Region 1 Finding Nemo DVD. DVDDecrypter selected
the longest PGC as it always does. But this PGC has not only the movie, but
also includes places where the movie is halted from time to time to show some
video commentary by various people, and explanations of how various scenes were
created. In this example, the main movie alone is in PGC 1, and if you want
that one, highlight it instead.
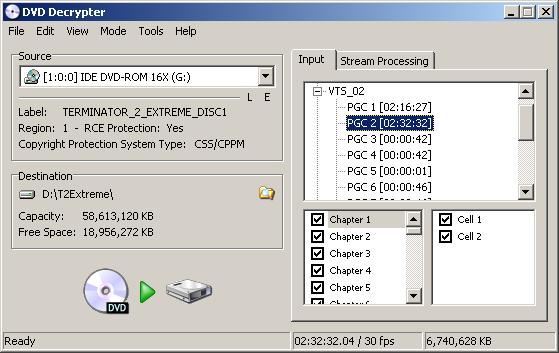 In cases where there are both the Director's Cut or Special
Edition, with extra footage , and the Theatrical Edition on the same DVD (as
in this example), then the longer Director's Cut will be chosen. In this case
you'll probably want to stick with the longer and default PGC. If not, then
just click on PGC 1 to get the shorter, original Theatrical Edition of the movie.
But don't hesitate to look around inside the various VTS's to get an idea of
what they contain. The back of the DVD Case, or the insert, may also have information
that will help.
In cases where there are both the Director's Cut or Special
Edition, with extra footage , and the Theatrical Edition on the same DVD (as
in this example), then the longer Director's Cut will be chosen. In this case
you'll probably want to stick with the longer and default PGC. If not, then
just click on PGC 1 to get the shorter, original Theatrical Edition of the movie.
But don't hesitate to look around inside the various VTS's to get an idea of
what they contain. The back of the DVD Case, or the insert, may also have information
that will help.
2. The AutoGK screen.
After decrypting the DVD to your hard drive, open AutoGK and select the Input
Directory where you just ripped the VOB files. Select the Output File where
you want the intermediate files and final .avi to go. It's usually the same
as the Input file. For the Audio track, select the one you want. Frequently,
you'll have audio tracks in different languages on the DVD. There may also be
a 6 channel AC3 (Dolby Digital 5.1), a 2 channel AC3 (DD 2.0), for older, classic
films a 1 channel AC3 (DD 1.0) and/or a Director's Commentary track. AutoGK
can't handle DTS tracks, so ignore that if there is one. If you plan on using
MP3 audio, it might be better to choose the 2 track DD 2.0 if there is one.
If you're going for 2 CDs and want the best quality audio, then choose the 6
track DD 5.1 if available. If you want subtitles with your .avi, then choose
one of the available languages. These will be "burnt in" by default,
unless you choose external subtitles in the Advanced Settings. That is, they'll
be encoded onto the video. About the Output size; the default is for 2 CDs and
the AC3 audio (DD 5.1, or 2.0 if no 5.1 is available). If you want to try and
put the movie onto 1 CD (with lower resolution and therefore somewhat lower
quality), then choose 1 CD, and MP3 audio will be chosen by default. Some movies
are long and/or difficult to compress. So (rarely) you may wish to go for 3
CDs. Be warned though; it's sometimes not possible to fill 3 CDs, even at the
highest quality and resolution.
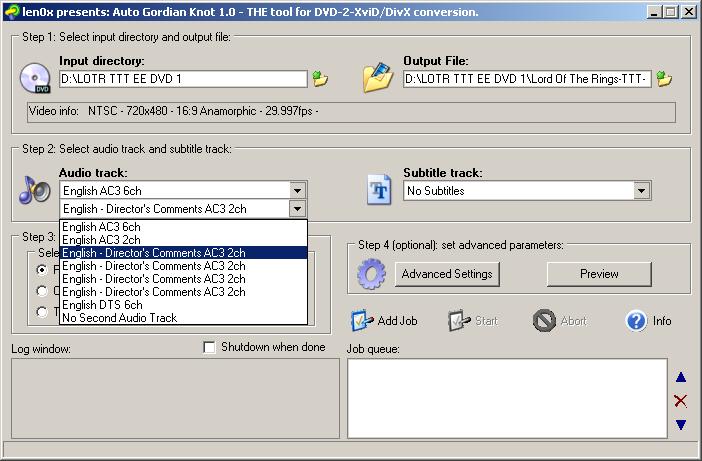 Step
1: Choose the Input directory and Output file name. You can write them just
about anyway you want, unless you are choosing External Subtitles (explained
later). In that case, you'll have to name them both with no spaces between them.
So for this example, you might choose to name them as LOTR_TTT_EE_DVD_1.
Step
1: Choose the Input directory and Output file name. You can write them just
about anyway you want, unless you are choosing External Subtitles (explained
later). In that case, you'll have to name them both with no spaces between them.
So for this example, you might choose to name them as LOTR_TTT_EE_DVD_1.
Step 2: Again, when going for 2 or 3 CDs, the first Audio track is chosen, but
feel free to choose another of the AC3 audio tracks, and it will be included
unchanged (not converted to MP3) with the video. Pressing Ctrl followed by F10
will bring up the option of adding a second audio track. This might be the Director's
Commentary, or a second language. In this example I've chosen to include one
of the Director's Commentary tracks. This second audio track will be encoded
as ABR MP3 at 128 KBps. In the Advanced
Settings, if you elect to change from the AC3 audio on the main screen (choose
to have it encoded as MP3), and you also have a second audio track, then that
second audio track will have the same MP3 settings as the first audio track.
If you are making a 1 CD backup of the DVD, then by default the audio will be
encoded as ABR MP3 at 128 KBps.
If you want burnt in subtitles, then choose your subtitle track. The default
setting is for burned in or subtitles embedded into the video. If you would
prefer to have external subs, then check that box in Advanced Settings.
 Step
3: Here we see the Output Size Box. The default is for 2 CDs. If you have a
TV series, or anime episodes, or some such, on the DVD, you may want to choose
to use 1/4, 1/3 or 1/2 CD for each. Although the default is for a 2 CD rip,
you may want to put the movie onto 1 CD or 3 CDs. If you plan to put your movie
onto a DVD-R, then you might want to choose the 2 GB option. If you want to
have the very best quality, at 720 Horizontal Resolution without regard to size,
then you can choose Maximum Quality. If you make a 2 or 3 CD rip, then it will
also be split into 700 MB pieces for you. 2 GB and Maximum Quality rips won't
be split.
Step
3: Here we see the Output Size Box. The default is for 2 CDs. If you have a
TV series, or anime episodes, or some such, on the DVD, you may want to choose
to use 1/4, 1/3 or 1/2 CD for each. Although the default is for a 2 CD rip,
you may want to put the movie onto 1 CD or 3 CDs. If you plan to put your movie
onto a DVD-R, then you might want to choose the 2 GB option. If you want to
have the very best quality, at 720 Horizontal Resolution without regard to size,
then you can choose Maximum Quality. If you make a 2 or 3 CD rip, then it will
also be split into 700 MB pieces for you. 2 GB and Maximum Quality rips won't
be split.
Step 4: I'll get to the Advanced Settings
and the Preview shortly.
When all done, hit the Add Job button. If you're doing only this one movie,
then hit Start next, and AutoGK will begin to go to work. If you want to encode
more than one job (movie or episode) during this encoding session, then go back
and start the process over again. Then when all done, hit Start, and the movies/episodes
will be encoded one after the other. If you have more than one movie to be encoded,
it's also possible to rearrange their order in the queue, or to delete one or
more entirely.
 Step
3 (continued): There are other Output Size options besides the Predefined Size
options. Maybe you have CDs of a different size than the standard 700 MB ones.
Maybe you're going to keep the movie on the hard drive. In such cases you might
want to choose a Custom Size. So tick Custom Size, and either fill in or use
the up/down arrows to select a Custom Size.
A Custom Size won't be split.
Step
3 (continued): There are other Output Size options besides the Predefined Size
options. Maybe you have CDs of a different size than the standard 700 MB ones.
Maybe you're going to keep the movie on the hard drive. In such cases you might
want to choose a Custom Size. So tick Custom Size, and either fill in or use
the up/down arrows to select a Custom Size.
A Custom Size won't be split.
Another Output Size possibility is Target Quality (in Percentage).
If, for example, you keep your movies on your hard drive, or run an HTPC, or
plan to burn them to DVD-R and not to CD-R, then the final file size may not
be important to you. A Quality encode will give you even quality throughout
the movie at your designated percentage. The default is 75%, which will give
you very good quality. Good quality percentages begin at about 67% (Quantizer
3). I don't think there's much point in going above about 80% because then you'll
lose some of the benefits of MPEG4's compression abilities. That's up to you,
though. But remember, if you use a Percentage output, you'll lose control over
file size. A Quality Percentage rip won't be split. The horizontal width will
always be 704, unless you set a fixed width in the Advanced Settings.
Step 2 (continued): Let's go into more detail about Subtitles.
As mentioned before, the default is for burned in, or hard coded or embedded
subs. You can only have one language of subs at the
default setting. If you prefer to have external or separate subs to be displayed
through DirectVobSub, then tick that box in Advanced Settings (see the pic just
below). At the moment, External Subtitles cannot be displayed by standalone
DVD/MPEG4 players, although that's in the process of changing. After selectimg
External Subs, it's then possible to have subtitles in 2 languages. Select External
Subtitles in Advanced Settings, press Ctrl and F10, and the option to choose
another language of subs will present itself back on the main screen.
Another Subtitle Option in the Advanced Settings
is Forced Subs. Ticking that
box does NOT force AutoGK to put the subs into the movie. It's for a special
class of subtitles that you'll want, even if you don't want the regular subtitles
in your language. Examples of Forced Subs may include the Elvish spoken in the
LOTR movies, the Alien languages of the Star Wars movies, the Spanish spoken
in Traffic, or sometimes signs in a different language. Forced Subtitles can
be real tricky to find. Sometimes (usually) they are part of the main subtitle
stream. In such cases, tick the Subtitle Stream in your language on the main
screen, and then check "Display only Forced Subtitles" in Advanced
Settings. Sometimes they have their own separate Sub Stream. So, you will choose
a different Subtitle Stream on the main screen, and then do NOT choose Forced
Subs in the Advanced Settings. Sometimes Subtitle Streams, regular or forced
subs, are mislabelled and will be in a different language than what it says.
The best advice that I can give is to run the Preview before doing the encoding
to make sure that you have the right subs. There's nothing worse than spending
all the time to encode the movie, and then finding out that you have to do it
all over again because the subs don't show up. When looking for Forced Subs,
try different combinations of languages on the main screen plus Forced Subs
in Advanced Settings, or languages on the main screen only. Yeah, I know it's
difficult and time consuming. But there aren't many movies with Forced Subs.
3. Advanced Settings. If this is one of your first tries at this, then
you will get an excellent quality backup using the defaults. Once you're feeling
a bit more confident, you might want to venture into the Advanced Settings.
:-) The Resolution settings will allow you to set a horizontal resolution or
a minimum horizontal resolution. Ordinarily the default Auto width is fine.
But if you want to set it yourself, then that choice is available. But, although
AutoGK can make certain adjustments if the quality won't be good for your chosen
horizontal resolution and file size, it's very possible that the quality will
suffer if you choose a high resolution and go for 1 CD. The chances of this
happening are less if you choose a Minimum width, but it can still happen. With
time you'll learn the relative compressibility of different movies, but if you
change from the default Auto width, you might pay attention to the Compression
Test results when they show up in the Log Window. Ordinarily you'll want a result
of between 60-80%, and if you get below 50% or so, the quality will suffer noticeably.
In that case you may wish to abort the process and start over with a different
Horizontal width, or use an extra CD.
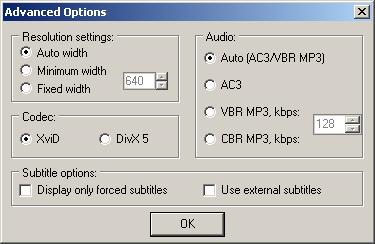 Here's
the Advanced Options screen. Auto Width is usually the best choice. Auto Audio
will give you MP3 at 128 ABR (Average Bit Rate, a kind of VBR or Variable Bit
Rate) for one CD, unless you change it to higher or lower quality (lower is
not recommended). A two or three CD movie will automatically get the best quality
AC3 (Dolby Digital) 5.1 or 2.0, depending on what's on the DVD. All of the default
choices can be overridden, but make sure you know what you're doing if you do
override them. It is, for example, almost impossible to get good video quality
for a one CD rip, if you've chosen AC3 Audio, because the AC3 takes up so much
room. And if your movie is long, and difficult to compress, even when doing
a 2 CD rip, you may want to choose MP3 Audio, rather than the default AC3.
Here's
the Advanced Options screen. Auto Width is usually the best choice. Auto Audio
will give you MP3 at 128 ABR (Average Bit Rate, a kind of VBR or Variable Bit
Rate) for one CD, unless you change it to higher or lower quality (lower is
not recommended). A two or three CD movie will automatically get the best quality
AC3 (Dolby Digital) 5.1 or 2.0, depending on what's on the DVD. All of the default
choices can be overridden, but make sure you know what you're doing if you do
override them. It is, for example, almost impossible to get good video quality
for a one CD rip, if you've chosen AC3 Audio, because the AC3 takes up so much
room. And if your movie is long, and difficult to compress, even when doing
a 2 CD rip, you may want to choose MP3 Audio, rather than the default AC3.
Next is the Codec choice. You have 2 choices,
with XviD being the default. There's a link to Doom9's Codec Shootout (comparison)
at the bottom of the page, which may or may not help you to decide which to
use. XviD is included with the main AutoGK Install package. You'll have to get
DivX 5.1.1 from the DivX.com website (link at bottom). If you have one of the
newer XviD 1.0 versions installed, please get an earlier version , such as Koepi's
6/24/03 (included with Auto GK), since AutoGK will not support XviD 1.0 until
it stabilizes and the 1.0 final has been released. If you're still not sure
which to use, if it's any help to you, both the developer of AutoGK and the
writer of this guide prefer XviD. Both will give good quality results. Both
DivX 5.11 and XviD movies will play well on standalone DVD/MPEG4 players. For
those of you with an ESS chipset based DVD/MPEG4 player, there's a note earlier
in the guide, in the Hardware Requirements section, about a special installation
procedure for you.
Important: The Advanced Settings
will remain after you close and reopen AutoGK, in case you always make your
movies with the same Custom Settings. If you use the Custom Settings for one
movie, but then intend to do the next one with the Defaults on the main screen
(which are reset every time), DO NOT FORGET to also reset the Custom Settings
to Auto. You may be unpleasantly surprised , if you next wanted to make a high
resolution .avi, to have it come out with a lower resolution because of a setting
from a previous movie.
4. Preview. This
will take a few minutes to set up (7-15 maybe, for a full movie, and a few minutes
longer if you want subtitles). It has to create a project file using DVD2AVI,
and maybe Subtitles using VobSub. It will then play the movie. This isn't really
a necessary step, unless you just want to see what it does, or check to see
if the Subtitles are displaying correctly. If you are testing out different
Sub choices, the indexing happens only once, and after that it's quick and easy
to switch Subs.
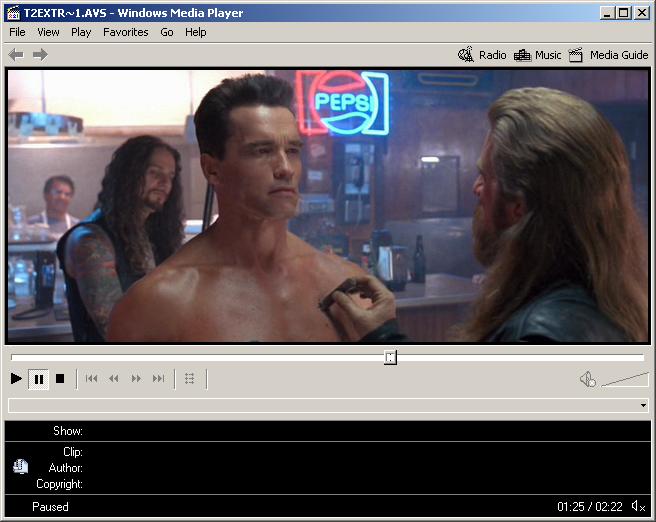 The
Preview will play the cropped and resized movie at 640*xxx resolution (in the
example on the left, 640x272) in WMP 6.4 for you. It should look fairly similar
to the way your completed .avi (encoded movie) will appear. If you keep the
default Auto Width, the Horizontal Resolution may or may not be different from
what the Preview displays. You can scroll around and have a look, and even play
it Full Screen. If you have elected to include subtitles, it will also display
them, but it won't play any audio.
The
Preview will play the cropped and resized movie at 640*xxx resolution (in the
example on the left, 640x272) in WMP 6.4 for you. It should look fairly similar
to the way your completed .avi (encoded movie) will appear. If you keep the
default Auto Width, the Horizontal Resolution may or may not be different from
what the Preview displays. You can scroll around and have a look, and even play
it Full Screen. If you have elected to include subtitles, it will also display
them, but it won't play any audio.
It is recommended that if you are going to
have subtitles in your movie, that you test them with the Preview before encoding.
If you choose to display different Subtitle Streams with the Preview, the movie
won't be reindexed again, which will save some time. If you get the wrong Subs,
or particulary if you're hunting for Forced Subs, go back and try another one,
and so on, until you find what you're looking for. When choosing the default
burned in subs, and then testing them in the Preview, you'll see "double
subs". You can ignore that, and be sure that the subs will be embedded
in the movie correctly.
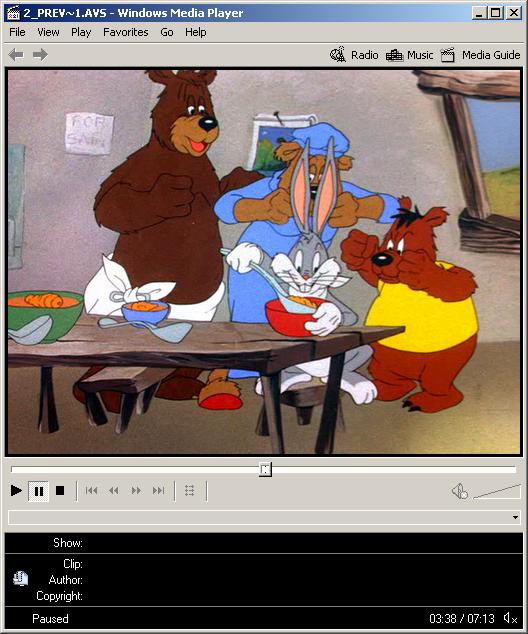 If
you have defined a Horizontal Resolution, then it will be played at that Resolution
(512x384 for the one on the left). The movie above is Wide Screen, and the one
on the left is Full Screen. The movie above will play on a monitor or standard
sized 4:3 Television with black bars added above and below. It will play on
a Wide Screen 16:9 Television with less black bars above and below. The cartoon
on the left will fill the screen on a computer monitor or standard 4:3 Television
set, but is meant to play on a Wide Screen 16:9 Television with black bars on
the left and right sides.
If
you have defined a Horizontal Resolution, then it will be played at that Resolution
(512x384 for the one on the left). The movie above is Wide Screen, and the one
on the left is Full Screen. The movie above will play on a monitor or standard
sized 4:3 Television with black bars added above and below. It will play on
a Wide Screen 16:9 Television with less black bars above and below. The cartoon
on the left will fill the screen on a computer monitor or standard 4:3 Television
set, but is meant to play on a Wide Screen 16:9 Television with black bars on
the left and right sides.
5. Encoding. Once you're all set up, just hit the Start button and
wait. With slower computers it's a long process, and you may want to set it
up to work overnight or while you're at work. Again, if you want the computer
to shut down automatically when done, check the box. Hitting the Abort Button
will cause the program to ask if you really want to halt the process, and then
aborts the rest of the job. But if you do so, you'll have to start all over
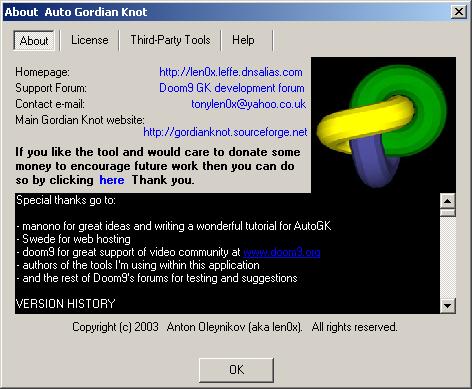
again later (except for the decrypting step). Inside the About button are useful
links, including one to this Guide, a way to donate to the creator of AutoGK,
a way to send him a message to thank him for the good work, and some other information.
 Nothing
to note here.
Nothing
to note here.
6. The Log Window
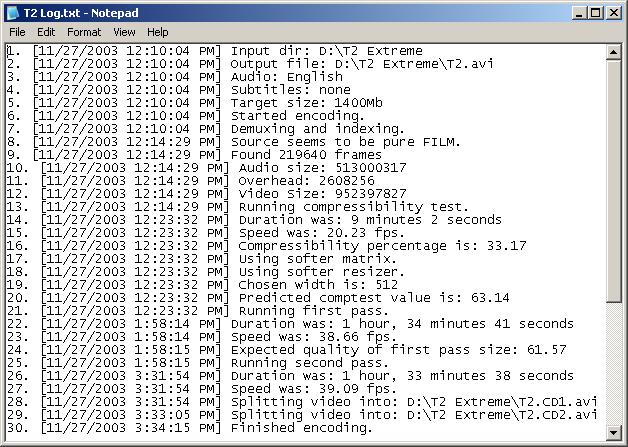 As
AutoGK goes about its work, lines are added in the Log Window. These same lines
are added to the MovieName_gk.log. But there's a lot of other information in
the log file that doesn't interest us, so I've saved the contents
of a Log Window and numbered them for reference. Let's go through it to try
and understand what the different lines mean.
As
AutoGK goes about its work, lines are added in the Log Window. These same lines
are added to the MovieName_gk.log. But there's a lot of other information in
the log file that doesn't interest us, so I've saved the contents
of a Log Window and numbered them for reference. Let's go through it to try
and understand what the different lines mean.
If you are new to video encoding, there will
be some lines that may not make much sense to you. But that's OK. Trust AutoGK
to know what it's doing. ;) There are links at the bottom if you want to read
up and understand better what's going on.
1.
and 2. The first two lines show where you've
set the Input and Output directories. The movie is Terminator 2 Extreme. At
153 minutes, it's quite long. And the DD 5.1 Audio that I want is nearly 500
MB in size. I'm going to see if I can make a good backup on 2 CDs. I'll keep
everything at default. I've already decrypted the DVD VOB files to the hard
drive. They total about 6.25 GB. Together with the Audio (489 MB), the Comptest
video (152 MB), the Muxed .avi (1.38 GB), the Split .avi (699 MB each), as well
as a few other files, this means that for this movie, I need over 9 GB of hard
drive space. There aren't too many movies that will require more space than
this one.
3., 4., and 5. Here we see the other settings I've made. Actually,
I didn't do anything with this one, as they're all the default settings.
6. AutoGK begins.
7. Demuxing is short for Demultiplexing, or separating the
audio from the video. This will give me the AC3 DD 5.1 Audio track and is done
using DVD2AVI. Indexing refers to the creation of a Project File using DVD2AVI,
which together with AviSynth, will feed the frames into the encoder as they
are needed.
8. AutoGK will run a number of tests to determine what's on
the DVD and how to treat it. This is a particularly easy case, and not much
has to be done to determine that it's been encoded as Progressive. Most movies
from the major studios are equally easy. In other cases you may see it run one
or 2 additional tests on PAL or NTSC material to determine if it's Interlaced,
can be IVTC'd, is Hybrid, has the common PAL Field Shifted problem, etc. Ordinarily
you'd have to figure these things out for yourself, but AutoGK saves you from
having to do that. If none of this means much to you, and you wish to learn
more about the subject, then please see the Doom9 IVTC Tutorial linked at the
bottom of the page.
9. The total number of frames in the movie.
10. The size of the audio. To get it in MB, divide by 1024
twice. I'm using the AC3, so no transcoding to MP3 took place.
11. Overhead is the amount of data required to interleave the
audio back into the video when done.
12. This is the amount of space we have leftover on the 2 CDs
for the video, after accounting for the Audio and the Overhead.
13. A Compression test encodes 5% of the movie (15 frames of
every 300 frames, so it samples the entire movie) to get an idea of how well
it will compress, and to give us an idea if the default parameters (resolution
and file size mainly) will give us a good quality movie. The Compress Test is
run at a Horizontal Resolution of 640.
14. and 15., 22. and 23., and 26. and 27. After each encoding
stage AutoGK will report the time it took and the frames per second you achieved.
This can be useful for benchmarking your computer. But the times may differ
significantly between different movies, for a number of reasons. So if you want,
for example, to compare your encoding speeds with those of a friend, make sure
you're comparing the same movie done with the same settings.
16. Oops! Only 33.17%. If 100% is perfect quality, we're aiming
for 60-75%. Below 50-55% the quality will suffer noticeably. AutoGK will try
and help by adjusting some things.
17. A Matrix
will help define the detail or sharpness of the image. We start with a sharp,
but less compressible Matrix, but because the result of the Compress Test was
so bad, it switches to a softer Matrix.
18. The default resizer is a sharp one, and just as in the
previous line with the Matrix being changed to aid the compressibility, so this
line tells us that a softer Resizer will be used.
19. And again, because the Compress Test results were so bad,
AutoGK changes from 640x272 to 512x208.
20. After making these changes, AutoGK calculates that the
quality has improved up to 63.14%. The initial Compress Test result is only
an approximation, but a good one to within +/- 5% or so. But by making the 3
changes of Matrix, Resizer, and Resolution, the errors may get compounded along
the way. So that 63.14% may be an even less accurate guess as to the quality
of the final movie.
21. Encoding is a 2 pass or 2 step process. The first pass
gathers the information needed to render the .avi during the second pass. The
main thing the first pass wants to know is the complexity of each frame, so
it can know how to distribute the available bits during the second pass. Complex
scenes will include crowd scenes, explosions, smoke and water scenes, brightly
lit scenes, or even just leaves blowing in the wind. When there is movement
across the entire screen, then that's a complex scene. T2 is full of complex
scenes, and that's one reason it's difficult to compress (that, and because
it's so long). An older film with lots of film grain or noise is also difficult
to compress. Even many modern films, where grain or noise is added purposely,
such as Saving Private Ryan, can be difficult to encode for that reason alone.
Movies with lots of static scenes of people talking, or with lots of dark scenes,
are much easier to compress, and can often be put on 1 CD with good results.
24. Now we get the true and accurate idea of the quality of
the final .avi. And in this example, 61.57% is pretty close to the predicted
value. AutoGK did a good job in adjusting the settings.
25. Now the second pass will write the final video.
28. and 29. The encoding has completed, and
the whole movie, complete with audio, is sitting on the hard drive. Now the
completed .avi is being split into the 2 CDs I asked for.
30. Done. So how does this 63.14% movie at 512x208 movie look.
Well, fine, sort of. It looks a bit soft or undefined. In closeups, the texture
of the faces isn't quite as clear or detailed as it might have been had a higher
resolution with a sharper Matrix and Resizer been used. You'll have to be the
judge of the level of quality you'll be satisfied with. There are a couple of
things you can do to improve the visual quality. One is to use the MP3 audio,
instead of the AC3. So you might go into the Advanced Settings before starting
and switch over to MP3. The AC3 took up 489 MB of the movie, but the MP3 takes
only 132 MB (I transcoded the audio to MP3 to find out). That 357 MB difference
could go towards improving the video quality by giving it a higher resolution.
Or you could keep the AC3 audio and go for a third CD and gain 700 MB. Since
the AC3 is so good for that movie, I decided to keep it and do it over again
for 3 CDs, and it looks great.
Burning To Disk
If you've never burned videos to CD-R, then pay
attention. Unless you use a Custom Size, when done, AutoGK will give you the
movie done for 1 CD (700 MB), 2 CDs (1400 MB) or 3 CDs (2100 MB) already split
and ready to put on CD-R. For that you'll need 700 MB or 80 minute CD-Rs. If
you have larger or smaller sized blank CD-Rs, then you'll probably want to use
a Custom Size, and you may have to split them yourself, since AutoGK doesn't
split Custom Sized movies. If you've only burned music CDs before, then there
are some different things you'll have to learn. Avi's are Data and not Audio.
So you'll have to set your program for that. If you go by the size that Windows
Explorer shows, then you might think you've been handed an oversized .avi that
won't fit onto your blank CD-R. But if it says 717,000 KB in Windows, that's
really a 700 MB file. To convert KB to MB, divide by 1024. 717,000/1024=700.195
MB, and it'll fit just fine. There are many burning programs, and although many
people's computers come with Easy CD Creator, most people much prefer to use
Nero to burn movies (link at bottom). So we'll teach you to use Nero.
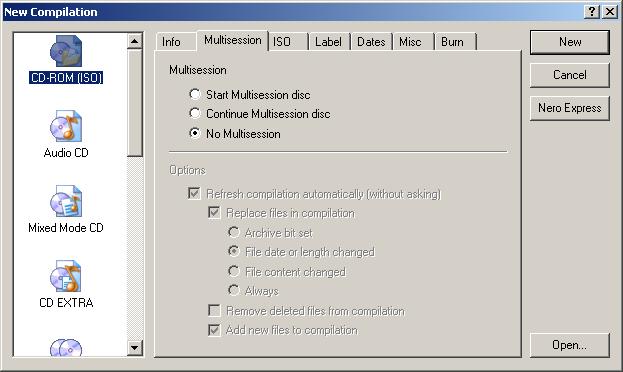 Here
in this first screen make sure that CD-ROM (ISO) on the left is highlighted.
Tick No Multisession, unless you want to add more videos later (like if you're
burning an episode, and intend to add one or two more later on). Over on the
right side, hit New.
Here
in this first screen make sure that CD-ROM (ISO) on the left is highlighted.
Tick No Multisession, unless you want to add more videos later (like if you're
burning an episode, and intend to add one or two more later on). Over on the
right side, hit New.
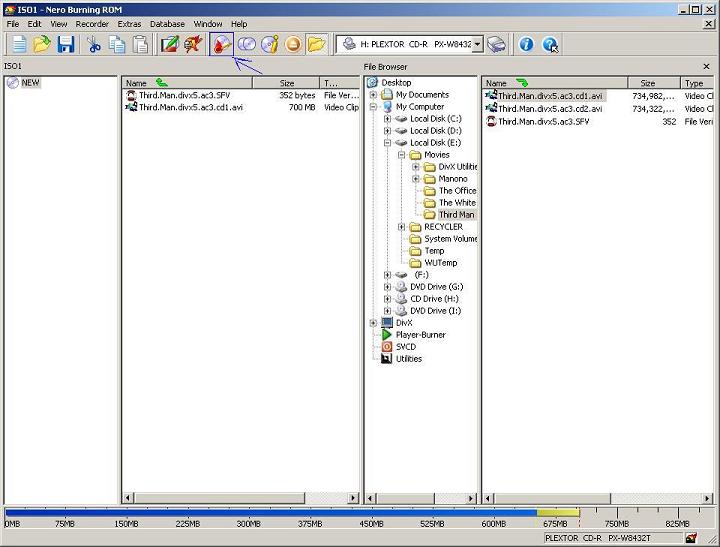 Then a new screen will pop up. Drag the movie from over on the
right side into the window on the left side. The arrow
is pointing to the picture of the CD with a lit match under it. Hit that button
to go to the next stage. Different versions of Nero have different pictures
for the next stage, but if you hold your mouse over it, it should say "Burns
the current compilation", or "Opens the CD Write dialog" or something
like that. The versions I've seen all have some fire in the picture.
Then a new screen will pop up. Drag the movie from over on the
right side into the window on the left side. The arrow
is pointing to the picture of the CD with a lit match under it. Hit that button
to go to the next stage. Different versions of Nero have different pictures
for the next stage, but if you hold your mouse over it, it should say "Burns
the current compilation", or "Opens the CD Write dialog" or something
like that. The versions I've seen all have some fire in the picture.
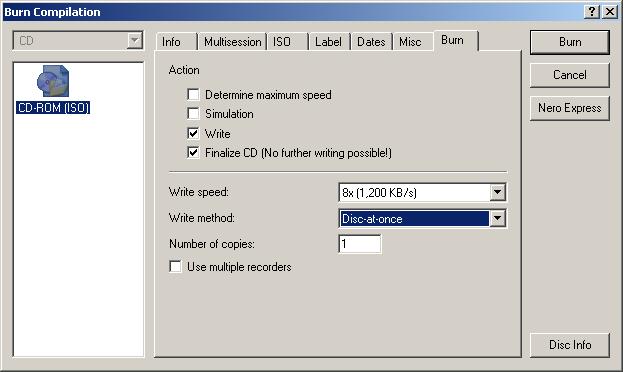 Unless
you're doing this for the first time and want to test your CD-RW before burning,
make sure that just Write and Finalize CD are checked. If you have a fast burner(48x
or 52x), you may wish to set it for 32x or 40x to insure a better burn. I have
had problems sometimes burning at max speed with my 48x burner. You can set
it to Disc-at-once , then hit Burn and wait a few minutes.
Unless
you're doing this for the first time and want to test your CD-RW before burning,
make sure that just Write and Finalize CD are checked. If you have a fast burner(48x
or 52x), you may wish to set it for 32x or 40x to insure a better burn. I have
had problems sometimes burning at max speed with my 48x burner. You can set
it to Disc-at-once , then hit Burn and wait a few minutes.
CONCLUSION
With any luck, after a while (maybe too long,
if you're anxious to see how your rip looks) you'll be able to see the results
of your efforts. You can play the movies on your computer, or pop the CDs into
your DVD/MPEG4 player and enjoy them. This way you can keep your prized DVDs
in mint condition, or keep the kids' grubby little paws off of them. :-) If
for some reason the audio and/or video doesn't play on your computer, or doesn't
play well, then go to the Links section below and get the filters you need.
You may find the whole process addictive and want to do more and more backups.
You may find yourself springing for the most powerful computer available, just
so you can get it done faster. You should be aware that not every DVD can be
backed up with good quality with this program. Sometimes the source DVDs aren't
very good. Garbage in/garbage out, as they say. Other movies, particularly older
ones, are grainy and very difficult to compress to 1, or even 2 CDs. With AutoGK
you don't have access to the full range of filters that may help compress them
better. Even more modern movies, such as Saving Private Ryan or The Abyss, are
notoriously difficult to compress. In addition, there are many badly mastered
DVDs out there which may give the program problems. But if you stick with DVDs
from the major studios, you should be OK. If you do wish to back up some of
the more difficult DVDs around, or just want more freedom to experiment and
tweak, then you might want to try the full, more configurable, but much more
complex, Gordian Knot program (link at bottom). AutoGK has purposely been kept
as simple as possible so that beginners can have success right from the start,
without the frustrations that go along with having to learn a number of complex
processes that accompany other programs, whether all-in-one front end solutions,
or the individual programs themselves. It's simple to use, but very powerful
under the hood, so to speak. It contains a number of programming breakthroughs
and innovations not found in any other program to date. In addition, if you
have any questions or problems, you can visit the Gordian Knot Development Forum
at www.doom9.org (link at bottom). But you'll have to wait 5 days from the time
you register until the time you can post a question. You can use that time to
good advantage, by reading the guides, browsing the forums, and exploring the
wealth of information available on that site. If you do have a question about
a particular encoding you did, be sure and save and post the log file (MovieName_gk.log)
along with your question. We hope you'll enjoy using Auto Gordian Knot. Thanks
for giving it a try. Best wishes, and happy encoding.
Acknowledgements go to TheWEF
for the countless man-hours he put into the development of the original Gordian
Knot. Also we thank len0x for continuing the work of TheWEF, keeping GordianKnot
the best all-in-one front end for .avi encoding, and for the development of
AutoGK. And last, but by no means least, we'd like to thank Doom9 for his wonderful
site, for his support of the continuing development of GKnot and AutoGK, and
for providing forums for their discussion and guides for their use.
Congratulations go out to Tuning
from the Doom9 Forums for coming up with the name of Auto Gordian Knot, and
for winning the "Name That Program" poll. It's a short, catchy and
accurate name that reflects what AutoGK does, and how it's different in concept
from the original Gordian Knot.
USEFUL LINKS
DVDDecrypter
http://www.dvddecrypter.com/
The Home Page for DVDDecrypter.
If you don't yet have it, you'll need it.
Downloads, Filters, And Codecs
http://www.divx.com/ DivX.Com site
where you can get the DivX Codec.
http://www.doom9.org/software.htm
I assume you can already play MP3. But if not,
then get the Audio Filters (in the Filters Section).
http://www.doom9.org/software.htm
If you can't play AC3 Audio, get the AC3 Filter. It's in the Filters-Show All
Filters Section. If the audio is too soft, go into Configuration and change
the Preset to Loud (lower left).
http://nic.dnsalias.com/XviD-Dec.exe
If your XviD movie doesn't play, or plays poorly, then get Nic's XviD Decoder.
http://www.doom9.org/software.htm If
you need to, get ffdshow, also in the Filters Section. This filter can play
XviD and many other types of .avi videos. It's highly configurable.
http://www.ahead.de/us/index.html
The Nero website. You can buy it, or download a demo version.
Auto Gordian Knot and Gordian Knot Links
http://gordianknot.sourceforge.net/
The main Gordian Knot and Auto Gordian Knot Web Site.
http://forum.doom9.org/forumdisplay.php?s=&forumid=70
To learn more about AutoGK, to get Beta updates, and to post questions about
them, please go to the Gordian Knot Development Forum.
http://forum.doom9.org/forumdisplay.php?s=&forumid=28
The Gordian Knot Forum. When AutoGK is complete, use this Forum to post questions
about it, as well as about Gordian Knot.
http://www.doom9.org/autogk.htm
The Doom9 AutoGK Guide. Mine is wordy. His is direct and to the point.
Doom9 Links
http://www.doom9.org/codecs-203-1.htm
Link to Doom9's most recent Codec Comparison.
http://www.doom9.org/ The best place
to learn about DVD Backups. It has Guides, Articles, Software Downloads, Forums,
and the Daily (or nearly Daily) News.
http://www.doom9.org/glossary.htm
A glossary of terms.
http://www.doom9.org/index.html?/dvd-basics.htm
DVD Basics for beginners. If you want to learn, you'll want to read
these articles.
http://www.doom9.org/ivtc-tut.htm
Want to learn about some of the intricacies of video encoding; things
that AutoGK spares you from having to learn? Here's one place.
Other DVD Links
http://www.dvddemystified.com/dvdfaq.html Want
to learn about all things DVD? Here's the Granddaddy of all DVD FAQs.
http://www.cs.tut.fi/~leopold/Ld/FilmToVideo/ How
Film Is Transferred to Video.
http://www.dvdweb.co.uk/information/anamorphic.htm
What does "Anamorphic 16:9" mean, and why is it better,
particularly now that the age of Widescreen HDTV has arrived?
http://www.widescreen.org/widescreen.shtml For
those of you that prefer Full Screen over Wide Screen, I hope this will convince
you otherwise.
Last updated on 2/22/2004, 5:34AM.
Duplication of content
without authors' authorization is prohibited. (c) manono & len0x. -= 2003-2004
=-