SMC Barricade 7004 ABR
Foreword:
This guide was written for the SMC Barricade 7004ABR
(eu) Firmware: V.1.40.02.
I assume that the
configuration is the same or similar in other SMC Router
Products.
This guide is usable for:
|
SMC Barricade 7004 ABR |
|
SMC Barricade 7004 VBR (Thx to Ulf for reporting
this) |
|
SMC Barricade 7004 BR (Thx to RenΘ for reporting
this) See the note in the 3.2
- Configuring of the
Ports |
If your router has
the same configuration, please contact me so that this guide can be updated.
This guide was written on a german OS, so the screen shots
show german words. Everything else should be the same.
This guide uses special formatted graphics, so that you can
move your mouse over them and see some hints about the
thing your cursor is on. The cursor has to rest approximately
1 sec until the hint pops up.
If you have any comments, additions
or questions concerning this guide, feel free to contact me. (If you want to in german)
|
Foreword
- Something you should read at first
Step
1. - Entering the Router configuration
Step
2. - How to find out your network IP
- 2.1a
- For Windows 2000
- 2.1b
- For Windows 9x and ME
Step
3. - Configure your Router to avoid
LowID
- 3.1
- Entering the Virtual Server configuration
- 3.2
- Configuring of the Ports
Misc.
- Some useful things to know
- M.1
- How to configure the router for two PCs
- M.2
- Help for users with a crashing router
The
end - Some troubleshooting and
Credits | |
Step 1. - Entering the Router
configuration
To enter the configuration of your
SMC Barricade 7004 ABR, you just have to navigate to your
routers IP with a browser.
The standard IP is set to 192.168.2.1, so the default
address you have to go to is http://192.168.2.1:88/.
There, a windows should appear that looks like
this:
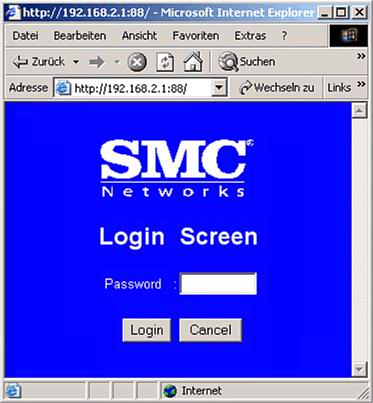
Enter your password into the Password-field and click
the [Login] button to enter the main menu of
your router configuration.
If you know your network IP, proceed with Step
3. - Configure your Router to avoid LowID.
If not,
continue with Step
2. - How to find out your network IP.
Step 2. - How to find out your network
IP
Finding out your IP is easy. Just open a DOS-shell when
you're connected to your router and run "ipconfig". Windows 2000:
Open your "Startmenu" and choose "run". In
the window that pops up, type "cmd" and click [OK]. A
DOS-shell will open. There you have to type "ipconfig"
and hit [enter]. You should now see something like
this:
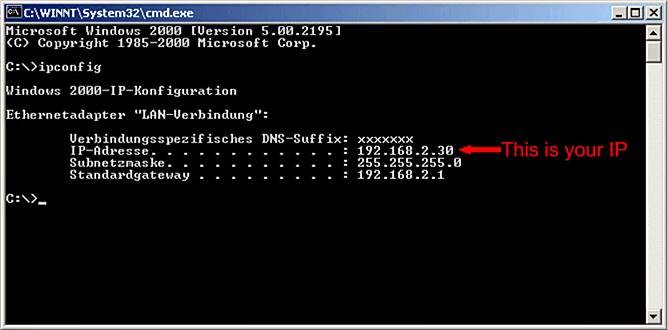
Write down your IP on a piece of paper. You'll need it
afterwards. Windows 9x and
ME:
Open your "Startmenu" and choose "run". In
the window that pops up, type "command" and click [OK].
A DOS-shell will open. There you have to type
"ipconfig" and hit [enter]. You should now see
something like this:
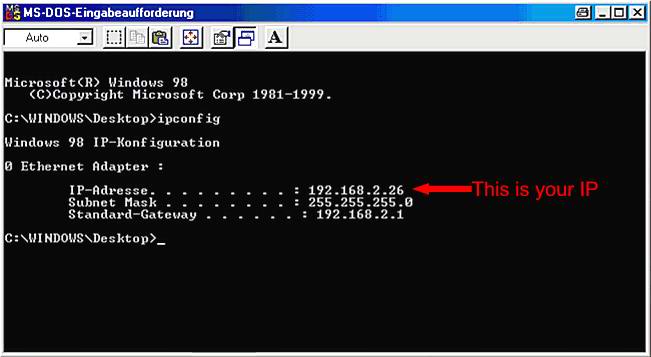
Write down your IP on a piece of paper. You'll need it
afterwards.
Step 3. - Configure your Router to avoid
LowID
Now, as you know your IP, you can go on to the configuration.
When you've followed the instructions of Step
1. you should now be in the main menu. Here you
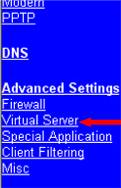
have to click on Setup.
On the left border of your
browser-window appears a list of links. Under the Advanced
Settings you have to click on Virtual Server. You're now in the Virtual Server
configuration. You should see something like this on your
screen (with empty fields):

To open and forward the needed ports you have to do the
following things:
- Insert the last part of your IP into the
according fields (the first one in the first 2 rows), so
that it's 'complete'.
- In the first row, insert your eMule Client port
(default: 4662) into the Public port and Private
port fields.
- In the second row, insert your eMule UDP-Port
(default: 4672) into the Public port and Private
port fields.
- In the second row, set the dot on UDP to make the
usage of the UDP-Protocol over this port possible.
At the end, it should look like the screen shot above.
If you have a SMC Barricade 7004 BR, you won't have
the same fields. In your configuration, the Network-IP
goes into "Server IP" and the Port into
"Service Port". Then you have to check the checkbox
called "Enable" to enable this port. You also wont
have the choice between TCP and UDP. That's
because the UDP-Ports aren't filtered, so you don't
have to set it to UDP, just forward your UDP-Port.
It should look like this:

Now you've only got to click on
this green [Enter] button (if you have a BR, it's grey
and called [save]) and then you may logout by clicking the
[logout] button on the left border.
Now start your eMule and connect to a server. When you are
connected go here, check if the number in the field
is the same as your client port and then click [test].
You should get a message like this: "success ... your id should be 1808631120 ".
If not, recheck if you inserted the right client port
and IP in the Virtual Server configuration and
that you are were connected with a server during the
test. If this doesn't help, you may contact me.
If everything works, you just configured your SMC
Barricade for eMule usage!
Misc. - Some useful things to know
M.1 - How to configure the router
for two PCs:
At first, I want to tell you, that using two eMules
over the same connection makes only sense if you
have an upload capacity higher than 20kb/sec because
the two eMules would have to share the upload capacity
and if an eMule can only give less than 10kb/sec
he only may download with your upload x 3.
If you have enough upload or you don't need much download,
here is a little guide for you how you can configure
your router for two eMules.:
If you want to avoid a LowID but use two eMules (either
on the same PC or on two different ones), you only have
to choose different ports for these two or more eMules.
For example:
|
PC 1 |
PC 2 |
| Client port: |
4662 |
3662 |
| UDP-Port: |
4672 |
3672 | Then you only have to
forward the different ports to the PC the eMule is running
on. In the example Port 4662 (TCP) and Port 4672 (UDP)
have to be forwarded to the IP of PC 1, while Port 3662 (TCP)
and Port 3672 (UDP) have to be forwarded to the IP of PC
2.
It's exactly the same as explained in the guide, you
just have to do it twice with different ports and IPs.
If you want to use two eMules on ONE PC, you have to forward
all 4 Ports to the IP of this PC (and don't forget to
use two different temporary folders!)
M.2 - Help for users with a crashing
router:
I received some mails that users have problems with
a crashing router. So I'll explain what you can do to
avoid the router crashing
| 1. |
Your router crashes because he is unable to
handle so many connections. |
|
First, I would recommend a Firmware Update
because I may improve the Router software so I
can handle more connections. (You can get them
here: EU and US.) If this doesn't help, you should
reduce the Max. Connections and Max.
Connections in 5 sec. until the router works
stable. |
| 2. |
Your router is crashed by a stupid script-kiddy
with a DoS, DDoS etc. attack (very unlikely). |
|
You can't do anything to protect you from these
attacks. Perhaps a Firmware Update fixes
some security holes in the router's software.
The only other possibility is to get another
IP address (with reconnection if you have
a dynamic IP) an reduce the possibilities for
the script kiddy to get your new one by closing
instant-messengers like ICQ, IRC and stopping
to surf on his/her homepage. |
| 3. |
Your router overheats. |
|
Like every other Computer, your router can overheat.
Make sure it's not covered with junk, paper or
socks to let it "breath". |
| 4. |
A bug in the routers software crashes
it. |
|
The only thing you can do here is a Firmware
Update(You can get them here: EU and US.) and to hope that it fixes the
bug. |
Last but not least I want to
thank the following persons:
- The whole eMule-Developers team
(especially Monk for updating this
guide ;-) ) and everyone who supports
them with code, ideas.. (especially
the modders)
- Sourceforge.net for hosting
the eMule Project.
- Jed aka Swamp for inventing the ed2k-Network
- Stillman and ocbMaurice for their
test-script and especially Maurice
for his great server lists.
- Stefan Mⁿnz for his SelfHTML. Without it, this
guide wouldn't exist.
- Ulrich for his SMC Barricade 7004 BR screen
shots.
- Many others I forgot to mention (hey, its
0:05 in the morning here :D)
| |
Big thanks to URMEL
for this comprehensive guide.
Last update on: 2003-21-02 by Monk
|