Linksys BEFSX41
This guide assumes you have a Linksys BEFSR41
router. It will be fairly similar if you have another
Linksys router like the 'wireless' or 'firewall' (BEFSX41)
version but I'm not sure because I don't have these.
I'm running Windows XP Pro, but these instructions work
fine with XP Home too. Windows98 users will want to look
at the alternate instructions. The first two
alternatives describe how to configure the router without
using DHCP. Using DHCP sometimes makes things messy but
Linksys offers a way to keep DHCP via Port
Triggering
The aim of the guide is to show you how to setup your Linksys
router so that you can use eMule. There are two ways to
do this, either as below using UPnP, or by using a browser.
These instructions are long and drawn out on purpose, hopefully
so you don't get stuck! Realistically the whole thing is
really very easy once you get the hang of it, so please
don't be too intimidated by how long these instructions
are.
Windows XP UPnP instructions
- The first step is to make sure you have a fairly recent
firmware version for your router. Firmware is like the
internal software inside the router. You can upgrade to
the latest version by visiting the Linksys download page.
Select your router from the drop down list, select the
firmware link, save the file and follow the instructions.
They make it fairly easy and straightforward to do, and
it is quick.
- Once you've done the previous step... In Windows, click
start>settings>control panel>network connections
to open this page:
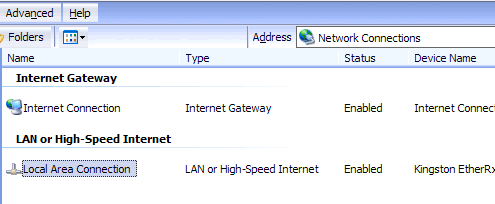
Compare what you see to my picture, if you have the entry
that says Internet Gateway enabled, you already have UPnP
installed and this whole process will be easier. Windows
XP should have already set all this up if you bought your
router and it already had firmware version 1.42 (?) or
later installed. If you do anyway then skip ahead to step number 4 below.
- To install UPnP:
- Click Start, click Control Panel, and then click
Add or Remove Programs.
- In the Add or Remove Programs dialog box, click
Add/Remove Windows Components.
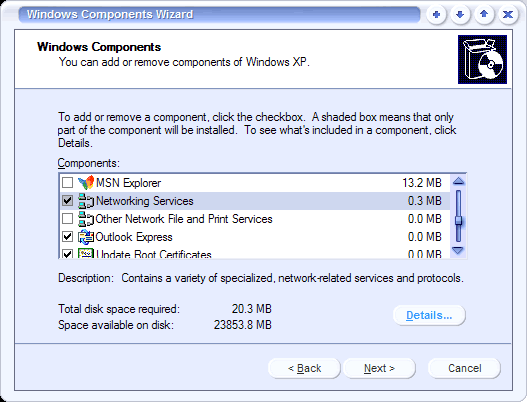
In the Windows Components Wizard, click Networking
Services, click Details, and then select the 'Universal
Plug and Play' check box. You should also see 'Internet
Gateway Device Discovery and Control Client' listed,
put a tick in the check box for this also - as I've
done below.
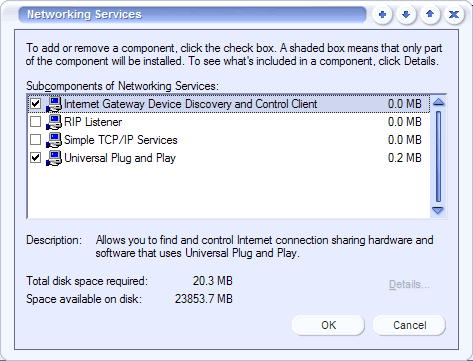
- Click OK, and then click Next in the Windows Components
Wizard. You may need to provide your Windows XP installation
CD.
( I found this info at http://www.microsoft.com/windowsxp/expertzone/columns/crawford/02july22.asp)
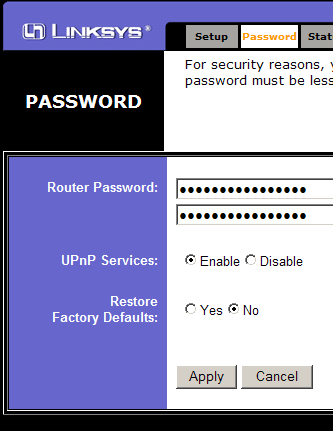
- Using your browser, go to http://192.168.1.1/Passwd.htm and, as shown in the picture
below, make sure that 'UPnP Services' are enabled:
- Click Start>Settings>Network Connections.
Right click on 'Local Area Connection'. Select 'Properties'.
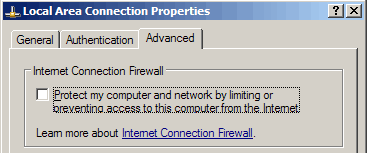
A small window appears. At the top click on 'Advanced'.
Make sure that the XP firewall is turned off as in
the picture below:
- Now check back to step 2 above to make sure you
have the UPnP working right. It seems to take a while
for the internet gateway entry to appear so be patient,
wait a couple of minutes perhaps and check again if
it isn't showing when you first look, refreshing the
window often makes it miraculously appear.
- Now that you have UPnP up and running
setting up port forwarding is really quite simple...
The first thing to do is to highlight the entry for the
local area connection in the network connections page
just like i'm doing in the picture below:

On the left side in the details section you should now
see your router assigned ip address as shown in the picture
below:
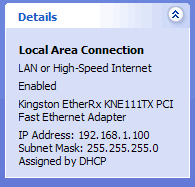 ...in this example it is 192.168.1.100, make a mental
note of whatever yours happens to be. ...in this example it is 192.168.1.100, make a mental
note of whatever yours happens to be.
- Back on the main section of the page, right click on
'Internet Connection' and then select 'Properties' from
the menu that appears.
You'll see this window:
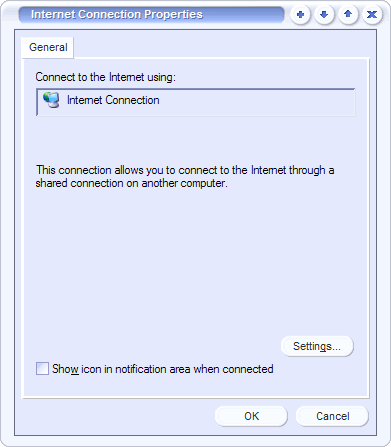
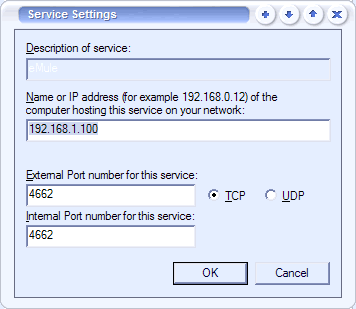
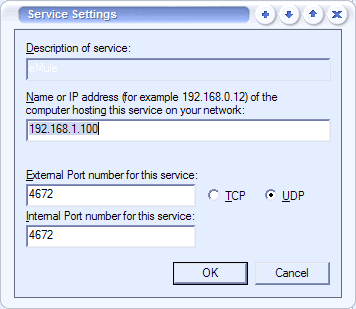
Click on settings, and then 'Add'. This is where you will
specify which ports the router needs to forward to make
eMule work. Fill in the blanks as below, except in the
IP address field substitute your own router assigned IP
address that you memorized from the previous step. The
'Description of Service' text field can be anything you
like - it's just so you can identify it later... "eMule"
works just fine:
- After clicking on 'OK' to save this new setting, click
'Add' once again to setup a second port forward. Once
again fill in your own IP address, type "eMule" as the
description of service, and copy the remaining details
as they are shown below. Then click 'Ok' to save the settings:
- You'll notice that you now have two entries for eMule,
as in the picture below:
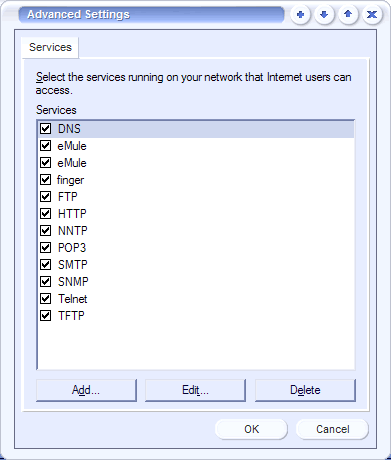
Click 'Ok' to save the settings you made and exit. That's
pretty much all there is to it! You've told your router
to forward incoming traffic to ports 4662 and 4672 on
your computer. Run emule and everything should now work.
There's another way of doing all this.
- Open up your web browser and type in the address: http://192.168.1.1
to access your router status pages. Enter your password,
the username is an empty field on my machine and it doesn't
seem to matter... you HAVE changed the default password
right? If not then for your own sake read your linksys
manual and do this now!
- Click on the DHCP tab at the top

Then click on the button labelled 'DHCP Clients Table'.
You'll see the window below appear:

Look in the Client Hostname column, find your computer
name and memorize the last three numbers of the IP address
to the right of it. In this example the client hostname
is 'Christopher', and the last three numbers of the IP
address are 100. Once you've got those three numbers memorized
then close the window.
- At the top of the screen, on the right hand side, click
on the orange colored tab labelled 'Advanced'. You'll
arrive on the 'filters' page - you don't want to do anything
here, instead click on the second tab along labelled 'Forwarding'...
and fill out the details as I have below. Except of course
you need to fill out the last three numbers of your IP
address that you memorized (it might well be 100 like
mine is):
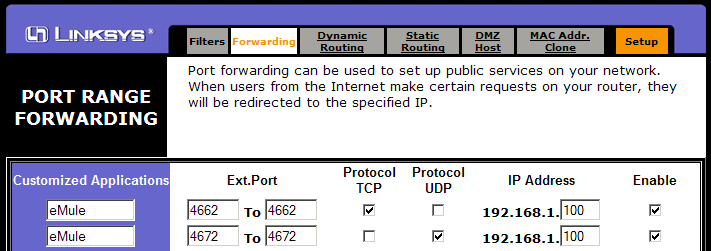
- At the bottom click on 'Apply' to save the settings
you just typed in. Now your router is setup to forward
incoming traffic to ports 4662, and 4672 on your computer.
Close out the browser window, and run eMule, it should
now work!
Configuration with
DHCP via Port Triggering
- Open up your internet browser and type the IP Address
of your router (default: 192.168.1.1). Enter
in your password (default: admin - change it!).
Click 'Advanced'. Click 'Forwarding'.
- In the Forwarding screen you will find the button Port
Triggering. Click it and enter the configuration
shown below. You can ignore the msn entry when configuring
eMule.

- Press 'Apply'.This should now allow your router
to forward eMule packets to your machine without the need
for specific IP Addresses allowing for DHCP or multiple
machines using eMule.
Big kudos to Violator for this very comprehensive
guide. Thanks to ThRaShErUk for the Port Triggering
how to.
Last update on: 16/01/03 by Monk |