Photosite Timesaviour Help 
Topics
- Welcome to Photosite Timesaviour
- Quick start guide
- Putting your site online
- Features
- The caption editor
- Troubleshooting
- Version history
- Plans for the future
- Glossary
Legend:
Lists with a yellow background are step-by-step guides. Text inside a red box is a warning. A word or phrase with a green background can be clicked to reveal a more detailed explanation.
Welcome to Photosite
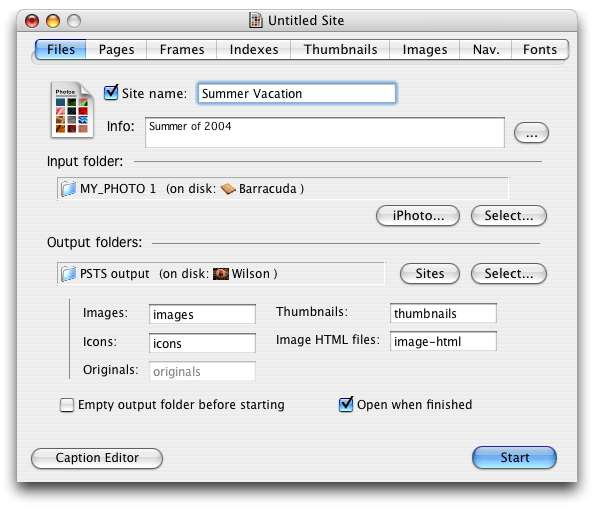
Photosite Timesaviour (for short PSTS) is a tool to create a full-featured website out of one or more folders of images. PSTS will scale images as necessary and create your HTML code. PSTS has very many options and featues, among other things:
PSTS is also very customizable, with options for everything from font sizes and how the navigation arrows look, to options for thumbnail sizes and folder icons.
Explore the interface and experiment with the options, the program it won't bite you! Just hover your mouse over a button or option and it will be explained.
Quick start
Follow these easy steps to create your first site:
- Open Photosite timesavior. A blank project window will appear.
- Enter a name for your site.
- Under "Input folder", click the "Select" button and browse to the folder that contains your images. Click "Choose".
- If you have your pictures in iPhoto, click the iPhoto button instead, and select for which dates you want to import photos.
- Now we will select the folder the finished site will be saved in:
- In MacOS X: Under "Output folder", click "Sites", and PSTS select your Sites folder inside your Home folder.
- In MacOS 9: Under "Ouput folder", click "Select", and browse to where you want to save the site. Click "New folder", and name the new folder. Select the folder you created and click "Choose".
- Check the "Open when finished" checkbox.
- Click "Start". PSTS will work for a while and then open up your new site! If you want to share your site with the rest of the world, or make it more advanced, read on!
Saving your project file.
If you want to return to a project and add images, you will want to save a project file. This is done by simply selecting "Save project" from the file menu.
Putting your site online
When you have just created your site on your computer, nobody except yourself can see it. Before you can share it with the world, you must put it on a world wide web-server.
If you have a broadband connection and a computer running MacOS X you are willing to leave on all day:
If so, you can use your own computer as an Internet server, so when people access your site, they are going into your computer. Follow these steps:
- Contact your Internet Service Provider and check if you are allowed to (and if you can) run a server.
- If you can, and you're using MacOS X, open the "Sharing" control panel and turn on "Personal Web Sharing".
- Copy your photosite output into the "Sites" folder in your home folder.
- The address to your homepage is under "Network Address" in the same control panel, but with a tilde (~), username and the name of the folder you put your site in (e.g. http://123.123.123.123/~steve/vacationphotos/).
- Some internet connections change IP address every time you connect. If you want a contast address use a DynDNS service. There are several ones and most are free and easy-to-use and give you an easy-to-remember address.
If you have a modem connection or are not comfortable leaving your computer on:
- You will need to get a hosting service to upload you page to, preferably with FTP access. There are many of these. The first place to check is with your Internet Service Provider. They often provide a few megabytes free with your internet account, without any obtrusive ads.
- If your ISP doesn't give you space there are a ton of hosting places on the net. One of the best (but not free) is Apples .Mac service that integrates nicely with the MacOS without any FTP software. You can read about it in the "Internet" control panel.
- If you want a free solution, there are lots, but generally not any good ones. They all add ads to you site, and limit the number of visitors per day, especially when large images are involved. One popular host is http://www.geocities.com/ For other options, try searching the net for "free web hosting".
- When you have an account that uses FTP, use a program such as Transmit or Fetch (find them at www.versiontracker.com) to connect to your hosts server and upload the page. Your host probably has a nice tutorial.
Features of PSTS
The caption editor (and image arranger)
You can use the caption editor to add captions to and rearrange your images.
This manual has a whole section dedicated to the caption editor, read more there.
EXIF/IPTC camera/photoshop data import
PSTS can import tags from your image files and turn them into caption files. This could be useful if you want to have an overview of you images that show for example what shutter speed was used. Read more in the caption editor section
Nested folders.
Say you went on a vacation for a week. Instead of having all the images in one long row, you can make a folder for each day of the week, and put them inside your input folder. If you wish you can take this to its extreme and divide it into months too, but if your project gets too large it may take a while to regenerate the page.
Frames.
One handy feature some websites have is frames. Simply put, frames let you split up a web page into seperate scrolling parts. What this means for is is that we can have the index of images always visible. Frames are easily turned on in PSTS with the check of a box.
Turning on frames may affect these other options, because they can not be used at the same time:
- When frames are on, you can not display the sites name on the index
- You can not use javascript popups when frames are on
- When frames are enabled, image pages are always created, and full-size images are always displayed
- Some index options are locked when frames are enabled (force square table cells, fill width)
- When frames are enabled, only one index is created (per folder)
Pop-ups.
PSTS has a setting that makes a new window when you click an image in the index.
Some webbrowsers have pop-up canceling features to avoid ad banners. These usually let through user-requested popups, but that is not always the case. Use only when you know you want to.
Image effects
The effects PSTS supports are:
- Scale images (images only)
- Imprint text
- Stamp image (watermark)
- Styled border
- Rotate (images only)
- Custom effect (matrix)
Effects applied to images also apply to thumbnails. Effects in the list marked "images only" can't be appled to thumbnails only.
Custom navigation icons
Just create a folder in the "Navigation icons" folder, and stick some pictures in a web-ready format inside it. name the pictures as follows:
- prev.png (Previous image)
- next.png (Next image)
- prev-disabled.png (Previous image icon when there is no previous image)
- next-disabled.png (Next image icon when there is no next image)
- close.png (Return to index / Close window)
- home.png (Go to home page)
- up.png (Go up in the folder hierarchy)
You can use any file type extension, you aren't limited to .png.
Custom background patterns
Just stick an image in a web-ready format inside the "Background patterns" folder, and reopen PSTS. It'll show up in the "Background pattern" popup menu on the Pages tab. You still need to define a background color which is shown before the image loads.
Custom borders, using the border maker
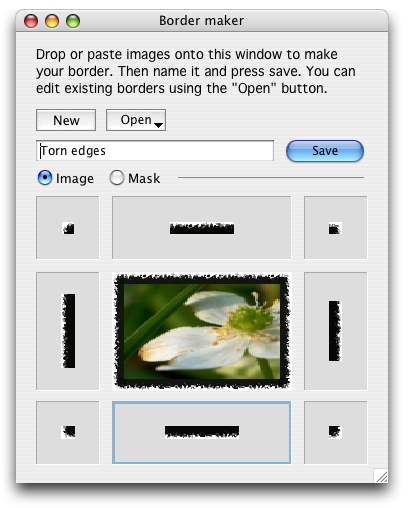
Here's how to create a custom border:
-
First create the segments of the border required in your preferred graphics editor:
- Top-left corner
- Top-right corner
- Bottom-left corner
- Bottom-right corner
- Top edge
- Bottom edge
- Left edge
- Right edge
- Open the border maker from the Tools menu
-
Now insert the images into the border maker using one of these methods:
- Drag and drop the image files into the image wells around the preview.
- Drag and drop the image from inside your graphics program into the image wells around the preview.
- Copy the images from inside your graphics program and paste into the image wells around the preview by selecting them and selecting "Paste picture" from the Edit menu.
- Enter the desired name for your border.
- Click the Save button. You're done! You may need to restart PSTS for the border to appear in the popup menus.
Custom HTML
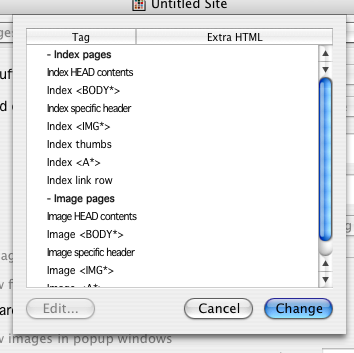
By clicking "Advanced HTML tag editor..." on the Pages tab you can add your own HTML code to parts of the page, if you for example want to specify a special style for links, or add CSS code.
These parts of HTML are currently customizable:
- On index pages:
- You can add code inside the HEAD tags.
- You can add attributes to the BODY tag.
- You can add a header.
- You can add attributes to the IMG tags for the thumbnails.
- You can add code inside the table cells where the thumbnails are.
- You can add attributes to the A (link) tags.
- You can add a code inside the row of links (the one containing home, and other pages).
- On image pages:
- You can add code inside the HEAD tags.
- You can add attributes to the BODY tag.
- You can add a header.
- You can add attributes to the IMG tags.
- You can add attributes to the A (link) tags.
Future versions of PSTS will have a complete template system where you can completely revamp the code.
The caption editor
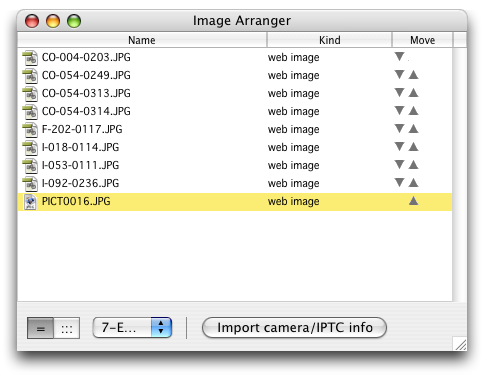
Click the image to show the full caption editor with inspectors and everything
Introducing the Caption editor / Image arranger
The caption editor lets you do several things:
Quickly captioning a folder of images
- First of all, create a project and select your input folder. Click on the "Caption Editor" button. The caption editor file list will appear (pictured above).
- Select the first image in the folder. Click on the "Image Preview" button on the Image Inspector to show a thumbnail of the images (useful if the files have useless filenames).
- Click in the Thumbnail caption field and type a caption to show beneath the humbnail. Leave it blank if you don't a caption there.
- Press the Tab key on your keyboard. You are now typing in the Image caption field. Enter a caption to show beneath the full-sized image.
- Press the Tab key again, and then press enter. PSTS will now select the next image.
- Repeat for all your images. When you are done you can close the Caption editor. PSTS automatically saves the captions when you switch between images, so there is no need to save manually.
Re-arranging your images
To move an image up or down in the list, click the arrows on the right side of the Caption editor window.
Applying effects to images
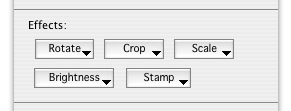
Select an image from the Caption editor list. Then use the options in the "effects" area of the Image Inspector to apply the effects. The effects aren't applied instantly, so you don't have to keep copies of your pictures. What PSTS does is saves your settings, and then applies the effects when the site is created. This leaves the original images unaffected, and lets you freely experiment with different effect settings.
These buttons works as popup menus. To turn of/off an effect, select Enable or Disable. The different effects have different ways of changing their settings, some only have an option in their popup menu, some give you a dialog box to change the settings in.
There are two ways to approach this: You can add tags to images one by one, or use a batch system to import tags for all images in a folder at a time
To add tags to images individually, click the "Tags inspector" button in the Image Inspector window. For images with tags, the window will show a list. Check the tags you want to add, put the text cursor in the field you want to put the tag in (Thumbnail caption or Image caption), and click the "Insert checked" button.
To batch import, click the "Import camera/IPTC info" button, select which tags you wish to be included, how to seperate them, and click "Import".
Tip: The default names for the tags are pretty dull and techy. If you want to change the names of the tags, go into the Preferences window and change them under the "Tag names" tab
Troubleshooting
My sort setting doesn't affect the created page
This can happen if you have used the Caption editor, which created a sorting that overrides the sort setting on the Images tab. Delete the "PSTS Arranger settings" file inside your input folder to reset the arranger settings.
My images are showing up as icons after I upgraded from 1.4 to 1.5
In the Preferences window, under the "Media types" tab, select "image" under Unknown files.
I'm getting an "internal error"
This is an indication of a bug in PSTS, please report the error number and what you were doing to me. See the next topic.
If you think you've found a bug in PSTS
First of all, go to www.kalleboo.com and check if there has been a new version released that fixes the bug. If you are feeling particularly adventurous, you can try the latest beta version, which is always located at download.kalleboo.com/pstsbeta.sit.
If there's no newer version, then you've probably found a bug. Please email it to me at pstsbugs@kalleboo.com.
One way to help me pinpoint your bug is to send me a debugging log. To create a debugging log, open PSTS' "About" window from the Apple menu, and hold down the "option" key on your keyboard (sometimes marked as "alt") and click on the PSTS logo. A status window will pop up. Now run your site in PSTS. When it is done, quit PSTS, and note a file in PSTS' application folder called "psts log". This file contains information about what PSTS has done to create your site. If you send this to me with your bug report, it could help me greatly in tracking down the problem.
Version history
1.5 has been a major overhaul, adding among other things these features:
- Full MacOS X support:
- Long file names
- Aqua user interface (sheets, animated window resizing, dock icon that bounces)
- Import images from iPhoto
- Auto-select MacOS X "Sites" folder
- Completely redone handling of file types. PSTS 1.4 didn't do any checking of file types, but now PSTS can handle files differently: it can take web-ready images and add them without conversion, other formats and convert them, it can embed QuickTime movies and include other files as downloads!
- Added a full-featured caption editor:
- Add captions to images and thumbnails
- Import camera (EXIF) and IPTC information
- Re-arrange images to sort as you would like them
- Apply effects to single images
- Added image effects:
- Added scale to max height and width
- Added background to "Imprint text"
- Added "Stamp" effect
- Added "Styled border" effect and accompanying border editor
- Added "Rotate" effect
- Added "Custom effect" matrix
- Removed "Move images instead of copy" option
- Removed "Use existing" option
- Removed "Estimate" feature
- Changed background pattern so you no longer need to keep the background in the input folder
- Changed "Add copyright" to "Add footer"
- Added "Add header"
- Added an HTML tag editor
- You now do not have to have HTML files for the enlarged images, the thumbnails can link directly
- Added options to link images on enlarged image pages
- Added option to the javascript popup feature
- Javascript popups are no longer the default behaviour
- Now you can create a page with frames
- Changed "Add logo" so you no longer need to keep the logo in the input folder
- Changed so that the extra info on the index is optional
- Added many more options for the index pages:
- Thumbnail spacing
- Solid border around thumbnails
- When you only want one index you can now specify to fill it with rows or columns
- Show filenames in bold
- Added advanced file name display options (truncation, line breaks, show filename extention)
- Added fields for meta information
- Added random sort option
- Changed the small and medium thumbnail sizes
- Added the option to opt-out of thumbnail creation
- Added option to create thumbnails for QuickTime movies
- Added image effects for thumbnails:
- Added background to "Imprint text"
- Added "Stamp" effect
- Added "Styled border" effect
- Added "Custom effect" matrix
- Added option for custom folder thumbnails
- Added option for small folders icons
- Added option to opt out of full-sized images
- Added option to link full-sized images directly to the input folder (good for quick previews)
- Now you now longer need to have custom icons in your input folder, added custom nav icon picker
- Added option to opt-out of the close icon
- FTP feature removed
Plans for the future
Plans for the next version, 1.6:
- Cleaner generated source code, using XHTML and CSS
- More options for frames pages
- Making PSTS a better MacOS X citizen (toolbars and Applescript support)
Plans for a more distant release, 2.0:
- HTML-based templates, for complete customization
Glossary


