|
|
|
|
Rendering a Scene
Once you've selected the rendering options you want to use and chosen a rendering mode, you're ready to start rendering. You render your entire image using the Render controls or use the Plop Render controls to render areas of your image.
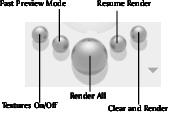
Using the Render controls
The Render controls let you start and resume a rendering of your image. There are controls for enabling two types of fast renders.
Use the Render controls to control the rendering of your scene.
To start a rendering of the entire scene:
1 Click the Render All button.
If you have already rendered any portion of your scene, it is cleared before the rendering begins.
You can interrupt any rendering by clicking the mouse.
To resume a rendering:
To clear a selection and start a rendering:
This control clears the contents of any marqueed region, and starts a render of the selected region. Refer to Plop-Render Mode below for more on rendering regions.
Plop-Render Mode
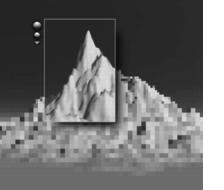
If you've begun rendering your image, you can use the Plop-Render controls to render specific areas of your image. You can use this mode to quickly see the results of repositioning and transformation operations.
Use Plop-Render mode to render specific areas of your image.
Plop-Render mode is enabled by default, but can be turned off using the Display palette.
To enable/disable Plop-Render mode:
When the small rectangle inside the icon (which represents an active Plop-Renderer) is red, Plop-Render mode is on. When it is white, the mode is off.
To render an area of your scene:
1 Make sure Plop-Render mode is enabled.
2 Begin rendering your scene by clicking the Render All button in the Render controls.
3 Pause rendering by clicking the Render All button again.
4 Drag a marquee around an area of your image.
The selection is outlined in a thin white line and is separated from the rest of the image by a drop shadow. A series of buttons appear beside the marqueed selection.
5 Click the top button that appears beside the selection.
You can interrupt the rendering by clicking the mouse.
To resume a render:
To scale the selected area to fill the working window:
1 Make sure Plop-Render mode is enabled.
2 Begin rendering your scene by clicking the Render All button in the render controls.
3 Pause rendering by clicking the Render All button again.
4 Drag a marquee around an area of your image.
The selection is outlined in a thin white line and is separated from the rest of the image by a drop shadow.
5 Click the triangle icon beside the Render controls and choose Zoom to Selection from the menu.
The command centers the selected portion of your wireframe scene and scales it up to fit your window. This is a pan and zoom operation, and therefore does not affect your camera position.
Spray Rendering
You can also paint an area of your scene to render it. Use spray rendering to preview a specific area of your scene. If you render the entire scene after doing a spray render of a specific section, that area will not be re-rendered.
- Spray rendering controls include five circular and five square spray nozzles. While in spray rendering mode, use the 1 through 5 keys to select the circular spray sizes, and the 6 through 0 keys to select the square nozzles.
To render using Spray Rendering:
1 Click the Spray Rendering tool on the Advanced Display palette.
2 Use the tool to paint over the area of your scene that you want to render.
3 Adjust the brush size to more easily paint a larger or smaller area.
You can also render a portion of your wireframe or rendered image to quickly see any modifications made to your scene. You can render from Wireframe mode or from Render mode. Spray rendering from Wireframe mode is a preview render that is lost when you press the Escape key.
Spray rendering from Render mode is a true render and can be continued by using Resume Render.
To render from Wireframe mode:
1 Click the Spray Rendering tool on the Advanced Display palette.
2 Use the tool to paint over the area of your scene that you want to render.
3 Press the Spray Rendering tool again or press the Escape key to dismiss this render and return to Wireframe mode. This doesn't affecting any previous render.
To render from Render mode:
1 Press the Escape key to switch from Wireframe to Render mode.
2 Click the Spray Rendering tool on the Advanced Display palette.
3 Use the tool to paint over the area of your scene that you want to render.
4 Click the Spray Rendering tool to put the tool away and remain in render mode. Press Escape again to return to Wireframe mode yet not lose your paint rendered area.
5 If you Resume Render your scene, Bryce continues to render the un-rendered portions of your scene.
 Corel Corporation http://www.corel.com Voice: (800) 772-6735 Fax: (716) 447-7366 www.corel.com/support |