|
|
|
|
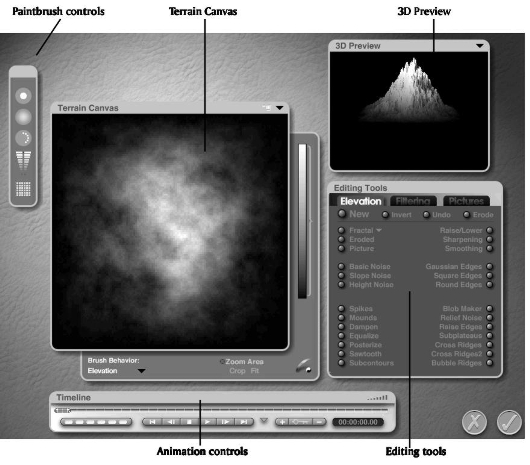
The Terrain Editor workspace
Features of the Terrain Editor
The Terrain Editor is divided into five sections:
- Terrain Canvas - displays the grayscale image used as a height map
- 3D Preview - displays a three-dimensional preview of the terrain you're working on
- Paintbrush tools - let you adjust the paintbrush
- Animation controls - let you set up key frames for animating the terrain
- Editing tools - let you generate and edit the terrain's height map
To open the Terrain Editor:
1 Select a terrain object in your scene.
2 Click the E icon that appears next to the terrain object,
or choose Objects menu>Edit Object,
or click the Edit text button to open the Edit palette, and then click the Edit Terrain tool,
or press Command/Ctrl+E.Terrain Canvas
The Terrain Canvas displays the grayscale image that is used to create the terrain object. You can think of the Terrain Canvas as a top view of the terrain object you're creating. The Terrain Canvas is where you paint the height map for your terrain.
To set Terrain Canvas options:
- Click the triangle icon in the top right corner of the Terrain Canvas and choose an option from the menu:
Set Preview Size lets you change the size of the Terrain Canvas frame. You can choose from five preview sizes.
Visible Brush lets you turn the circle of the brush on and off.
Solid applies volumetric materials to the terrain. Even if you are not using volume materials, this selection causes the material to render as a solid.
Smooth allows a smooth rendering of the terrain. If this is not selected, the terrain is faceted.
Keep Gradient makes the gradient the terrain's diffuse color.
Export lets you save a terrain in a variety of file formats. You can then import a saved terrain into another 3D application or a different Bryce scene.
You can also access a number of tools in the Terrain Canvas, including the gradient strip, the bracket, controls for color mapping, the Zoom Area control, and the Brush Mode selector.
To access a tool in the Terrain Canvas:
- Click the menu icon at the top right of the Terrain Canvas. The Terrain Canvas tool area will open up.
The right side of the Terrain Canvas tool area contains a gradient strip and bracket for clipping operations. In the bottom right corner, you will find controls for color mapping. Refer to "Adding Color to Terrains" and "Clipping Terrains" for more on these tools.
Across the bottom of the Terrain Canvas tool area, you will find a Brush Mode selector and the Zoom Area controls. Refer to "Using the paintbrush" and "Using the Zoom Area" for more on these tools.
3D Preview
The 3D Preview displays a terrain object based on the image in the Terrain Canvas. As you edit the terrain image, the preview updates to show the result of your changes.
The 3D Preview has several options that control how the preview updates and displays.
To set 3D Preview options:
- Click the triangle icon in the top right corner of the 3D Preview and choose an option from the menu:
Set Preview Size lets you change the size of the 3D Preview frame. You can choose from four preview sizes.
Flat Preview is the default preview type. In Flat Preview, you see a basic rendered preview of the terrain using a plain grayscale material with basic shading and lighting.
Rendered Preview displays a fully rendered view of the terrain, including any materials you have applied.
Auto Rotate sets the 3D Preview to rotate when it is in Flat Preview mode. The 3D Preview updates as it turns.
Realtime Linking connects all terrain editing to the 3D Preview. Every change you make is applied simultaneously to the Terrain Canvas and the 3D Preview.
RIP To Screen displays a full-screen preview of your terrain. Clicking anywhere will return you to the main Terrain Editor. Use Command/Ctrl+W to toggle in and out of this mode.
The preview of your terrain can be rotated so that you can see your terrain object from different angles.
To rotate the terrain preview:
Paintbrush controls
Although you can create some very spectacular terrains using just the elevation tools, there are times when you want to create a precise Terrain Canvas. The Terrain Editor's Paintbrush lets you paint any type of terrain you wish. Using the Paintbrush, you can re-create real-world topographical maps or design landscapes with specific contours.
The Paintbrush controls let you select the size, hardness, flow, and level of the Paintbrush, as well as control the resolution of the grayscale data.
Paintbrush size
The Paintbrush size control lets you select the size of the Paintbrush.
To change the Paintbrush size:
- Drag left or right over the Paintbrush size control. Dragging towards the center decreases the Paintbrush size while dragging away from the center increases the Paintbrush size.
Paintbrush hardness
The Paintbrush hardness control lets you choose how hard to make the edges of the Paintbrush. A hard Paintbrush has sharp edges and will create a very vertical effect such as a cliff edge. A soft Paintbrush has feathered edges and will blend more with the existing terrain, providing a more gently sloping effect.
To change the paintbrush hardness:
- Drag left or right over the Paintbrush hardness control. Dragging towards the center increases the hardness of the Paintbrush, while dragging away from the center makes the Paintbrush softer.
Paintbrush flow
The Paintbrush flow control lets you set the density of the grayscale value being applied by the Paintbrush.
To change the Paintbrush flow:
- Drag left or right over the Paintbrush flow control. Dragging left decreases the flow, while dragging right increases the flow.
Paintbrush level
The Paintbrush level control lets you set the grayscale value of the Paintbrush. Darker values produce lower terrain while lighter values produce higher terrains.
To change the Paintbrush level:
- Drag up or down over the Paintbrush level control. A small red dot in the middle of the control indicates the current level.
Grid selector
The grid selector controls the resolution of the grayscale data in the terrain.
The terrain's resolution determines the amount of detail in your terrain. The higher the resolution, the more detail appears in your terrain's surface. However, higher resolution values also increase the rendering time for your scene and require more memory.
The highest resolutions should be reserved for terrains that are very close to your camera or where detail is important. For terrains that are far away, or where detail is not so important, lower resolutions are more appropriate.
To set the Terrain resolution using the Grid selector:
- Click the Grid selector icon at the bottom of the Paintbrush controls and choose a resolution from the menu.
Brush sizes may appear to vary depending on your resolution, but in fact they remain proportional to the size of the Terrain Canvas.
Animation Controls
The Animation controls at the bottom of the editor let you create key frames for your terrain. Any change you make to the geometry of the terrain can be stored in a key frame and animated.
The Timeline that runs along the bottom of the editor displays the length of the animation. The Current Time Indicator within the timeline lets you set the current time of the animation.
The buttons in the Animation controls let you preview the animation. The buttons beside the Preview controls let you add and delete key frames from the Timeline.
 Corel Corporation http://www.corel.com Voice: (800) 772-6735 Fax: (716) 447-7366 www.corel.com/support |