Panda Antivirus Titanium is a compact, easy-to-use program capable of detecting and eliminating more than 60,000 virus automatically, including those attached to e-mail messages. There are several ways of executing the software (opening the antivirus program window), and starting to work with it:
Once the antivirus window opens, the user will see the following menu options:
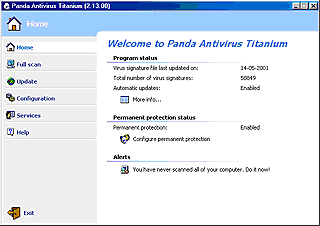
![]() Home. This informs the user of Panda Antivirus Titanium's current status (last update of the Virus Signature File, total number of virus signatures, and automatic update status. Additionally, it will be possible to consult other data and perform a number of actions (create rescue disks, access the virus list) through the More info... option).
Home. This informs the user of Panda Antivirus Titanium's current status (last update of the Virus Signature File, total number of virus signatures, and automatic update status. Additionally, it will be possible to consult other data and perform a number of actions (create rescue disks, access the virus list) through the More info... option).
Full Scan. This lets you scan and disinfect (neutralize) 'in the wild' viruses, as well as new ones (we advise you to update your antivirus periodically). Apart from disinfecting viruses, Panda Antivirus Titanium eliminates all the changes made by viruses to the system files and/or the Windows Registry.
![]() Update. This ensures that Panda Antivirus Titanium is a 'live' antivirus. The user simply has to click on this option and an update will immediately take place via the Internet. By default, updates are carried out daily and automatically. Users do not have to enable any option. Additionally, the update process will not interfere with their work. It is the antivirus itself that 'detects' the need to be updated, and automatically updates itself when the user connects to the Internet. This way, the software can detect and disinfect newly created viruses. Users can also configure the necessary options to ensure that the updates are performed correctly via the Internet.
Update. This ensures that Panda Antivirus Titanium is a 'live' antivirus. The user simply has to click on this option and an update will immediately take place via the Internet. By default, updates are carried out daily and automatically. Users do not have to enable any option. Additionally, the update process will not interfere with their work. It is the antivirus itself that 'detects' the need to be updated, and automatically updates itself when the user connects to the Internet. This way, the software can detect and disinfect newly created viruses. Users can also configure the necessary options to ensure that the updates are performed correctly via the Internet.
![]() Configuration. This allows users to select the features that will determine the way that Panda Antivirus Titanium operates regarding certain situations and options. These features include the different scan, update and permanent protection options.
Configuration. This allows users to select the features that will determine the way that Panda Antivirus Titanium operates regarding certain situations and options. These features include the different scan, update and permanent protection options.
![]() Services. Panda Antivirus Titanium makes it possible to use many of the services offered by Panda Software. Firstly, users can carry out a Antivirus update. Secondly, they can send Panda Software all those files that Panda Antivirus Titanium regards suspicious (possibly infected by a new virus) through the Send us suspicious files (S.O.S. Virus) service. We will scan them, and if they are infected we will send the corresponding solution to the user free of charge. Users can also consult a list with the most frequent questions that previous users have asked us. They will have access to them, together with their answers, thanks to the FAQs (Frequently asked questions and answers) service. Even if you solved all your doubts through the FAQs service, you can still send us any question or enquiry by means of the E-mail technical support. Finally, thanks to our Suggestion box, it will be possible for you to submit any comment or suggestion to us. For further information on other Panda Software products, click on the Other Panda products option.
Services. Panda Antivirus Titanium makes it possible to use many of the services offered by Panda Software. Firstly, users can carry out a Antivirus update. Secondly, they can send Panda Software all those files that Panda Antivirus Titanium regards suspicious (possibly infected by a new virus) through the Send us suspicious files (S.O.S. Virus) service. We will scan them, and if they are infected we will send the corresponding solution to the user free of charge. Users can also consult a list with the most frequent questions that previous users have asked us. They will have access to them, together with their answers, thanks to the FAQs (Frequently asked questions and answers) service. Even if you solved all your doubts through the FAQs service, you can still send us any question or enquiry by means of the E-mail technical support. Finally, thanks to our Suggestion box, it will be possible for you to submit any comment or suggestion to us. For further information on other Panda Software products, click on the Other Panda products option.
It is very simple! First, to guarantee your protection, make sure that your antivirus software is fully updated (remember that Panda Antivirus Titanium will automatically update itself once the Automatic update option is enabled). To do this, click on the Update option in the options menu, on the left of the program window. Next, click on the Update the antivirus now! option. Once the program is updated, scan your computer with the Full Scan option.![]() Help. Panda Antivirus Titanium incorporates a series of Help files for you to learn how to use the program and solve any doubt that you might have regarding its functionality. It also includes a practical tips section that will help you avoid virus infections. The program's help files consist of the Description of the program (the help file that you are now reading), a Practical tips section, and an FAQs (Frequently Asked Questions and Answers), section with answers to other users' consultations.
Help. Panda Antivirus Titanium incorporates a series of Help files for you to learn how to use the program and solve any doubt that you might have regarding its functionality. It also includes a practical tips section that will help you avoid virus infections. The program's help files consist of the Description of the program (the help file that you are now reading), a Practical tips section, and an FAQs (Frequently Asked Questions and Answers), section with answers to other users' consultations.
Panda Antivirus Titanium is an antivirus software that works in computers with any of the following operating systems installed: Windows 95, Windows 98, Windows Millennium Edition, Windows XP, Windows NT 4.0 Workstation, or Windows 2000.
The program window is divided into three different areas:
It will also be possible to carry out certain actions through the Windows Task Bar. Once the antivirus is installed, the corresponding access will be immediately created in the bar: (Start button - Programs - Panda Antivirus Titanium, as well as a button in the Quick Launch bar).
Also, if the permanent protection (of the Internet and files) is enabled, the Windows Task Bar will display a blue icon corresponding to Panda Antivirus Titanium next to the clock. By right-clicking on it, it will be possible to carry out the following operations:

By clicking on Exit (at the bottom left corner), Panda Antivirus Titanium will automatically close and the antivirus stops running. However, if the permanent protection of the Internet and files is enabled, it will continue like that until the user disables it.
Panda Antivirus Titanium, not only protects users, but also informs them on the program's status. You can access this data, as well as enable/disable the permanent protection and perform other actions, by clicking on the Home menu.
Program status.
In this section, the user is informed of the current status of Panda Antivirus Titanium. The data offered is as follows:
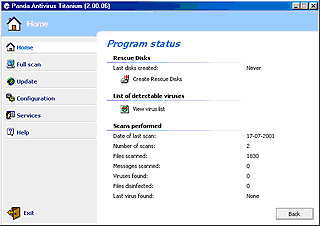
By clicking on the More info... option, users can access other data and perform the following additional actions:
![]() View virus list: This displays the list of viruses that Panda Antivirus Titanium can detect and eliminate. The screen has the following sections:
View virus list: This displays the list of viruses that Panda Antivirus Titanium can detect and eliminate. The screen has the following sections:
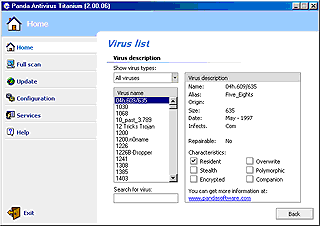
If you want further information on a certain virus, simply click on the link at the bottom of the screen (www.pandasoftware.com), or go directly to the Virus Encyclopedia in the Panda Software web site. Click on Back to return to the previous screen.
Scans performed
This section displays the scan result. The data offered is the following: Number of Scans, Viruses found, Files disinfected, Files scanned, Messages scanned, Date of last scan and the name of the Last virus found.
Click Back to return to the previous screen.
Permanent protection status
This section tells you whether the permanent protection is Enabled or Disabled. If you wish to change its current status (enable or disable it), click on the Configure permanent protection option. A new screen will appear with the following check box: Enable permanent protection (recommended). Tick the checkbox if you wish to enable the permanent protection. Also, if you wish to determine which files should be scanned by the permanent protection feature, click on Advanced.

A list appears with the file extensions that will be scanned by the permanent protection. To add new extensions to the list, write them in the box above the Add button then click on Add. If you want to exclude an extension from the list, select it and then click on Delete. To restore the list to its original status (the list included by default in Panda Antivirus Titanium), click on Restore. There are two other possibilities at the bottom of the screen:
![]() When the permanent protection is enabled, the Panda icon in the Windows Task Bar will be blue.
When the permanent protection is enabled, the Panda icon in the Windows Task Bar will be blue.
![]() It is also possible to enable/disable the permanent protection from the Task Bar. To do so, users must right-click on the icon and select the Enable permanent protection option. If they disable the protection, the icon in the Task Bar will change color.
It is also possible to enable/disable the permanent protection from the Task Bar. To do so, users must right-click on the icon and select the Enable permanent protection option. If they disable the protection, the icon in the Task Bar will change color.
![]() If the virus signature file is older than seven days, the appearance of the icon will change, warning users that the antivirus is not updated. In order to find out the date of this file, simply move the mouse pointer over this icon .
If the virus signature file is older than seven days, the appearance of the icon will change, warning users that the antivirus is not updated. In order to find out the date of this file, simply move the mouse pointer over this icon .
Click on Back to return to the previous screen.
Alerts
When necessary, this section will display some comments prompting the user to carry out certain actions. These actions will be immediately performed by clicking on them. For example, if you have not scanned the whole of the computer yet, the corresponding note will appear suggesting you to do so (You have never scanned all of your computer. Do it now!).
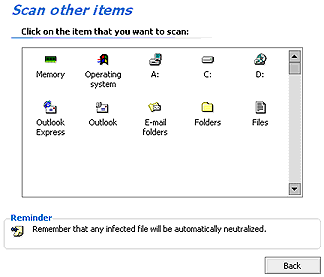
In order to carry out a scan, click on the Full Scan option. Then, select the elements in your computer that you wish to scan and disinfect (if virus-infected). As shown in the image below, you can scan any element in your computer:
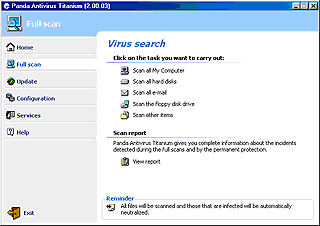
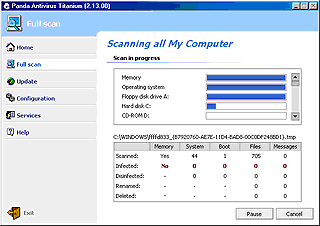
![]() Scan all My Computer: If you click on this option, an immediate scan of ALL the elements in your computer will begin (this might take some time, as every file in each of the computer elements will be scanned): memory, floppy disks found in any of the drives, hard disks, the D: CD-ROM drive, sent and received e-mail messages (both in Outlook Express and Outlook),... etc.
Scan all My Computer: If you click on this option, an immediate scan of ALL the elements in your computer will begin (this might take some time, as every file in each of the computer elements will be scanned): memory, floppy disks found in any of the drives, hard disks, the D: CD-ROM drive, sent and received e-mail messages (both in Outlook Express and Outlook),... etc.
![]() Scan all hard disks: On clicking this option, ALL the files stored in every hard disk installed, or existing, on the computer will be scanned.
Scan all hard disks: On clicking this option, ALL the files stored in every hard disk installed, or existing, on the computer will be scanned.
![]() Scan all e-mail: On clicking this option, ALL the e-mail messages sent and received will be scanned (Outlook and Outlook Express) .
Scan all e-mail: On clicking this option, ALL the e-mail messages sent and received will be scanned (Outlook and Outlook Express) .
![]() Scan the floppy disk drive: On clicking this option, ALL the files contained in any disk found in the floppy disk drive will be scanned.
Scan the floppy disk drive: On clicking this option, ALL the files contained in any disk found in the floppy disk drive will be scanned.
![]() Scan other items...: A list will be displayed making it possible to select which other element the user wishes to scan by simply clicking on it. If it is a folder (a directory) or file in particular, the user must indicate their location by clicking on the 'Folders' or 'Files' icon. Once this is done, a dialog box will be displayed allowing the users to select the item they wish to scan.
Scan other items...: A list will be displayed making it possible to select which other element the user wishes to scan by simply clicking on it. If it is a folder (a directory) or file in particular, the user must indicate their location by clicking on the 'Folders' or 'Files' icon. Once this is done, a dialog box will be displayed allowing the users to select the item they wish to scan.
Some viruses modify important system files as part of their infection routine. Selecting the Operating System from the Scan other items... option makes it possible to undo all the changes made by viruses, and eliminate the files that some of the disinfected malicious codes might have saved to the system. Furthermore, this option restores the original configuration of other very important system files as well as the Windows Registry (the place where the configuration of the Operating System and other programs is stored).
At the same time that the scan is taking place, data regarding the progress of the scan is shown to the user (scanned elements and progress bars). Additionally, users can pause the scan through the Pause button. In order to resume the scan, click on the Resume button. If you want to abort the scan, click Cancel.
Every time a scan is finished, a small summary will appear with the results of the operation. This summary includes the following information: Scanned, Infected, Disinfected, Renamed and Deleted items.

Moreover, the View detailed report option makes it possible for users to access a report detailing other scan characteristics. This report will show data regarding the Incidents occurred, the Date and Time when they took place, the item or path scanned (Scan / Path) and the Action carried out in each case (in the event of infection).
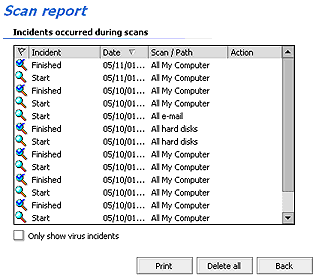
Users can get a printed copy of the report by clicking the Print button. Click on Back to return to the previous page.
Additionally, it is possible to access a report including the characteristics of ALL the scans carried out from the Scan main screen. To do this, simply click on the View report option.
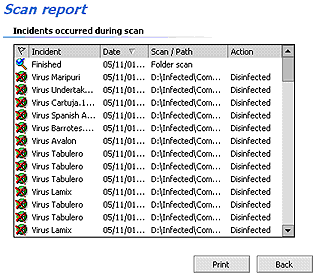
The information regarding each scan is arranged in several columns:
Users are offered the possibility to edit the report column width. To do so, simply place the mouse pointer between the titles in two adjoining columns. The pointer will become a double arrow. Then, click on the left mouse button and -without releasing it- drag the border to a new position.
At the bottom of the screen where all the scan results are displayed, the user will find a checkbox: Only show virus incidents. On ticking it, the report will only show the list entries related to viruses (detected, disinfected, deleted viruses...). If the user wants the report to display all incidents again, they must uncheck the checkbox.
In order to get a printed copy of the list, click on Print. Finally, it will be possible to delete all the data gathered in the report through the Delete all button. The report will then display the information regarding the scans carried out after the data deletion. Click on Back to return to the previous screen.
Panda Antivirus Titanium uses what we call the Virus Signature File (PAV.SIG), to detect viruses. This file contains information that enables the antivirus to identify the viruses (signatures). If there is a virus in your computer, the signature file allows the antivirus to recognize it and locate (detect) it. Thanks to this, it can then be eliminated.
New viruses are continually appearing (20 per day on average). This means that in order to be adequately protected, you should ensure that this file is always completely up-to-date.
Panda Antivirus Titanium can update itself automatically. When Panda Antivirus Titanium detects an open Internet connection and recognizes that there is a need to be updated, this update is carried out automatically. You can also update the product at any other time you want. All updates are carried out over the Internet by connecting (automatically) to Panda Software's update center. Here you will obtain the latest version of the virus signature file and any new features or improvements to the program. This means you will be able to detect and disinfect more than 60,000 viruses, as well as those new viruses that appear every day.
From the Updates menu, you can carry out instant updates of the antivirus and configure the characteristics of these updates.
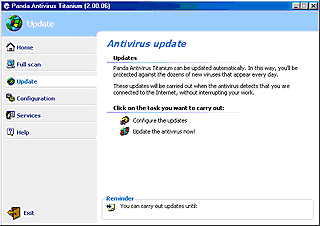
![]() Configure updates. This lets you establish the characteristics of the updates. Here you can define certain aspects of the updates and enter your user name and password. The following possibilities are available:
Configure updates. This lets you establish the characteristics of the updates. Here you can define certain aspects of the updates and enter your user name and password. The following possibilities are available:
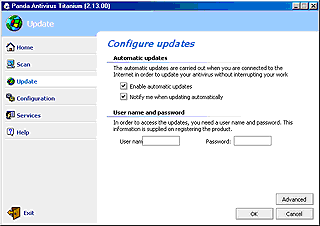
- Enable automatic updates: if this box is checked, Panda Antivirus Titanium will carry out the updates automatically, whenever it detects an open connection to the Internet. These updates are transparent (the user does not realize that they are taking place) and they do not affect in any way whatsoever, any work being done on the computer at that moment.
- Notify me when updating automatically: if this box is checked and an automatic update is taking place, a message will appear informing you of the automatic update.
- User name: in order for the antivirus to be able to update automatically, you must enter your user name in this section. This information will be given to you once you have you registered online.
- Password: in order for the antivirus to be able to update automatically, you must enter your password in this section. This information will be given to you once you have you registered online.
- Notify me when updating automatically: if this box is checked and an automatic update is taking place, a message will appear informing you of the automatic update.
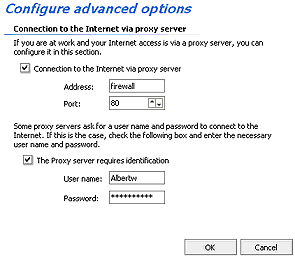
At the bottom of this screen there are various buttons. The OK button saves any changes and takes you back to the previous screen. The Cancel button, also takes you back to the previous screen, but does not save changes. If you want to define details related to the connection to the Internet, you can to this by clicking on Advanced. This takes you to another screen with the following possibilities:
![]() Update the antivirus now!. This will immediately update the antivirus. When you click here, Panda Antivirus Titanium will be instantly updated. If the antivirus is already up-to-date (if the last update coincides with that currently available), this will be displayed in a dialog box. If not, the update will start. On completion, the result of the update will be displayed. If for any reason it was not possible to carry out the update, this will also be shown. In any event, you can return to the main updates window by clicking on Back. You can also try to update again using the button Retry.
Update the antivirus now!. This will immediately update the antivirus. When you click here, Panda Antivirus Titanium will be instantly updated. If the antivirus is already up-to-date (if the last update coincides with that currently available), this will be displayed in a dialog box. If not, the update will start. On completion, the result of the update will be displayed. If for any reason it was not possible to carry out the update, this will also be shown. In any event, you can return to the main updates window by clicking on Back. You can also try to update again using the button Retry.
In brief, there are two ways of updating:
From each of the options in the Panda Antivirus Titanium menu, you can determine various characteristics regarding the operation of the antivirus. This menu also includes a configuration menu that includes all of these. This makes it straightforward and easy to define what the antivirus should do. Through the Configuration menu, you can establish all the scan properties, the updates, the permanent protection and other general options.
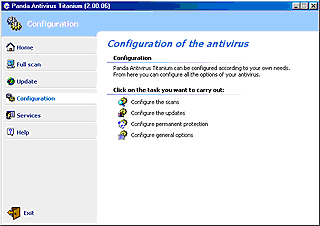
![]() Configure the scans. You can indicate whether the heuristic scan (which detects new viruses) should change the name of suspicious files. For this to take place, check the box Automatically rename the suspicious files.
Configure the scans. You can indicate whether the heuristic scan (which detects new viruses) should change the name of suspicious files. For this to take place, check the box Automatically rename the suspicious files.
![]() Configure the updates. As with the Update menu, here you can define certain aspects relating to the updates:
Configure the updates. As with the Update menu, here you can define certain aspects relating to the updates:
- Enable automatic updates: if this box is checked, Panda Antivirus Titanium will carry out the updates automatically, whenever it detects an open connection to the Internet. These updates are transparent (the user does not realize that they are taking place) and they do not affect in any way whatsoever any work being done on the computer at that moment.
- Notify me when updating automatically: if this box is checked and an automatic update is taking place, a message will appear informing you of the automatic update.
- User name: in order for the antivirus to be able to update automatically, you must enter your user name in this section. This information will be given to you once you have you registered online.
- Password: in order for the antivirus to be able to update automatically, you must enter your password in this section. This information will be given to you once you have you registered online.
- Notify me when updating automatically: if this box is checked and an automatic update is taking place, a message will appear informing you of the automatic update.
At the bottom of this screen there are various buttons. The OK button saves any changes and takes you back to the previous screen. The Cancel button, also takes you back to the previous screen, but does not save changes. If you want to define details related to the connection to the Internet, you can to this by clicking on Advanced. This takes you to anther screen with the following possibilities:

![]() Configure permanent protection. Just as was possible when starting from the Home menu, in this section you can indicate whether the permanent protection should be enabled or disabled. If you want to change the status (enable or disable) click on Configure permanent protection. This will show a new screen with a checkbox, Enable permanent protection (recommended). Check this box to enable the permanent protection. If you also want to indicate what file types should be scanned under the permanent protection, click on the Advanced button.
Configure permanent protection. Just as was possible when starting from the Home menu, in this section you can indicate whether the permanent protection should be enabled or disabled. If you want to change the status (enable or disable) click on Configure permanent protection. This will show a new screen with a checkbox, Enable permanent protection (recommended). Check this box to enable the permanent protection. If you also want to indicate what file types should be scanned under the permanent protection, click on the Advanced button.

A list appears with the file extensions that will be scanned by the permanent protection. To add new extensions to the list, write them in the box above the Add button then click on Add. If you want to exclude an extension from the list, select it and then click on Delete. To restore the list to its original status (the list included by default in Panda Antivirus Titanium), click on Restore. There are two other possibilities at the bottom of the screen:
![]() Configure general options: here you can indicate whether Panda Antivirus Titanium should scan floppy disks that are in the disk drives, when the computer is shut down. In this case, check the box Scan floppy disk drives on computer shutdown.
Configure general options: here you can indicate whether Panda Antivirus Titanium should scan floppy disks that are in the disk drives, when the computer is shut down. In this case, check the box Scan floppy disk drives on computer shutdown.
By accessing this section (by clicking on the Services menu), it is possible to take advantage of the services which are part of the wide range of services offered by Panda Software.
As the Reminder that appears at the bottom of this section reminds you, the services can only be used if you have registered On Line as a Panda Antivirus Titanium user. If this is not the case, you can register now by clicking on the link that appears in the Reminder section (service.pandasoftware.com/rol). However, you can register at any time by clicking on the Windows Start button and selecting Programs - Panda Antivirus Titanium - On Line Registration.
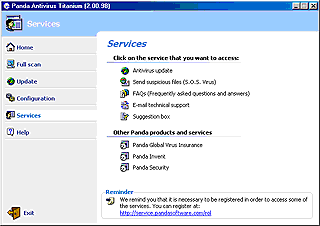
![]() Antivirus update. This option allows you to update the antivirus manually, enable or disable the automatic updates and define the characteristics of either of them. For further information, consult the Update section of this help.
Antivirus update. This option allows you to update the antivirus manually, enable or disable the automatic updates and define the characteristics of either of them. For further information, consult the Update section of this help.
![]() Send us suspicious files (S.O.S. Virus). If the name of a file has been changed (renamed) during a scan and this file appears in the report as suspicious, it may be infected by a new virus. If this is the case send it to us. Panda Software will provide you with an antivirus solution quickly and free of charge, or with certification that the files are in perfect condition! After selecting the files, instruct your Panda Antivirus Titanium to send them to the Panda Software Research Laboratory. Our experts will study them and detect the virus (if it exists), then they will eliminate it and send you the corresponding antivirus solution. In order to send the files, follow the steps below:
Send us suspicious files (S.O.S. Virus). If the name of a file has been changed (renamed) during a scan and this file appears in the report as suspicious, it may be infected by a new virus. If this is the case send it to us. Panda Software will provide you with an antivirus solution quickly and free of charge, or with certification that the files are in perfect condition! After selecting the files, instruct your Panda Antivirus Titanium to send them to the Panda Software Research Laboratory. Our experts will study them and detect the virus (if it exists), then they will eliminate it and send you the corresponding antivirus solution. In order to send the files, follow the steps below:
- Go to the Services menu.
- Select the option Send us suspicious files (S.O.S. Virus).
- Read carefully the comments that are displayed and click on the Next button.
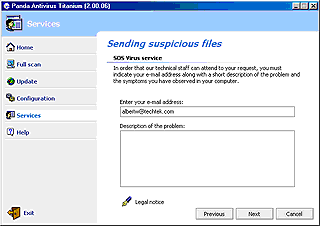
- In the box Enter your e-mail address, enter you e-mail address and check that it is correct. In the section description of the problem, describe what has happened, how the scan was carried out, which files have been renamed, etc. Explain CLEARLY and PRECISELY, what has happened. When you have done this, click on the Next button. If you want to go back to the previous step, you can click on the Previous button. If you click on the Cancel button, you will go back to the Services menu. By clicking on the Legal notice, a notice about the legality and protection of confidential data will appear. Click on the Next button to continue.
- Click on the option Add suspicious files, in order to attach to the message the files that the antivirus has renamed during the scan (a maximum of five files). If none of the scans have renamed any files, a dialog box will inform you of this.
- Click on the option Add other files, to attach to the message other files that you want our Virus Laboratory to scan.
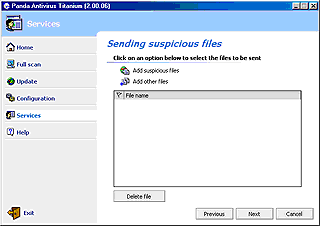
In both cases you can select several files at the same time using the mouse and holding down the SHIFT key (to select adjacent files), or the CTRL key (to select non-adjacent files). When you have selected all of the files that you want to send, click on the Next button to continue. Panda Antivirus Titanium will then compress the files that you want to send.
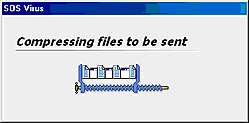
Then a screen will appear that indicates the size of the message that you are going to send. You have the option of sending it by clicking on the Send button, or of going back to the Previous step.
![]() FAQ's (Frequently asked questions and answers). Questions that other people have asked. The corresponding answer is also included. This can help you to clear up the doubts that you may have. In order to access them, go to the Services menu and click on the option FAQ's (Frequently asked questions and answers). Then an index of the questions will be displayed. Click on the question that interests you most and the answer will be displayed. In order to go back to the index or to go back to the Services menu, click on the Back button that appears at the bottom of this section.
FAQ's (Frequently asked questions and answers). Questions that other people have asked. The corresponding answer is also included. This can help you to clear up the doubts that you may have. In order to access them, go to the Services menu and click on the option FAQ's (Frequently asked questions and answers). Then an index of the questions will be displayed. Click on the question that interests you most and the answer will be displayed. In order to go back to the index or to go back to the Services menu, click on the Back button that appears at the bottom of this section.
![]() E-mail technical support. After consulting each of the FAQ's that are included in the antivirus program, through the FAQ's service (Frequently Asked Questions and Answers), you should have cleared up all of your doubts. If this is not the case, you can send us any other question you may have through the e-mail technical support service. In order to do this, follow the steps below:
E-mail technical support. After consulting each of the FAQ's that are included in the antivirus program, through the FAQ's service (Frequently Asked Questions and Answers), you should have cleared up all of your doubts. If this is not the case, you can send us any other question you may have through the e-mail technical support service. In order to do this, follow the steps below:
- Go to the Services menu.
- Select the option E-mail technical support.
- In the box Enter your e-mail address, write your e-mail address and check that it is correct. Next, select the country to which you want to send your enquiry. In the section Enquiry, let us know your doubt, problem, etc. Explain your doubt or problem CLEARLY and PRECISELY. The Attach file button lets you select any file that you think might help us deal with your problem. After you have done this click on the Next button. If you want to go back to the previous step, click on the Previous button. By clicking on the option Legal notice, a note on the legality and protection of confidential data will be displayed.
- Click on the Send button so that we will receive the questions you have described in the section Enquiry. When this has been done, a dialog box will appear informing you that the message has been sent. In order to go back to the Services menu, click on the Back button.
![]() Suggestion box. Your opinion is very important to us! This service allows you to directly contact Panda Software, sending us any ideas, comments or suggestions that you may have for improving your Panda Antivirus Titanium, the services that it includes, or any other matter. In order to send us any suggestions, follow these steps:
Suggestion box. Your opinion is very important to us! This service allows you to directly contact Panda Software, sending us any ideas, comments or suggestions that you may have for improving your Panda Antivirus Titanium, the services that it includes, or any other matter. In order to send us any suggestions, follow these steps:
- Go to the Services menu.
- Select the option Suggestion box.
- In the box Enter your e-mail address, write your e-mail address and check that it is correct. In the section Suggestion, enter your comments or ideas for improving the antivirus as well as the services that it includes. All suggestions will be carefully considered and will help us to improve. Explain each of your comments CLEARLY and PRECISELY. The Attach file button lets you select any file that you want to send to us. Once you have done that, click on Next. If you want to go back to a previous step, click on the Previous button. By clicking on the option Legal notice, a note about the legality and protection of confidential data will be displayed.
- Click on the Send button so that we will receive all of the comments that you have included in the section Suggestion. When this has been done, a dialog box will be displayed informing you that the message has been sent. In order to go back to the Services menu, click on the Back button.
Through the Services menu, you can also find out about the features of any other Panda Software product. To do this, simply click on the option that appears at the bottom of this window: Other Panda products. By doing this a window will be opened in your Internet browser and you will go to the page which describes all of the Panda Software products.
Panda Antivirus Titanium includes a menu that you can use to find out everything you need to know about the antivirus and clear up your doubts. In order to do this, go to the Help menu. In this menu you will find the following options:
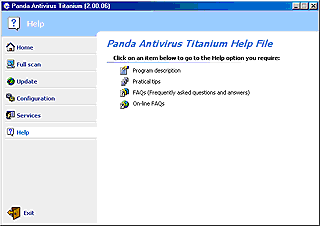
![]() Program description. Accesses the help files that you are consulting at the moment.
Program description. Accesses the help files that you are consulting at the moment.
![]() FAQ's (Frequently asked questions and answers). The questions that people have asked us and the answer to each question. This can help you clear up the doubts that you may have. In order to access this section, go to the Services menu and click on the option FAQ's (Frequently asked questions and answers) and an index of all of the FAQ's will appear. Click on the one that interests you most and you will be given the answer. To go back to the index or to the Services menu, click on the Back button that appears at the bottom of this section.
FAQ's (Frequently asked questions and answers). The questions that people have asked us and the answer to each question. This can help you clear up the doubts that you may have. In order to access this section, go to the Services menu and click on the option FAQ's (Frequently asked questions and answers) and an index of all of the FAQ's will appear. Click on the one that interests you most and you will be given the answer. To go back to the index or to the Services menu, click on the Back button that appears at the bottom of this section.
In addition to the functions, services and utilities incorporated in Panda Antivirus Titanium, it also includes other benefits that are worth highlighting.
E-MAIL SCAN
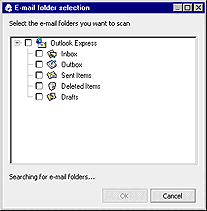
The e-mail scans are aimed at Microsoft Outlook messages as well as Microsoft Outlook Express messages. All messages will be scanned, thereby monitoring the POP3 port. In addition, you can also independently scan the e-mail folders that you consider necessary. In order to do this, follow these steps:
PERMANENT PROTECTION
As well as scanning all of the files involved in the operations that you carry out and those transferred through Internet, it will also handle e-mail messages. By doing this, Panda Antivirus Titanium monitors the POP3 port. The permanent protection (of files and Internet) can be enabled/disabled and configured in different ways:
From the Panda Antivirus Titanium window. You can do it through two menus:
MEMORY SCAN
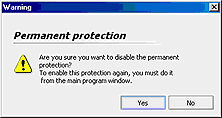
From the icon on the Windows taskbar. If the permanent protection is open (whether it is enabled or disabled), the Panda icon will appear in the Windows taskbar. If you right-click on it, a menu will appear. This menu has two options related to the permanent protection:

Panda Antivirus Titanium carries out scans in memory, which allows it to check files that could be blocked (in use) as well as the active processes. This results in a considerable increase in the speed of the scan and increased control of the corresponding detection and disinfection.
UNINSTALLATION AND REPAIR
You can remove (uninstall) Panda Antivirus Titanium from your computer whenever you want. In addition, it is also possible to repair or restore any of the components that may have been damaged or deleted, such as shortcuts and entries in the Windows Registry.
Uninstallation of Panda Antivirus Titanium. Follow these steps:
ON LINE REGISTRATION
Repair Panda Antivirus Titanium. In order to repair the antivirus (its components or files), the Panda Antivirus Titanium window must be closed. However, the permanent protection does not have to be disabled or closed. To carry out the repair, follow the steps below:
In order to use each of the services included in your antivirus, you must have previously registered as a Panda Antivirus Titanium user. This On Line Registration can be done in two ways:
During the installation of Panda Antivirus Titanium. One of the steps of the installation process allows you to Register On Line. However, you do not have to do it at this point, you can leave it until later.
RESCUE DISKS OR EMERGENCY DISKS
After installing Panda Antivirus Titanium. In this case, you must use the 'shortcuts' to your Panda Antivirus Titanium in the following way.
These disks allow you to boot your computer from a virus free environment and to scan any of its components (in command line, by running PAVCL).
Panda Antivirus Titanium allows you to create rescue disks for Windows 95, Windows 98 and Windows Me. You can also create rescue disks for Windows NT 4.0, but they will be different from those above. In either case, it is highly advisable to create them and you have two options for doing this: during the installation of Panda Antivirus Titanium, or later on. In the case of the latter, go to the Home menu and select More info... Then click on the option Create Rescue Disks. In order to obtain further information, go to the section Create Rescue Disks in this help.
PANDA REPS
In order to view the addresses of the offices and representatives of Panda Software throughout the world, simply follow the steps below:
INSTALLATION REQUIREMENTS
Panda Antivirus Titanium can be installed in computers which meet a series of minimum requirements (hardware and software). These requirements are as follows: