![]()
![]()
![]()
CDR Presenter is designed as a point-and-click program where you can develop your presentation simply by clicking with your mouse on the items or areas you wish to change and then selecting relevant options. The program shows your presentation as it currently stands, either full-screen or in a window. While you are changing the presentation, the display is marked out into areas for text, images and so forth which can be selected with the mouse. Over the top of this display is a separate 'Designer' which displays a list of the sections and pages in the presentation and has buttons for various options.
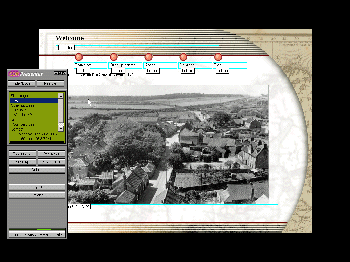
Presentations are made up of a series of 'screen sized' pages. When you are editing, the page is shown marked out into labelled areas such as 'text', 'image' and 'headline'. Clicking on these areas allows you to change them... click on a text area to enter and format text or change what's already there or click on an image area to choose an image for that space or adjust the settings for an image already shown there.
You can use the main buttons on a page to move around the presentation as you are editing it. Note however that some of the animation of the final presentation isn't shown at this stage and that some features, such as playing a video, are disabled until the presentation is being previewed or run.
The Designer is your main control area for the program. It appears over the presentation display or, if your screen size is large enough, can be placed to one side of it.
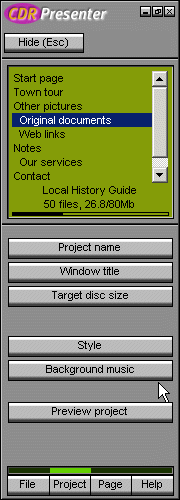
Underneath this listing is the name of the current presentation and an indication of its size, such as '50 files 26.8/80Mb'. This tells you the number of files currently in your project (50 in the example) and how much space it takes up (26.8Mb in the example). The second figure is an indication of total space for your project which you can set with the Target disc size button on the Designer. In the example above, the project is intended to be burnt onto an 80Mb business card CD so the display is showing 26.8 out of 80Mb used. A bar graph is provided under the figures to more clearly show how much of the available space the project has used up.
Pressing Esc a couple of times to quickly view the finished page is useful just to check where you are up to when you are working or to try out a link or video button on the page. But remember that changes can only be made to a page when the Designer is visible.
With the Designer hidden, the presentation is effectively being previewed; you can move pages as normal, run videos and so forth. This is a useful way to check your work so far.
![]()
The Designer divides its other controls into four separate 'pages'. Click on one of the selector buttons to select a particular set of buttons:
You can see which set of buttons is currently selected by the green highlight bar.
![]()
![]()
![]()