
What is an array? An array is a series of memory locations that holds data sequentially in elements. You can access the data by referencing an element within the array.
In this chapter, you'll see three types of arrays:
To include an array in your script, you must first instruct VBScript to create an array and also tell it how many elements you want the array to have by providing the highest element index:
Dim myArray(9)
This code creates an array called myArray with 10 elements. Remember that VBScript arrays always start with position 0, so when you reference this array, the maximum element or index number you can use is 9.
To access data from or assign data to the array, you simply refer to the array name and the element number:
myArray(3) = "Tuesday"
This code places the word "Tuesday" in the fourth element of the array (fourth not third). You can use a loop to access the data in an array like this:
For I = 0 to 9
 Alert myArray(i)
Next
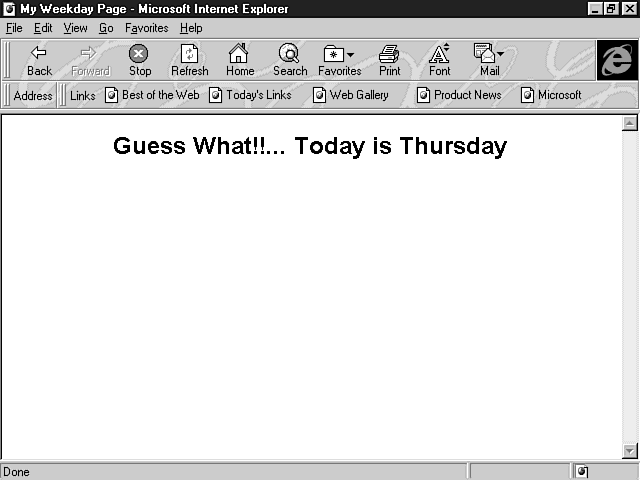
Here's a quick example that lets you display the day of the week on your page. First, you must build an array of days, and then you use the built-in Weekday() function to access the correct day:
<HTML>
<HEAD>
<TITLE>My Weekday Page</TITLE>
<SCRIPT LANGUAGE="vbscript">
Dim myDays(6)
myDays(0) = "Saturday"
myDays(1) = "Sunday"
myDays(2) = "Monday"
myDays(3) = "Tuesday"
myDays(4) = "Wednesday"
myDays(5) = "Thursday"
myDays(6) = "Friday"
</SCRIPT>
</HEAD>

<BODY BGCOLOR="white">
<FONT FACE="arial">
<CENTER>
<H2>Guess What!!... Today is
<SCRIPT LANGUAGE="vbscript">

 myNow = Now()
 myWeekDay = WeekDay(myNow)
 strDay = myDays(myWeekDay)

 Document.Write strDay

</SCRIPT>
</H2>
</CENTER>
</BODY>
The first script block sets up the array with seven elements. Then, the script assigns strings to each element. Note that the VBScript Weekday() function is programmed to return 0 when it's Saturday:
Dim myDays(6)
myDays(0) = "Saturday"
myDays(1) = "Sunday"
myDays(2) = "Monday"
myDays(3) = "Tuesday"
myDays(4) = "Wednesday"
myDays(5) = "Thursday"
myDays(6) = "Friday"
Because this first script is outside any subroutine, it executes immediately upon loading and also creates the array with global scope, which means that any other script on the page can access it. The next script block, which appears in the headline tag, is also outside of any subroutine, so it also executes upon loading:
 myNow = Now()
 myWeekDay = WeekDay(myNow)
 strDay = myDays(myWeekDay)

 Document.Write strDay
I split the procedure into four lines so that you can see how it works. First, the date is retrieved using Now() and assigned to the myNow variable. Next, the number of the day of the week (from 0 to 6, starting at Saturday) is returned using WeekDay(), and the value is assigned to the myWeekDay variable. The next line dips into the array at the element number corresponding to the day of the week. The value retrieved from the array is assigned to strDay, which is then printed on the Web page using the Write method. I showed this in four lines of code, but in reality, you need only one line:
Document.Write myDays(WeekDay(Now()))
Now that you've typed all that code and tried it with the browser, as shown in Figure 10.1, you might be interested to know that the file days.htm is on the CD-ROM at \SOURCE\chAPTER10.
Figure 10.1 : Ideal for people like me!
Dynamic arrays are ideal when you aren't sure at the outset how many elements you need for the array and you want to define or redefine the array during the program's execution. Defining a dynamic array is similar to defining a static array, except you simply leave out the number of elements:
Dim myDynamicArray()
This instructs VBScript to create a dynamic array that you will dimension at a later stage in the program. To dimension the dynamic array, you use the Redim keyword and specify a number of elements:
ReDim myDynamicArray(9)
You can dimension an array at any time within the script. However, when it comes to resizing (or redimensioning) a dynamic array, you must be careful. Resizing a dynamic array creates a brand new array with the newly requested number of elements. Any data you had stored in the old array is lost. Help comes in the form of the Preserve keyword. When you use Preserve after the Redim, the contents of the old array are copied into the new array automatically. However, if you specify a lower number of elements, the data in the upper elements is lost. The following examples illustrate the use of dynamic arrays:
You can add new data to the dynamic array whenever you need to, increasing the size of the array as you go, but what happens when you want to access that data again? You are obviously storing it for a purpose! How do you find out how many elements you now have in your ever-expanding dynamic array? The answer is a function called UBound().
UBound() returns the largest element number. In an array of 20 elements, UBound returns the number 19. You use the UBound function like this:
i = UBound(myDynamicArray)
To show how a dynamic array works in practice, construct a sample Web page in the next section.
This example uses a very simple array to store the information given by the user. The Web page is a basic travel survey in which the user enters the names of cities visited in the past year. Of course, you don't know how many cities a user might have visited, so this is an ideal job for a dynamic array. Perform the following steps to build this example:
<HTML>
<HEAD>
<TITLE>Travel Survey</TITLE>
<SCRIPT LANGUAGE="vbscript">

</SCRIPT>
</HEAD>

<BODY BGCOLOR="white">
<FONT FACE="arial" SIZE=3>
<CENTER>
<H2>Travel Survey</H2>
<P>
<BLOCKQUOTE>
Enter all the cities you have traveled to in the
past year, enter as many or as few as you like.
</BLOCKQUOTE>
<P>
 <FORM NAME="Form1">
    <INPUT TYPE="Text" NAME="Input">
    <INPUT TYPE="Button" NAME="cmdAddOne" VALUE="Add to List">
    <INPUT TYPE="Button" NAME="cmdFinish" VALUE="Finish">
 </FORM>
</CENTER>
</BODY>
</HTML>
Dim strCities()
Dim CRLF

ReDim strCities(0)
CRLF = Chr(10) & Chr(13)
Sub cmdAddOne_OnClick
  If Len(Document.Form1.Input.Value) > 0 Then
      ReDim Preserve strCities(UBound(strCities)+1)
      strCities(UBound(strCities)) = Document.Form1.Input.Value
      Document.Form1.Input.Value = ""
  End If
End Sub
Sub cmdFinish_OnClick
  Dim i
  Dim strMsg

  strMsg = "You have visited " &  UBound(strCities)
  strMsg = strMsg & " cities in the past year" & CRLF

  For i = 1 to UBound(strCities)
      strMsg = strMsg & strCities(i) & CRLF
  Next

  MsgBox strMsg,0,"Cities"
End Sub
The first two lines of the event handler create two local variables, one for the loop counter and the other to hold the message.
The first part of the message includes the number of cities visited by the user. You quickly obtain this by returning the highest index number in the array.
Now, you have to return the values held in each element of the array (apart from the first element 0, which in this case is not used). The loop assigns the values of 1 through the maximum number of cities entered to the loop counter i, which can then access the array element. The value of each element is then concatenated to the message string followed by the carriage-return character.
When all the elements have been accessed, the message is displayed to the user in a message box, and that is that, as they say. Just for fun, Listing 10.1 shows the complete HTML and script.
Listing 10.1. The travel.htm code.
<HTML>
<HEAD>
<TITLE>Travel Survey</TITLE>
<SCRIPT LANGUAGE="vbscript">
Dim strCities()
Dim CRLF

ReDim strCities(0)
CRLF = Chr(10) & Chr(13)

Sub cmdAddOne_OnClick
  If Len(Document.Form1.Input.Value) > 0 Then
      ReDim Preserve strCities(UBound(strCities)+1)
      strCities(UBound(strCities)) = Document.Form1.Input.Value
      Document.Form1.Input.Value = ""
  End If
End Sub

Sub cmdFinish_OnClick
  Dim i
  Dim strMsg

  strMsg = "You have visited " &  UBound(strCities)
  strMsg = strMsg & " cities in the past year" & CRLF

  For i = 1 to UBound(strCities)
      strMsg = strMsg & strCities(i) & CRLF
  Next

  MsgBox strMsg,0,"Cities"
End Sub

</SCRIPT>
</HEAD>

<BODY BGCOLOR="white">
<FONT FACE="arial" SIZE=3>
<CENTER>
<H2>Travel Survey</H2>
<P>
<BLOCKQUOTE>
Enter all the cities you have traveled to in the
past year, enter as many or as few as you like.
</BLOCKQUOTE>
<P>
 <FORM NAME="Form1">
    <INPUT TYPE="Text" NAME="Input">
    <INPUT TYPE="Button" NAME="cmdAddOne" VALUE="Add to List">
    <INPUT TYPE="Button" NAME="cmdFinish" VALUE="Finish">
 </FORM>
</CENTER>
</BODY>
</HTML>
Figure 10.2 shows what happens when you run Listing 10.1 with the browser.
Figure 10.2 : The contents of the dynamic array.
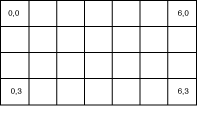
A multidimension array allows you to build a temporary mini-database in memory. Consider a single-dimension array as simply a row of elements (as shown in Figure 10.3), starting at 0 and containing a given number of elements, each holding a self-contained piece of information or data.
Figure 10.3 : A single-dimension array.
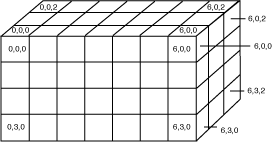
If you add a second dimension, the array takes on the appearance of a spreadsheet with rows and columns. You declare a two-dimension array by specifying the number of rows and number of columns:
Dim MyMultiArray(6,3)
This code creates a multidimension array in memory consisting of seven rows and four columns. You can access each element within this two-dimension array by referencing its coordinates, arrayname(row,column), as shown in Figure 10.4. It is as though each element of the single-dimension array had its own unique array.
Figure 10.4 : A two-dimension array.
Now, you add a third dimension to the array. Think of each element of the two-dimension array having its own unique array, as shown in Figure 10.5. A three-dimension array is declared like this:
Figure 10.5 : A three-dimension array.
Dim MyMultiArray(6,3,2)
| Note |
Multidimension arrays can eat memory very quickly. Consider the following: Dim myArray(9,9,9) These two lines of code actually zap 25KB of memory in the blink of an eye because memory is reserved for all elements of the array, whether they contain data or not. The string added to the array is 25 bytes long, so every element of the array is set to hold 25 bytes. Therefore, 10 elements ¥ 10 elements ¥ 10 elements ¥ 25 bytes = 25,000 bytes. Add another similar dimension and you eat up a quarter of a megabyte of memory! |
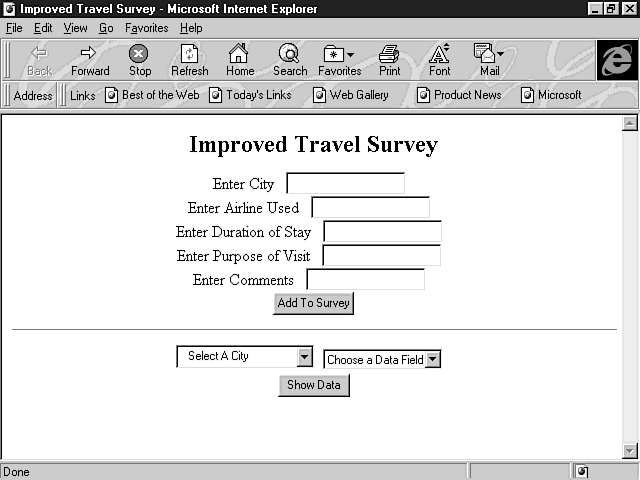
A multidimension array can act very much like a database. To demonstrate this, continue with the travel theme from earlier in the chapter. This time, you add an ActiveX control to help display the data dynamically, too.
<HTML>
<HEAD>
<SCRIPT LANGUAGE="vbscript">
<!-- SCRIPT TO GO HERE -->
</SCRIPT>
</HEAD>
<BODY BGCOLOR="white">
<CENTER>
<H2>Improved Travel Survey</H2>
<FORM NAME="Form1">
Enter City <INPUT TYPE=text NAME="City"><BR>
Enter Airline Used <INPUT TYPE=text NAME="Airline"><BR>
Enter Duration of Stay <INPUT TYPE=text NAME="Duration"><BR>
Enter Purpose of Visit <INPUT TYPE=text NAME="Purpose"><BR>
Enter Comments <INPUT TYPE=text NAME="Comments"> <BR>
<INPUT TYPE=button VALUE="Add To Survey" NAME="cmdAddOne">
<HR>
<!-- ACTIVEX COMBO TO GO HERE -->
<SELECT NAME="DataField">
<OPTION> Choose a Data Field
<OPTION>Airline
<OPTION>Duration
<OPTION>Purpose
<OPTION>Comment
</SELECT>
<BR>
<INPUT TYPE=button VALUE="Show Data" NAME="cmdShowData">
<BR>
</FORM>
</CENTER>
</BODY>
</HTML>
Figure 10.6 : The multi.htm file--with only HTML code.
Dim myMultiArray(4,4)
Dim CITY
Dim AIRLINE
Dim DURATION
Dim PURPOSE
Dim COMMENTS
Dim CurrentElement
CurrentElement = 0

CITY = 0
AIRLINE = 1
DURATION = 2
PURPOSE = 3
COMMENTS = 4
Sub cmdAddOne_OnClick
  If CurrentElement = 4 Then
   Alert "Sorry, no more"
   Exit Sub
  End If
myMultiArray(CurrentElement,CITY) = Document.Form1.City.Value
myMultiArray(CurrentElement,AIRLINE) = Document.Form1.Airline.Value
myMultiArray(CurrentElement,DURATION) = Document.Form1.Duration.Value
myMultiArray(CurrentElement,PURPOSE) = Document.Form1.Purpose.Value
myMultiArray(CurrentElement,COMMENTS) = Document.Form1.Comments.Value
CurrentElement = CurrentElement + 1
call Document.Form1.Cities.AddItem(Document.Form1.City.Value)
Document.Form1.City.Value = ""
Document.Form1.Airline.Value = ""
Document.Form1.Duration.Value = ""
Document.Form1.Purpose.Value = ""
Document.Form1.Comments.Value = ""

End Sub
Sub cmdShowData_OnClick

 If CurrentElement = 0 Then
  Exit Sub
 End If
intDataField = Document.Form1.DataField.SelectedIndex
intCity = Document.Form1.Cities.ListIndex
If intCity < 0 Or intDataField = 0 Then
 Exit Sub
End If
strMsg = "City:  " & myMultiArray(intCity,CITY) & "  "
strMsg = strMsg &  Document.Form1.DataField.Options(intDataField).Text
&  ": "
strMsg = strMsg &  myMultiArray(intCity,intDataField)
Alert strMsg

End Sub
Listing 10.2 shows the complete source code.
Listing 10.2. The completed multi.htm.
<HTML>
<HEAD>
<SCRIPT LANGUAGE="vbscript">
Dim myMultiArray(4,4)
Dim CITY
Dim AIRLINE
Dim DURATION
Dim PURPOSE
Dim COMMENTS
Dim CurrentElement
CurrentElement = 0
CITY = 0
AIRLINE = 1
DURATION = 2
PURPOSE = 3
COMMENTS = 4
Sub cmdAddOne_OnClick
If CurrentElement = 4 Then
Alert "Sorry, no more"
Exit Sub
End If
myMultiArray(CurrentElement,CITY) = Document.Form1.City.Value
myMultiArray(CurrentElement,AIRLINE) = Document.Form1.Airline.Value
myMultiArray(CurrentElement,DURATION) = Document.Form1.Duration.Value
myMultiArray(CurrentElement,PURPOSE) = Document.Form1.Purpose.Value
myMultiArray(CurrentElement,COMMENTS) = Document.Form1.Comments.Value
CurrentElement = CurrentElement + 1
call Document.Form1.Cities.AddItem(Document.Form1.City.Value)
Document.Form1.City.Value = ""
Document.Form1.Airline.Value = ""
Document.Form1.Duration.Value = ""
Document.Form1.Purpose.Value = ""
Document.Form1.Comments.Value = ""
End Sub
Sub cmdShowData_OnClick
If CurrentElement = 0 Then
Exit Sub
End If
intDataField = Document.Form1.DataField.SelectedIndex
intCity = Document.Form1.Cities.ListIndex
If intCity < 0 Or intDataField = 0 Then
Exit Sub
End If
strMsg = "City: " & myMultiArray(intCity,CITY) & " "
strMsg = strMsg & Document.Form1.DataField.Options(intDataField).Text & ": "
strMsg = strMsg & myMultiArray(intCity,intDataField)
Alert strMsg
End Sub
</SCRIPT>
</HEAD>
<BODY BGCOLOR="white">
<CENTER>
<H2>Improved Travel Survey</H2>
<FORM NAME="Form1">
Enter City <INPUT TYPE=text NAME="City"><BR>
Enter Airline Used <INPUT TYPE=text NAME="Airline"><BR>
Enter Duration of Stay <INPUT TYPE=text NAME="Duration"><BR>
Enter Purpose of Visit <INPUT TYPE=text NAME="Purpose"><BR>
Enter Comments <INPUT TYPE=text NAME="Comments"> <BR>
<INPUT TYPE=button VALUE="Add To Survey" NAME="cmdAddOne">
<HR>
<OBJECT ID="Cities" WIDTH=139 HEIGHT=24
CLASSID="CLSID:8BD21D30-EC42-11CE-9E0D-00AA006002f3">
<PARAM NAME="VariousPropertyBits" VALUE="746604571">
<PARAM NAME="DisplayStyle" VALUE="3">
<PARAM NAME="Size" VALUE="3669;635">
<PARAM NAME="MatchEntry" VALUE="1">
<PARAM NAME="ShowDropButtonWhen" VALUE="2">
<PARAM NAME="Value" VALUE="Select A City">
<PARAM NAME="FontCharSet" VALUE="0">
<PARAM NAME="FontPitchAndFamily" VALUE="2">
<PARAM NAME="FontWeight" VALUE="0">
</OBJECT>
<SELECT NAME="DataField">
<OPTION> Choose a Data Field
<OPTION>Airline
<OPTION>Duration
<OPTION>Purpose
<OPTION>Comment
</SELECT>
<BR>
<INPUT TYPE=button VALUE="Show Data" NAME="cmdShowData">
<BR>
</FORM>
</CENTER>
</BODY>
</HTML>
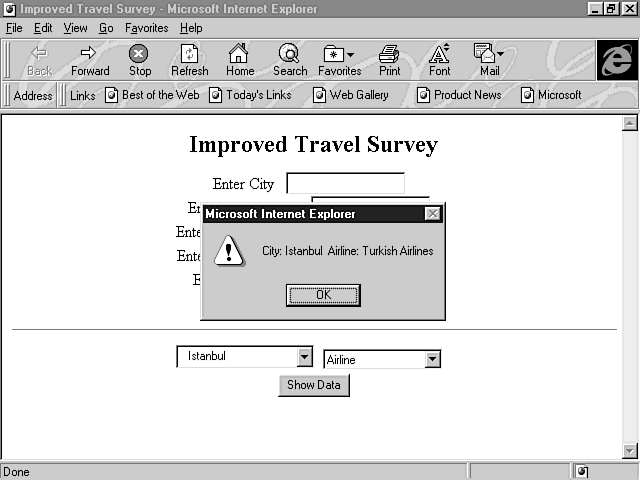
Save the page and try it out in the browser, as shown in Figures 10.7 and 10.8.
Figure 10.7 : The completed travel survey version 2.
Figure 10.8 : Travel survey version 2, completed with result.
| Note |
You can add further functionality to this page. Because you created constants to represent the field names, you can use them to access all the data of the same field, such as airlines, like this: for i = 0 to 4 To access all the fields for a particular city, you use something like this: cityNumber = 3 |
As you know, VBScript uses only one data type, the variant. Variant holds whatever data subtype is necessary for the data it is currently storing. In Chapter 4 "Using the VBScript Language," you learned how to use VarType() to determine what data subtype is held within a variant.
If a variant is holding an array, VarType() returns 8192 plus the normal VarType return value for the data within the array.
For example, if you have an array that consists of integer data, which has a normal VarType return value of 2, VarType returns 8194, as this short example shows:
intMyArray(10)
intMyArray(0) = CInt(Document.Form1.Input.Value)
x = VarType(intMyArray)
Remember that in normal circumstances, if you transfer any data from the HTML form directly into an array or any other variable, the variable is cast automatically as a data subtype of string. Other data subtypes must be invoked explicitly as shown in the previous example.
In this chapter, you saw how to use arrays to add much more programmatic functionality to your Web pages. Here are some main points to remember about arrays:
Now you've seen how to use arrays in your scripts to create database-like functionality in your Web pages, giving your applications power and purpose. But you can't neglect the user interface. To improve the look and feel of your applications, look at these chapters:
| How do I vary the contents of an array? All you've shown here is a hard-coded list of values. | |
| At the moment, the only way you can change the values list for a client-side array is to use a CGI server-side script to build the Web page as the client requests the page. You basically replace the value lists with a server-side script, but a lot depends upon the database system and Web server platform you are using, and that really goes well beyond the scope of this book. Whichever system you use, the page downloaded to the client will look identical to the ones used in this chapter, and the way you handle arrays at the client is the same. |


