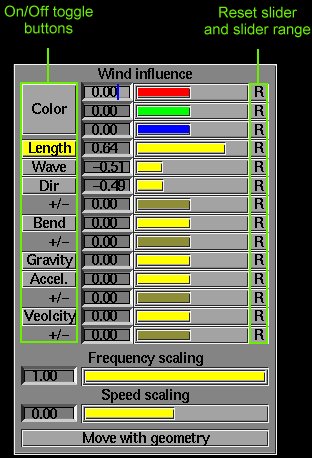
Dynamics is a good way to give the impression of movement, but in animation the dynamics is not really enough. We need something to make the fur blow in the wind.
Implementation
Real calculation of wind and turbulence is a very slow process. So we did a 'look alike' wind calculation that will help you make the fur animate as if it was influenced by wind.
Imagine the world space in FurDesigner
is filled with a 3Dsolid texture, just like the 3Dglobal textures in Softimage.
A 3Dsolid texture is really a formula that takes a world-space coordinate
and returns a number for that specific point in space.
In FurDesigner you can use the 3Dsolid
texture to influence all Channels (see tutorial 5)
Unlike the normal channel controls, Wind
works in the direction (or in the opposite direction) of the objects movement.
For instance a Bend function usually bend the hair around the U and V direction
of a patch, but if you let the wind influence the bend, the hairs will
bend along the direction of the wind.
Wind is kind of like Velocity Dynamics,
only the wind is moving by itself, and it can be turbulent.
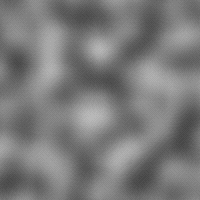
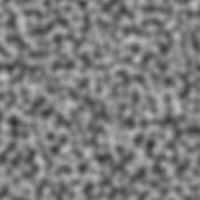
The Frequency slider controls the 'resolution'
of the 3Dsolid texture, here's some images to illustrate the influence
of the frequency slider:
| Low frequency | Middle frequency | High frequency |
 |
 |
 |
NB: Press the "Color" button to activate wind for the color channel. You can activate wind for any channel you want to.
Render the scene and try the effect of
changing the frequency slider.

Switch on bend and set the Bend +/- slider
to 10.0. This will activate the winds influence on the bend channel, and
thus the hairs will bend ;)
With a speed scaling of zero the wind
is stationary. Set the speed to 1 and render an animation.
Click this image to download a rendered
MPEG movie, where the Bend and Color channels are active:
Click this image to download a MPEG movie,
where only the Bend channel is activated:

Animated wind direction and speed.
To change the direction of the wind, exit
FurDesigner (save & exit). When back in Softimage, create a standard
cone. Change the name of the cone to "Wind". FurDesigner looks for a object
called "Wind" and uses the rotation and scaling of this object to control
the wind.
In Softimage, goto frame 1 and set a keyframe
with the cone in the default position.
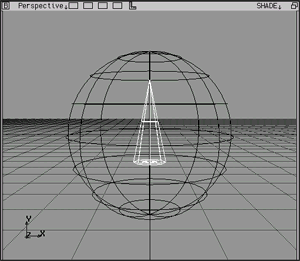
The cone looks like an arrow, that's 'pointing'
up. This will make the wind move up the Y axis. To change the direction
of the wind, rotate the cone to change the way it's pointing.
Goto frame 100 in Softimage and rotate
the cone to 0,0,180 so it's pointing down. Set a keyframe.
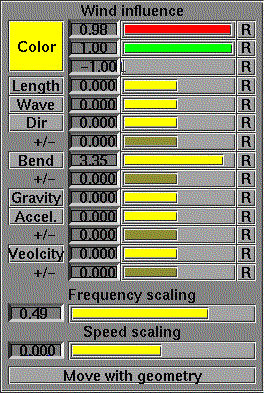
Open FurDesigner and open the Dynamics
panel. Adjust the Bend +/- slider to 1.0 and set the Bend slider itself
to 0.4. The bend slider is a general no-noise influence of the wind (all
hairs are affected equally) and the Bend+/- slider edits the effect of
the 3DSolid texture.
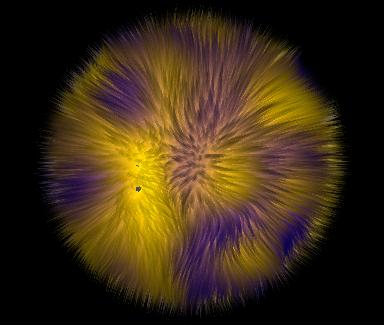
Render the animation or click the next image to see that the wind direction is animating with the rotation of the cone.
{IMAGE HERE}
The animation of the cone named "Wind"
(remember the capital W) controls the direction of the wind. The objects
X scale controls the frequency of the wind and the objects Y scale controls
the speed of the wind.
The "Speed scaling" slider and the "Frequency
scaling" slider (in the dynamics menu) are still used, and are multiplied
with the scaling of the cone. This way you can adjust the effect of the
cone's animation inside FurDesigner.
To visualise how the wind is moving, open the display window and press the "Show wind vector" button. This will make the wind vector as a purple vector and the current "offect" of the 3DSolid texture as a yellow NULL.
NB: You don't have to make it a cone, it can basically be any object. But the cone looks like it's point up the Y axis, and that makes it intuitive to use the cone. You will ofcause hide the cone when rendering the scene in Softimage or MentalRay.
Objects moving under wind influence.
When objects are moving around in world
space, they are also moving through the 3DSolid texture field, the 3DSolid
texture will be steady, in world space.
To make the object look like it's moving
through a viscous element, endble the velosity calculation (top of the
dynamics window).
This will enable speed-calculation for
each hair of the fur. The calculated speed will bend the hairs away from
the direction the object is moving. Enable "velosity" under the Wind parameters
to make the calculated velosity be influenced by the 3DSolid texture, the
wind.
The "Move with geometry" button makes the 3DSolid texture follow the object in world space, and thus the wind will act as if the object was steady in space, while it's moving around. If you chose to use this approach, you'll have to animate the wind cone youself to get a realistic effect.
This animation is made using velosity calculation in a combination with velosity-influenced wind.
{IMAGE HERE}