When designing fur you need to do different
styling at different locations of a model. FurDesigner uses a very powerfull
styling technique that allows you to make almost any look you can think
of.
Normally you keyframe things over time.
In FurDesigner you KeyPoint parameters over the surface of a object. The
KeyMap is defined by interpolating the KeyPoints. For any given surface
FurDesigner attatches a KeyMap like the one shown here:
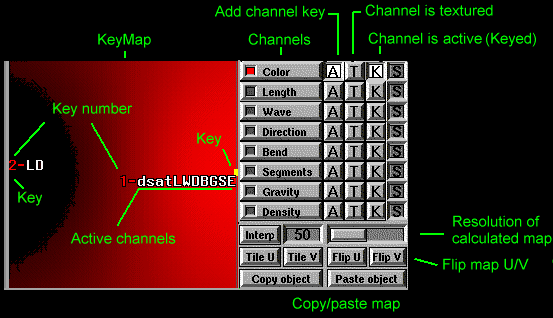
The Keymap is UV mapped on the surface,
as a texturemap is UV mapped in Softimages texture editor. In FurDesigner
the lower left corner maps to UV cooridinate 0,0 on the surface, and the
upper right corner maps to UV cooridinate 1.1.
Each parameter in FurDesigner (Length,
Color, Wave etc.) is called a Channel and any Channel can be KeyMapped.
Basic KeyMapping:
In this tutorial we will KeyMap the Length
Channel on a grid.
In Softimage, make a default b-spline grid
and move the camera to 0,10,-20. Then bring the scene into FurDesigner.
Select the grid and make 50 hairs pr. square
unit. Set the length slider at 4.0 to make the hairs longer.
Press down the "A"-button (Add) for
the Length Channel. This means that the Length Channel will be active for
the new key.
Press down left mouse button anywhere on
the KeyMap and drag the mouse around while holding the left mouse button
down. Notice the key is drawn in the graphics window as a small 'normal',
tagged with the key number.
Drag this Key to the right side of the
KeyMap area and release the mouse.
This first Key has all Channels active.
You need at least one Key of all Channels to edit the values. Before adding
the first Key, it was virtually there, just not at any specific UV coordinate
as it is now.
When there's only one active Key for any
given Channel, that key will have global influence.
Add another Length Key by pressing anywhere
on the KeyMap area again, this time drag it to the left side of the KeyMap
area.
The new Key is blue, which indicates
that this Key is selected. Key 1 is now unselected, thus drawn yellow.
Pull down the length slider to 0.2. This
sets the Length Channel for Key 2 (which is selected) at 0.2 and the length
is now interpolated between Key 1 and Key 2.
Press "Render selection"
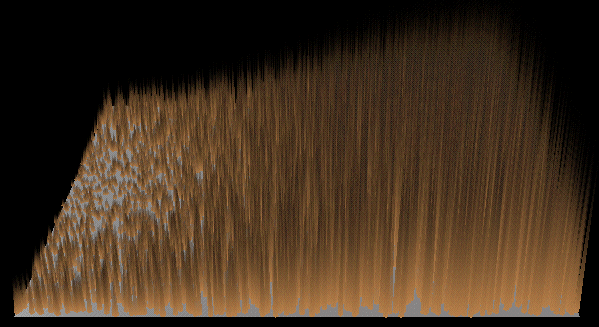
As you can see, the Length of the fur
is interpolated over the surface of the image.
Add another Key and place it at the top-middle
of the KeyMap area. The new Keys value is evaluated where you put the Key,
so no major difference should be visable till you change the length at
this new Key.
All Channels works like this, except the
Color and the Thickness Channels, which needs more parameters.
Color and Thickness
Length, Wave, Gravity, Segments, Density,
Direction and Bend are all 2D-parameters. They vary over the span of the
surface only. Color and Thickness are 3D parameters, as the color of a
hair can change over the span of a surface AND over the length of the hair.
In other words, the color of the hair can be different at different points
of the surface, but it can be different at different positions of each
hair too.
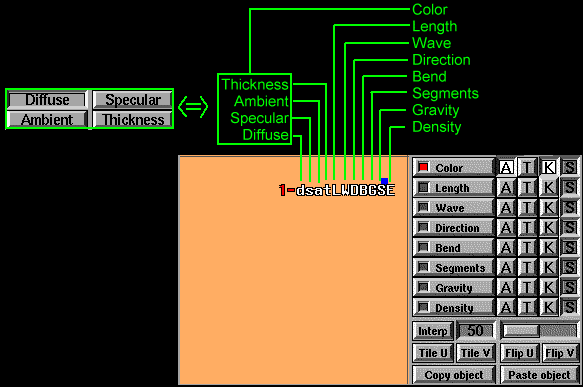
The ColorStrip is used to set the color
(Diffuse, Ambient and Specular colors) at different locations of the hair
(Root color, middle color, tip color) and the Thickness of the hairs. (Refer
the tutorial #2)
To define color in 3D space, each Color
Key is really an instance of a ColorStrip thus the KeyMap in figure 1 really
symbolises a color specification as it's seen in figure 2.
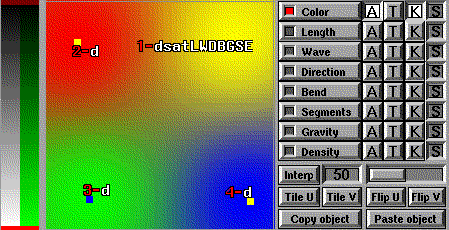

And results in this image:

Color Keying
To do the image in figure 3, first, we
have to delete the Keys already there. Hold Delete (Just over the left-arrow
key) and left-click the Keys 2 and 3.
Now, move Key 1 to the top-right corner
of the KeyMap area, by holding "M" (Move) and click-drag the key.
Notice how the
'normal' moves around on the surface in the graphics-window as you drag
the Key.
In FurDesigner, there's 4 different parameters
that varies over the length of a hair. As in Softimage|3D there's 3 different
color parameters - the Diffuse color, the Ambient color and the Specular
color. Futhermore you can set the thickness of the hair to vary along the
length of the hair.
Parameters that can change over the length
of the hairs are called "Color mode" parameters, even Thickness is a "Color
mode"
First, let's work with Diffuse color.
Depress the "A" for the Length Channel
and press "A" for Color. This way any new key added to the KeyMap area
will have the Color Channel active.
Make sure color-mode is "Diffuse" - check
it over the RGB sliders. If you followed this tutorial corrctly, ColorMode
is already set at "Diffuse" - if not, press down "Diffuse"

The Channel selector selects what type
of Channel will be added to the KeyMap area, but a Color Key can be either
a Diffuse, a Ambient, a Specular or a Thickness type.
To see what you are doing, press down the
"Color" channel selector. These buttons selects what Channel will be drawn
'behind' the keys in the KeyMap area. To see how the colors are interpolated,
press down the "Color" Channel selector.
Press left mouse button on the KeyMap area
to add a Color key of type Diffuse. Again, notice that the 'normal' shows
you where the key is going to be, on the KeyMap area as you drag the key.
When a Key is selected on the KeyMap area,
you are editing that key's values. If for example a Key don't have the
Length Channel active, and you pull the Length slider, either the global
key is changed (If there's only one key with a active Length Channel) or
you will get a error message telling you to select a Key with a active
Length Channel.
Editing Color Keys
Now you have two Color keys on your KeyMap.
To select a key for editing, hold down the "M" Key (Same as when moving
keys) and left-click the key. It turns blue and is selected.
Select Key 1 by holding LMB and click Key
1.
Tip: You can select several Keys
by holding "T" and click-drag. A Yellow frame will be drawn as you drag,
and the keys you frame will be selected. This way Left mouse 'Tags' keys,
Middle mouse 'Untags' keys and Right mouse 'Toggle-tags' keys (As in Softimage).
If more than one key is selected, all the selected keys will be edited
at the same time, when pulling a slider.
Key one has all channels active by default.
You can de-activate any channel by selecting the Key and depress the "K"
(keyed) for the channel you want to deactivate. If you deactivate all keys
of any channel (if you deactivate all the Length Keys for example) a new
key will be assigned to Key 1, as you always need at least one instance
of any Channel at any time.
If you deactivate all Channels for a given
Key, you will be asked if you want to delete the key (as it don't have
any function anymore) or leave a 'Phantom' key. A Phantom Key is a KeyPoint
with no Channels active. You cn re-activate any channel for a Phantom key
at will.
Switching Channels
on/off.
Delete all Keys in the KeyMap area by holding
the "Delete" key (on the keybaord) and left-click the key you want to delete.
If a key do not go away, that key probably holds the only instance of some
Channel, and thus this is the 'Global' instance of that Channel. To get
rid of it, select Key 1 and check if any Channels are switched off.
A channel is switched off if the
"K" button for the Channel is not pressed.
To switch on a Channel, just press the
"K" and the Channel is activated for the select(ed) key(s).
To switch off a Channel, just depress
the "K" and the Channel is de-activated for the select(ed) key(s).
Working with multiple
keys
In Softimage, do a default b-spline grid.
Take it into FurDesigner and add two Length Keys to the grid. (You get
to deside where the Keys goes) Make the two keys have different lengths,
so you can see the difference.
Notice that Key 1 by default has
all channels active, to forfill the prequisition that any Channel should
be present at a KeyMap at any time.
Now, select Key 2 (With "M" or "T" on the
keyboard) and switch on the "Color" Channel for that key, by pressing the
"K" button for the Color Channel. Key two now looks like this on the KeyMap:
2-dL
This tells you that
this is key 2 and that the "Diffuse" and "Length" Channels are active for
this key.
Which tells you that
all Channels are active for Key 1.
To deactivate a Channel
for a Key, select the Key and depress the "K" button.