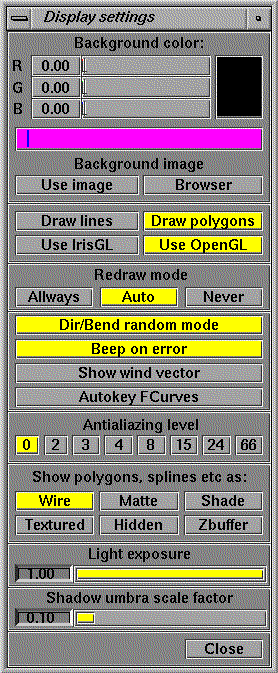
The Display menu is used to set options
that concern the whole scene, like background color, antialiazing level.
To access the menu press the Display button
in the lower left corner of the main menu.
 |
|
|
| |
Background
settings
The top part of the Display menu is used
to adjust the background color and to load a background image.
Remember to press Use image if you want
to use an image as background. |
|
Render
mode
Select the render mode. Render polygons
1 and Use OpenGL are the normal settings. |
|
Misc.
display commands
|
|
Antialiazing
level
0 is no antialiazing. Normally use 2 to
8 for smooth edges. |
|
Draw
mode
Set the draw mode for objects other than
patch and NURBS objects |
|
Use this slider
to adjust the amount of light in the scene. |
|
|
|
|
Background settings
Use the color sliders to adjust the background
color in the graphics area or check the Use Image button to use a background
image, loaded from disk.
The Browser button brings up a file selector
box, use this box to select the full path and filename of the background
image.
To load an animated background (a series
of numbered images), just select one of the images. The image names should
be in standard Softimage format (name.frame_number.pic). FurDesigner searches
for a new image every time the time slider is dragged.
Render mode
The default render mode is Render polygons
1 and Use OpenGL. This gives the full functionality of the program.
Render lines uses lines to draw the hairs.
This can give a nice look with very thin hairs, but it takes a lot of hairs
to cover the object the hairs grow on. Note that not all graphics hardware
support lines with variable thickness.
Render polygons 2 is a new renderer under
development. It has a limited functionality and is not recommended.
Misc. display commands
Normally only the Softimage objects are drawn
while orbiting and zooming in the graphics window. Check Draw hairs while
panning to draw hairs also.
If somebody is sleeping in your office
you can avoid waking them, by unchecking Beep on error.
The wind vector shows the direction of
the wind noise function. It is only interesting to se the vector if wind
is enabled. See the wind
tutorial for more info.
Antialiazing level
If you experience jagged edges in your rendering,
try raising the antialiazing level. Antialiazing is time consuming but
worth while, as it raises the image quality considerably.
Draw mode
Set the visualization for all non hair objects.
-
Wire
The objects are drawn as wireframe. Useful
for styling because you can see through the objects. Wireframe objects
are not drawn in the final rendering.
-
Matte
The objects are drawn in the matte color
-
Shade
The objects are drawn shaded.
-
Textured
The objects are drawn with texture mapping.
-
Hidden
The objects are not drawn.
-
Zbuffer
The objects are drawn only to the Zbuffer.
This way an object can be used to mask out objects drawn behind it, without
being drawn itself.