The dropping-zones as planned and the local situation.
 The map on the left, shows a number of foibles on the plan,
wich were the cause of failure on the Arnhem part.
The map on the left, shows a number of foibles on the plan,
wich were the cause of failure on the Arnhem part.
 1) The large distance between dropping-zone and main target.
2) Dropping in different lifts. (Not enough planes available for one
large dropping.)
Only the first lift arrived on schedule. The rest were late (bad weather), on the wrong spot
and worse, not at all.
Later on, supplies were dropt on the right spot but unfortunatly those spots were already taken by the enemy
at that time. One of the weaknesses of Airborne troops is, they can't take enough wapens and supplies at once.
Therefore quick supplying is essential. In this case many supplies were dropped on the enemy. Because of strict
orders to the pilots not to respond to signals from the ground, adjustment of dropping-zones were not possible.
The main target, Arnhem Bridge.
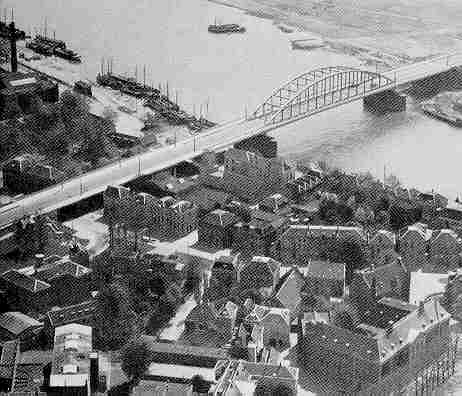
Well, here it is. The main target for the 1st Airlandingbrigade, the traffic-bridge of Arnhem.
One mile downstream the bridge there was a shipbridge, wich was removed a few days before the landings.
Two Miles downstream of the river Rhine lies the railroad bridge, wich was blown up when the first troops arrived to take it.
Five Miles downstream was the fourth rivercrossing "The Drielse Ferry". Wich was sunk on wednesday 20st by the Dutch
ferryman Pieter Hensen.
Houses direct to the left and to the right of the bridge, offering a splendid strategic position to overlook
the bridge directly. On this air-reconaissance photo there are a few boats who were not there when the battle
began. Later on in this report there will be much more on the development of the occupation
of the North side of the bridge and the battle-front here. There will be more pictures taken during the battle
and detailed maps will be shown.
Enemy positions on 17 September.
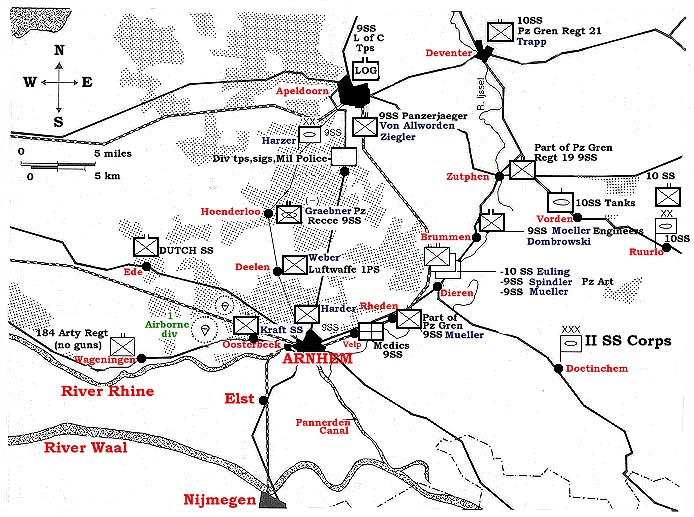 Brittish Intelligence did not take notice of the warnings of the Dutch resistance. Dutch resistance was well organized
and had send detailed reports about the growing strenght of German troops. Alarming was the presence of headquarters
of the
9.SS and
10.SS divisions as you can see on this map. Dutch resistance spotted staf-cars of high SS officers.
They also notified Brittish intelligence about the presence of armoured cars and tanks in the woods around Arnhem.
Also present are the Dutch SS (!) trainees, and the SS trainings school of
Major Sepp Krafft.
Brittish Intelligence did not take notice of the warnings of the Dutch resistance. Dutch resistance was well organized
and had send detailed reports about the growing strenght of German troops. Alarming was the presence of headquarters
of the
9.SS and
10.SS divisions as you can see on this map. Dutch resistance spotted staf-cars of high SS officers.
They also notified Brittish intelligence about the presence of armoured cars and tanks in the woods around Arnhem.
Also present are the Dutch SS (!) trainees, and the SS trainings school of
Major Sepp Krafft.
And there is the strong presence of Luftwaffe forces around the airfield of Deelen. Near the airfield, the location
of a large Bunker-
complex called DIOGENES. Headquarters of "3rd Jagddivision", which still exists today.