The Main Game
■
(1) Escape the goblin caves
You start
in [Room 1, Level 1] in a goblin prison
cell. Your first task is to escape the cell.
-
Talk to
Kultar.
-
Get
close to the metal bars leading to the Prison Cell annex
[Room 1a]. Remove the stone bricks blocking the metal
bars on the floor and activate the metal bars to bend them.
-
Pick up
the bone and equip it as a weapon.
-
Kill the
patrolling goblin.
-
Open
KultarÆs cell (he will be very helpful later).
-
Break
the wooden trap [Room 2, Level 1] by hitting it and
then jump down the hole.
-
YouÆll
land in an abandoned area [Room 1, Level 2].
-
Get the
torch, the leather leggings, another bone, and the sleeping
bag from the corpse.
-
Find
your first runes and check out the corpse in the abandoned
fire camp [Room 6, Level 2].
-
In the
elevator room [Room 12, Level 2], go through the
secret passage by transferring the stones from the pad
theyÆre laying on to the other pad. There you will find the
key to the store room.
-
Take the
rope from the barrel in the abandoned room [Room 5, Level
2] and use it on the broken elevator mechanism.
Use the elevator to gain access to the upper part of the
room.
-
Get the
dagger [Room 13, Level 2], being careful of the rats.
-
Go to
[Room 14, Level 2] and fight the goblin lord. Kultar
appears if you opened his cell, and will help to kill the
lord.
-
Unlock
the supply room [Room 17, Level 2] and take the
stairs [Room 16, Level 2].
-
At this
point, you can either choose to kill all aggressive goblins
in this level, or sneak past them into the large corridor
[Room 10, Level 1] to reach the human guard post.
(To sneak past them, drop a plate on the table in the guard
bedroom [Room 9, Level 1] to start a fight between
the two lords.)
-
You
can open PolsiusÆ cell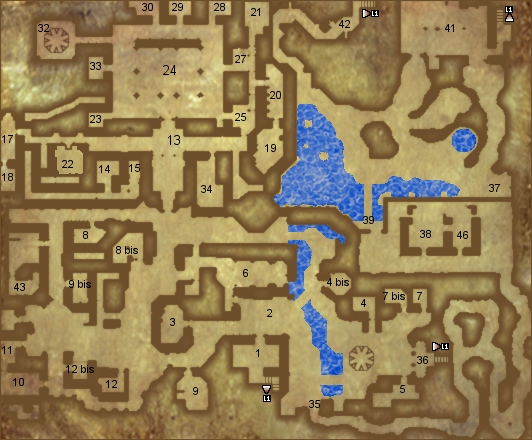 [Room 6, Level 1] if you
managed to get rid of the lord. (HeÆll be helpful later.) [Room 6, Level 1] if you
managed to get rid of the lord. (HeÆll be helpful later.)
-
Take the
blank papers in the Goblin guard room [Room 13, Level 1]
without waking up the sleeping lord. Get the key on the
table (It opens the door in the guard post managerÆs office
[Room 13, Level 1].)
-
In this
room, behind the secret door, youÆll also find the key to
the weapon room [Room 11, Level 1].
LEVEL 0 >>
■
(2) Guard post
-
Talk to
Ortiern in the guard post [Room 38, Level 0] and
receive the gem dealer license.
-
Ortiern will also place a
cross on the playerÆs map ([Room 35, Level 2]).
-
You can
go to the tavern [Room 41, Level 0], and learn about
Arx background, or play a game to earn money.
-
Polsius
is in the tavern if the player has opened his cell. If you
are aware of the written authorization that youÆll need, you
can give him the blank papers now.
-
Go back
down to the goblin area through the stairs in goblin customs
[Room 42, Level 0].
■
(3) Access the castle of the
king
-
Talk to
the guard [Room 12, Level 1].
-
Ask
Polsius to sign the fake authorization (he can be in the
tavern if you opened his cell earlier).
-
Show gem
dealer license and written authorization to the lord
[Room 12, Level 1]. If Polsius is dead, the player can
bribe the
lord. (Give him 300GP.)
-
Take the
stairs [Room 35, Level 2] up to the caves [Room
35, Level 0].
-
Talk to
Lord Lunshire in the throne room [Room 24, Level 0].
Receive a note from Lunshire.
-
Buy as
many goblin-mine shares as you can at the bank [Room 10,
Level 0]: they are very cheap at this point in the game
due to the trollÆs strike. You can also visit MariaÆs Pawn
Shop [Room 5, Level 0]. At this point, the Weapons &
Armors Shop is closed. [Room 9, Level 0].
■
(4) Ask for
help from Pog, King of the Trolls
-
Go back
down to the troll area through the stairs [Room 35, Level
0].
-
Show
LunshireÆs note to the troll [Room 36, Level 2].
-
Talk to
Pog in the Hall of Trolls [Room 37, Level 2] and give
him Lord LunshireÆs note.
-
Talk to
Izak the goblin at the entrance to the Troll encampment
[Room 36, Level 2].
-
Talk to
the guard [Room 27, Level 2] to access the supply
room. You wonÆt get in yet.
-
Put some
wine in the cake flour located in the kitchen [Room 25,
Level 2] and wait for the cook to take the cakes to the
king. (Poison wonÆt work: the cook will notice and make
another cake from scratch.)
-
After
eating the
cakes with wine [Room 20, Level 2],
King Alotar will get up and run to his bedroom [Room 21,
Level 2]. Follow him there and ask for his
authorization to open the supply room. (To speak to the
Goblin King, you can also steal the key to
his throne room from one of the guards.)
-
Go to
the supply room [Room 28, Level 2]. You can take
everything you want in this room but donÆt forget to close
the door so that the Goblin Lord guard
doesnÆt
see you. Lockpick the chest if you
have enough skill or
take the key
hidden under a pillow in AtokÆs room [Room 26bis, Level
2]. (Do not show this key to Atok: he will attack you.)
the chest if you
have enough skill or
take the key
hidden under a pillow in AtokÆs room [Room 26bis, Level
2]. (Do not show this key to Atok: he will attack you.)
-
Atok
comes in and attacks when the chest is opened.
-
Bring
the idol back to Pog.
-
As the trolls go back to work, Pog will send some of them to
free the path near the guard post.
-
You can now go back to the kingdom of Arx or access Level 3.
LEVEL 1 >>
■
(5) Go back to the kingdom to investigate the rituals and
learn your
destiny
-
Go back
to the human throne room and talk to the king about the
trollÆs quest. Receive the key to your bedroom [Room 32,
Level 0].
-
Talk to
Felnor [Room 19, Level 0] and receive a note from
Falan Orbiplanax. Read it to get the secret code.
-
Open the
chest in FalanÆs bedroom hidden behind the curtains [Room
27, Level 0].
-
Enjoy the council meeting cut-scene.
■
(6) Find the temple entrance
-
Talk to
Erzog in the prison of the castle [Room 15, Level 0].
He will give location of the secret temple and the password
to access it.
-
Go to
the castle exit, see the cinematic of Lunshire being
threatened by the snake women.
-
Leave
the castle, and meet with Chinkashh in town who will show
you how to use the teleporters.
-
Go to
the tavern [Room 41, Level 0], give the password to
the Ylsides (behind the metal door) and go down to the
temple.
■
(7) Enter the temple to
destroy the statue
-
Kill all
the hostile priests. One is blind and wonÆt attack. He can
be useful for information.
-
The goal
is to access the Meteor Chamber [Room 37, Level 1] in
order to destroy the meteor. The only way to do this is to
unset the security system and activate the bridge [Room
22, Level 1]. ItÆs an anti-magic zone so the levitate
spell canÆt be used.
-
There
are three levers to activate: [Room 26, Level 1],
[Room 27, Level 1], and [Room 28, Level 1].
-
Dispel
the energy field [Room 29, Level 1] using a scroll of
dispel or by casting the dispel field spell.
-
Go to
the Golem Room [Room 34, Level 1] and kill the golem
to retrieve his golem heart. You can also get a golem heart
from one of the high priestsÆ bodies.
-
Go to
the high priestÆs bedroom [Room 31, Level 1], kill
the high priest and take the code from his corpse.
-
In the
golem riddle room [Room 26a, Level 1], use the golem
heart on the golem and attract him onto the pressure pad in
the nearby room [Room 26b, Level 1]. This will grant
access to lever #1 [Room 26, Level 1].
-
Enter
the code from the dead priest and activate lever #2 [Room
28, Level 1]. A golem will be released when the lever is
activated.
-
Activate
lever #3 [Room 27, Level 1]. There is a little trick:
to open the
second door of the corridor, the first one must be closed.
-
IMPORTANT : Find three magic rocks of Akbaa
(out of 5), this
will be useful to finish the game.
-
There is a lich with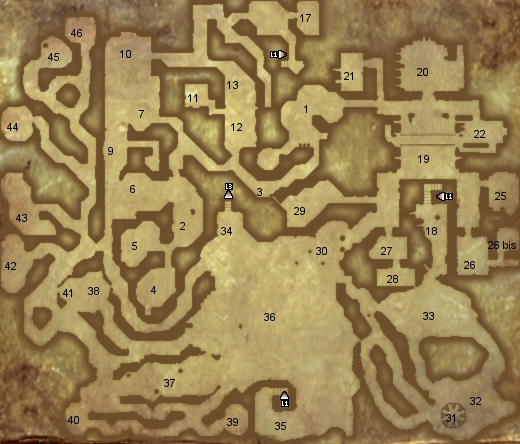 some goodies
in the tomb [Room 35, Level 1]. Defeating it
is optional; you should try to kill it later on, when
stronger.
some goodies
in the tomb [Room 35, Level 1]. Defeating it
is optional; you should try to kill it later on, when
stronger.
-
Go to
the Meteor Chamber [Room 37, Level 1]. Kill the
demon, free the woman and touch the statue.
-
Go back to the human castle. You
can use the teleporter [Room 18, Level 1] as
it avoids a long trip.
-
See the Mini-cinematic of Erzog dying on your way back to
the castle.
LEVEL 2 >>
■
(8) Find a solution to
destroy AkbaaÆs statue
-
Talk to
Lord Lunshire. Felnor is here; learn about Krahoz, Zohark,
and the anti-mana drain.
-
At this
point, you can do the Krahoz quest or the Zohark quest in
any order.
■
(9) Find Krahoz
-
Go to
the tavern and talk to Enoil Calpale. (This is optional.)
-
Go to
the Underground Lake [Room 14, Level 3] two levels
below and talk to Alia.
-
After
the cinematic, you can choose to act in two different ways:
■
(9.1) Accept AliaÆs deal and
get her shield back from the crypt
-
Go back
to the kingdom [Room 36, Level 0] and get the key to
the crypts from Carlo or lockpick the portcullis leading to
the crypt.
-
Read the
tombstones [Room 35, Level 3]. A tomb says that
Achanta was a vampire. Get the ritual bloodletting device.
-
Use the
ritual bloodletting device in front of AchantaÆs statue
[Room 36, Level 3].
-
Get the
key [Room 39, Level 3].
-
Solve
the statue puzzle in the Tomb of Heroes [Room 32, Level
3] by activating the sword of the statue in the
north-east corner of the room to open the portcullis. Go
down to the next level.
-
There
are two major obstacles in this level. The first is the
portcullis in the KeeperÆs Room [Room 1, Level 4].
-
Pull the
two levers in the KeeperÆs Room [Room 1, Level 4]
after putting a weight on the pressure pad.
-
Open the
other portcullis [Room 12, Level 4] by pushing the
two hidden buttons in the corridors.
-
Go to
the unfinished tomb [Room 11, Level 4] and take three
stones. Put them on the three pressure pads [Room 14,
Level 4].
-
Access
the next level with the stairs [Room 13, Level 4].
-
Open
either of the tomb doors ([Room 7, Level 5] or
[Room 8, Level 5]). Both lead to the
same room. The lever in one room opens the door in the
opposite room.
-
Jump
over the pressure pad at the entrance of the rooms or the
mechanism will be reset.
-
When you
get to the
pit room [Room 14, Level 5], itÆll be too large to
jump over. Throw something on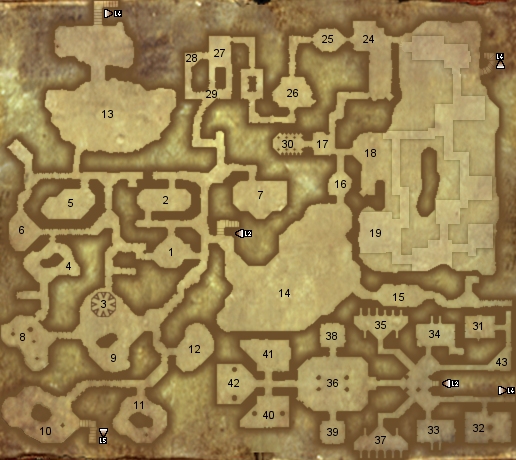 the pressure pad on the other side of the pit and walk
across on the metal grids that appear.
the pressure pad on the other side of the pit and walk
across on the metal grids that appear.
-
Pick up
each of the six element stones you find in the crypts (in a
tomb in [Room 35, Level 3], on a corpse [Room 37,
Level 3 ], on a corpse in [Room 6, Level 4], on a
corpse in [Room 11, Level 4], in a tomb in [Room
6, Level 5], in a tomb in [Room 2, Level 5]).
-
Solve
the Elder puzzle leading to the treasure [Room 11, Level
5].
LEVEL 3 >>
(1) Each
wheel stands for a room:
-
Wheel A
= Room 3
-
Wheel B
= Room 4
-
Wheel C
= Room 5
-
Wheel D
= Room 6
-
Wheel E
= Room 7
-
Wheel F
= Room 8
Inside
each of the rooms, youÆll see symbols on the ground. The goal
of this riddle is to turn the wheel in order to get the symbol
to match from the appropriate room, facing the big direction
arrow.
Exit
********** ***********
* *
* Wheel E Wheel F *
* *
*Wheel C Wheel D *
* *
* Wheel A Wheel B *
* *
* *
* *
*********** ***********
Entrance
-
Turn
Wheel A five times
-
Turn
Wheel B three times
-
Turn
Wheel C four times
-
Turn
Wheel D twice
-
Turn
Wheel E once
-
Turn
Wheel F three times
(2) Now
put each element stone on the appropriate pillar. (The stone
symbol must match the second symbol that appears on each
wheel.)
-
Take the
Shield [Room 12, Level 5].
-
Beware
of the liches [Room 2, Level 5] on the way back. Exit
the crypt via the secret passage [Room 3, Level 5].
To open it, use the orb you found [Room 6, Level 5]
on the little hole.
-
Bring
the shield back to Alia.
■
(9.2) Steal Krahoz
-
Go to
the entrance to the rebel camp [Room 16, Level 3] and
open the door.
-
Go to
the food storage area [Room 24, Level 3]. Here, a
guard is patrolling. Wait until the guard has turned back,
then follow him silently to reach the barrels.
-
Hide
behind the barrels and wait until the guard has reached the
corridorÆs entrance. Enter the next room [Room 25, Level
3].
-
Another
way to pass this guard is to poor some poison or sedative
into the wine bucket heÆs drinking from.
-
Beware of the pressure pads on the floor. If activated, they
will
activate traps.
-
Remember
to throw objects to attract guards.
-
For the
next guard, the player must follow him silently until he has
reached the guardÆs turning back point. Wait for the guard
to go back near the
previous room [Room 25, Level 3]
and then enter the second part of the corridors.
-
The
player has
limited time to open the treasure room, steal Krahoz and close the door back.
-
The player can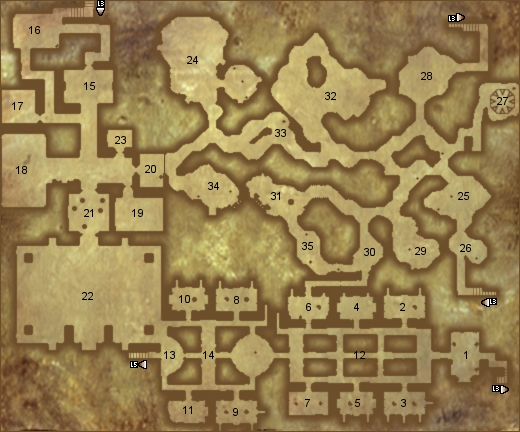 activate 3 levers in this room. Lever A will simply ring the
alarm bell. Lever B will open the portcullis leading to the
treasure room (but a pressure pad behind it will ring the
bell). Lever C will open a secret passage leading directly
to the treasure room.
activate 3 levers in this room. Lever A will simply ring the
alarm bell. Lever B will open the portcullis leading to the
treasure room (but a pressure pad behind it will ring the
bell). Lever C will open a secret passage leading directly
to the treasure room.
-
Take the
same way back, avoiding the same traps, and leave the rebel
camp.
-
You can
give Krahoz back to Alia if that pleases you (she will give
you money in return), or you can keep it.
LEVEL 4 >>
■
(10) Find Zohark
-
Talk to
the gate keeper of the snake women [Room 34, Level 5].
-
Talk to
Zalnashh in her throne chamber [Room 35, Level 5].
The player will receive a key to the Temple of Illusion.
-
Go to
the Temple of Illusion [Room 15, Level 5].
-
Activate
the lever hidden behind the retractable tapestry [Room
16, Level 5].
-
Go
through the secret passage to a hidden room [Room 27,
Level 5].
-
Retrieve
the real golden snake after having shot at the eye in
the poster [Room 17, Level 5].
-
In the
room with the missing lever [Room 17, Level 5] , cast
the ôRevealö spell (or use a reveal scroll) to see and
activate the lever that leads to a hall [Room 18, Level
5].
-
To open
the portcullis here [Room 18, Level 5], the player
must solve the puzzle of the Golden Snake room [Room 19,
Level 5]. Activate the six levers placed in the six
little rooms [Room 19, Level 5] in the correct
sequence. Drop objects in each little room to recognize them
and activate the orb in the center of the room to see which
lever to activate next.
-
Ignore
the joke room[Room 21, Level 5], as it is only here
to fool the player.
-
Go to
the mirror room [Room 22, Level 5] and approach the
mirror, turn your back, then fight with the reflection that
comes out of the mirror.
-
Cross
the mirror and open a door in the back of the room.
-
Walk
through the wall to a teleporter room [Room 23, Level 5].
-
There is
a trick to using this teleporter. Walk backward until
teleported, then turn again in the opposite direction
(dropping objects on the floor might be useful to stay
oriented).
-
In this
corridor [Room 18, Level 5], it seems
to be infinite.
There is a hidden button on the wall that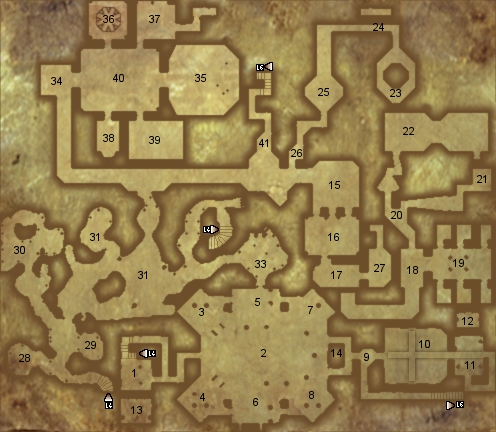 opens a secret
passage to skip the teleporters and go to the Room of Truth
[Room 25, Level 5].
opens a secret
passage to skip the teleporters and go to the Room of Truth
[Room 25, Level 5].
-
Place
the real golden snake in the bowl. This will reveal Zohark
to the player and, as he grabs it, lead him to the final
test.
-
You will
be teleported back to the Temple of Illusion entrance
[Room 15, Level 5]. The snake women statues will
turn into real snake women. Kill them to finish the Temple
of Illusions.
-
Activate
the teleporter on this level [Room 36, Level 5].
LEVEL 5 >>
■
(11) Go back to AkbaaÆs
temple to destroy the statue for good
-
This
time, the statue is protected by a few Ylside. You can avoid
them if they are still too tough for you.
-
Equip
Krahoz and Zohark and touch the meteor. It will disintegrate
this time. Receive some rock of Koltk powder in order to
make a super-weapon.
-
Return to the castle of Lunshire.
■
(12) Set Lord Lunshire free
from the Ylsides
-
Shopkeepers locked themselves in their shops, Ylsides have
invaded the place.
-
Everybody is dead at the guard post.
-
Meet a
dying guard in the caves [Room 35, Level 0] or the
town entrance [Room 1, Level 0] who will tell you
that the castle has been invaded by the Ylsides.
-
You must
go to the prison [Room 15, Level 0]. Try stealth if
facing the Ylside warriors is too tough.
-
From the
castleÆs corridor, surrounding the throne chamber, use the
secret passage leading to the kitchen [Room 17, Level 0].
-
Cross
the corridor to reach the secret passage leading close to
the weapon room [Room 14, Level 0], avoiding any
contact with the two Ylside warriors patrolling. In this
room, the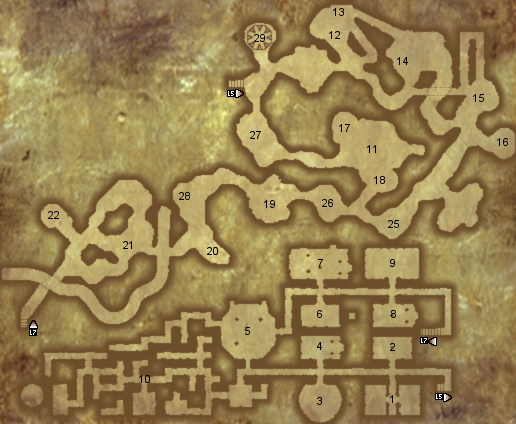 player must wait until the Ylside has passed the
corner, then open the door leading to the prison [Room
15, Level 0]. player must wait until the Ylside has passed the
corner, then open the door leading to the prison [Room
15, Level 0].
-
Watch
the cinematic with KultarÆs intervention. Receive the Ylside
armor.
-
Open the
sewers and go down [Room 8, Level 0].
-
Once you exit the sewers, Iserbius recalls his Ylsides
warriors and everything will be back to normal again. Shops
are open, guards are roving, etc.
LEVEL 6 >>
■
(13) Super-weapon quest
-
Talk to
the king and Felnor.
-
Go to
the dwarfÆs level. YouÆll have to first go back to
the snake woman level since itÆs the only way to
access the next level.
-
Go to
Level 6, through entrance to the ratmenÆs lair
[Room 41, Level 5], and defeat the ratmen. Make your way
deeper [Room 20, Level 6].
-
Fight
the giant worm.
-
Go down
to Level 7 using the stairs after the giant worm.
-
Enter
the dwarfÆs level [Room 8, Level 7]. Note that there
are signs saying it is impossible to cast magic in this
zone.
-
Go to
the dwarf entrance [Room 12, Level 7], then to
the kitchen [Room 13, Level 7].
-
The
black beast will fall from the roof, making it collapse,
preventing you from returning to the entrance [Room 12,
Level 7]. The black beast will grunt for a second. DonÆt
try to fight it; itÆs certain death.
-
Run out
quickly, close the door behind you in order to slow down the
monster a bit.
-
Run to
the lava pit [Room 24, Level 7], jump on the
remaining platforms to cross the lava pit and leave the
black beast on the other side of the pit.
-
Find the
key, a power stone and some dwarf flesh in a corpse down the
stairs.
-
Now walk
back up the stairs. The black beast is here waiting for you.
-
Open the
door with the key (without panicking) and run through the
corridor to the smelting room [Room 15, Level 7].
-
Combine
the Power Stone with the generator to activate the crusher.
-
Jump up
the ladder and relax once at the second floor. You can see
the monster from above trying to jump and reach you.
-
Activate
the lever; you will hear a machine starting. Jump down where
the monster is and attract it under the crusher. Time this
right or die, either crushed by the crusher or eaten by the
monster. While upstairs, you can also drop a piece of dwarf
flesh on the ground to attract the black beast under the
crusher.
-
Once
itÆs dead, take the sword mold and also take the key in the
office [Room 16, Level 7]. Activate the lever that
will release the one opening lava pit [Room 15, Level 7].
Go back to the corridor [Room 14, Level 7]. The black
beast will come back from the alcove.
-
Run back
to the lava pit [Room 15, Level 7] and open the lava
trap at the right time to finally get rid of the monster.
-
Go to
one of the bedrooms[Room 18, Level 7]. Find a sword
mold, a key, and a power stone.
-
Get the
power stone from the next bedroom [Room 19, Level 7].
-
Read the
book there [Room 19, Level 7]: it gives instructions
on how to forge an object.
-
Leave
the dwarf hall [Room 20, Level 7] to enter the mines.
Turn right; youÆll find a power stone blocked behind a piece
of wood near the cave wall.
-
YouÆll
find another power stone on a corpse [Room 21, Level 7].
-
Go to
the Transfer Room [Room 26, Level 7], climb the beams
to the top of the room and use a pickaxe on the mithril
in the wall to retrieve a chunk of mithril. Go downstairs
and place the mithril under the pod. Put a power stone in
the teleporter and activate it.
-
Go back
to the smelting room [Room 15, Level 7]. Put a new
power stone in the generator, take back the chunk of mithril
and place it under the crusher. Activate the crusher. Get
the four chunks of mithril.
-
Go to
the forge [Room 23, Level 7] and create the weapon
doing the following: Place two chunks of mithril and the
koltk powder in the oven. Use another power stone and
activate the machine. Get the koltk-mithril ingot. Face the
other machine; place one of the mold on the left side and
the ingot in the hole on top of the forge. Use the last
power stone and activate the machine to obtain the
super-weapon.
-
Cross
the gap [Room 16, Level 1] using a levitation spell.
-
Shoot a
fireball at the stalactite in the cave [Room 18, Level 1]
and levitate to the stalactite. stalactite in the cave [Room 18, Level 1]
and levitate to the stalactite.
-
Jump
around or use levitation scrolls to find your way to the Ice
Dragon cave entrance [Room 19, Level 1].
-
Melt the
ice block leading to the Ice DragonÆs lair [Room 20,
Level 1].
-
Talk to
the dragon. Bring him enough gold to buy his egg. The price
is equal to the number of scales that the dragon has. (This
number can be found in a book in the human library.)
-
If you
canÆt pay the dragon, fight it and get an egg.
LEVEL 7 >>
■
(13.1) Enchant the weapon the
nasty way
-
Go back
to the snake woman temple [Room 40, Level 5] and talk
to Zalnashh near the transmutation altar.
-
Drop the
egg and the weapon on the altar and then talk to Zalnashh to
give her the rebelÆs hideout location. Watch the ritual,
wait for the snake women to leave, and then get the ultimate
weapon from the altar.
-
(Note
that you can also sell the rebels to the snake women after
dropping the egg and the weapon on the altar by using the
dissidentÆs hideout key on Zalnashh.)
■
(13.2) Enchant the weapon
yourself
■
(14) Find the entrance to the
YlsideÆs bunker and destroy Iserbius
-
Go to
the entrance of the YlsideÆs bunker [Room 13, Level 3].
On the way youÆll see the wrap-up of AliaÆs quest; there are
many endings according to what you have done in the past.
-
Dispel
the energy field closing the path to the bunker [Room 13,
Level 3].
-
Fight
the two Ylside warriors guarding the gate, or avoid them.
-
Go to
the secret bunkerÆs entrance [Room 15, Level 4].
-
Get a
stone of Akbaa from a priest [Room 16, Level 4]
-
Get a
stone of Akbaa from IserbiusÆ room [Room 20, Level 4]:
Use a candle on the skull on the table (the one with no
candle). It will open some kind of secret ôchestö in the bed
of Iserbius. Inside this chest you will find a key to open
the big chest on the ground. The rock is inside.
-
Go to
AkbaaÆs puzzle room [Room 21, Level 4] and put the
stones in the puzzle of Akbaa.
-
Draw
AkbaaÆs sign in spell casting mode.
-
Enter
the praying room [Room 22, Level 4] to fight Iserbius
merged with Akaa.
-
Watch
the end cinematic.
Subquests and
Fun Things to Do
■
Oliver, the Dead Hermit
treasure hunt (XP 1000)
-
Read the
inscription on the wall of the tavern [Room 41, Level 0].
-
Read the
note on the corpse [Room 8, Level 3].
-
In this
room, combine an emerald on the chest to unlock it.
-
Read the
note in the chest.
-
Remove
all the stones in the mining zone [Room 42, Level 2]
and read the note.
-
Cast
ôRevealö in the abandoned area [Room 4, Level 2] and
read the sign on the wall.
-
Go to
the spider room [Room 30, Level 5]. Use a shovel in
the zone and read the note.
-
Go on
the island in the teleport room [Room 11, Level 7]
and read the public notice in the mud.
-
Use a
shovel in the spider cave [Room 32, Level 2] to
retrieve a little key that opens the chest in the dead
hermitÆs room. Inside the chest is a ring that gives +1 to
all the main characteristics.
■
Steal the snake women
reservation
Find the
note under the coffin on the bed near the twinÆs shop [Room
24, Level 4]. It will add a marker to your map showing a
secret access to the snake womenÆs lair. Go there [Room 1,
Level 3] by jumping on the platforms. Find your way
through the cornices and exit to Level 5.
When you
sneak inside the snake woman reservation, be very prudent: If
you leave this room by the ôenergy shield door,ö try not to be
seen by the snake woman patrolling or she will attack you.
■
Shany kidnapped by the cult
(XP 1,000)
-
This
quest starts when Carlo breaks into the conversation between
the king and yourself after the trollÆs quest.
-
Talk to
Maria [Room 5, Level 0].
-
Enter
the cult memberÆs bedroom [Room 7, Level 0], open the
little chest, and read the note.
-
Go to
the snake pillar room [Room 10, Level 3] and hide
behind the snake column before the appointment takes place.
-
Follow
the group of cultist without being seen or heard.
-
Once in
the cultÆs secret room [Room 7, Level 3], kill the
priests and free Shany. (Beware: if you wait too long, Shany
will be killed by the priest.)
■
Finishing the game being
nasty to everybody
ItÆs
important to note that the game can be finished even if the
player decides not to follow the quests and the path given by
the King or other NPCs. This choice is not the easiest, and it
should make the player feel very uncomfortable.
-
Escape
from the prison, kill everything you can, even humans from
the guard post. Retrieve the gem dealer badge that is on
OrtiernÆs corpse.
-
Show the
badge to the goblin lord and give him 300 GP to open the
portcullis, then kill him to get your money back.
-
Kill
everything in order to get enough experience and skill to
face the stronger monsters.
-
Go to
the temple (by lockpicking the tavern door or getting the
key from the bartender corpse).
-
Free
Alia, meet her down at the lake, kill her, and take the key.
-
Steal
Krahoz from the rebelÆs camp.
-
Go to
the snake women outpost, kill Zalnashh and take her key to
the Temple of Illusion.
-
Solve
the Temple of Illusion and grab Zohark.
-
Equip
Zohark and Krahoz, and return to the temple of Akbaa to
destroy the meteor.
-
Go to
the human castle where the Ylsides have settled and kill
everything. Once in the jail, Kultar appears and attacks
you. You canÆt take his super-armor because it dies with
Kultar, but there is a key on his corpse thatÆll open a
chest in the YlsidesÆ forge where youÆll be able to find a
brand new super-armor. (ItÆs important to finish the game.)
-
Get the
egg from the Dragon. (DonÆt talk ù just kill him.)
-
Go down
to the dwarf forge, killing all ratmen, the giant worm, and
the black beast along the way.
-
Forge
the super-weapon, enchanting it yourself with the enchant
object spell. (The appropriate scrolls can be found in the
snake woman reservation if you donÆt have the right runes.)
-
Go back
to the Ylside Bunker and face Akbaa.
■
The ghost quest (XP 1,000)
-
In the
tomb [Room 33, Level 3], talk to Queen FlorenceÆs
ghost. The ghost gives information about the man who killed
her.
-
Visit
the tavern [Room 41, Level 0] and talk to Enoill
Calpale (the one-eyed man). After talking to him, buy him a
drink. He will go to the restroom, leaving his key on the
stool.
-
Go to
his house [Room 12, Level 0] and find the letters.
-
Go back
to the tavern to show Enoill the evidence. He will claim
that heÆs not the only one whoÆs guilty.
-
Find
Carlo in the city and show him evidence.
■
Tracked down by a ratman
assassin
After
walkthrough point #5, Iserbius knows that you are The
Guardian. Consequently, he sends an assassin to kill you.
After youÆve left the council room, the assassin leaves a
warning to the player. On his bed, the player will find a dead
headless chicken. With blood, the sign of Akbaa has been drawn
on the wall. From this moment, the player will see quick
shadows on the walls. He will also hear rapid footstep sounds
from the assassin. The player will see the assassin watching
him closely. After this observation round, the assassin will
attack. YouÆll see the assassin standing in front of you, 10
yards away. The assassin will throw two poisoned daggers and
then disappear. You can easily evade the daggers with a
strafe. The second encounter will be more deceitful. The
player will hear the sound of incoming daggers. This time the
assassin will be behind you. But, as you hear the daggers, you
can evade this attack as well. The third attack will be more
conventional as the assassin will engage the player in close
combat. If you get the upper hand in combat, and the assassin
loses more than 80 percent of his HP, he will jump back and
throw a gas bomb at your feet, ninja style. The explosion will
result in a lot of smoke but the gas is harmless and used only
to evade combat. The fourth (and last) encounter will see the
assassin attack you but not flee. Encounters # 3 and # 4 will
take place in the galleries [Room 31, Level 5] as it is
an inevitable route for the player to access the Order of the
Ederneum sanctuary.
Here are
some rooms where the player can see or hear the assassin:
L0R35, L0R42, L0R44, L1R38, L2R33, L2R12, L3R1, L3R11, L4R28,
L4R30.
If the
assassin is killed, the player earns 1,600 XP.
■
PogÆs quest (XP 400)
-
You can
give Pog a book of finance taken from a rebel bedroom
[Room 21, Level 3].
-
The
trolls will now sell gems on their own and Alotar will stop
selling them. Be careful, though; goblins will attack you on
sight.
■
Rob the
goblins
-
Under
the Goblin KingÆs bed [Room 21, Level 2], you will
find a note with the code to open a secret wall mechanism in
AlotarÆs throne room [Room 20, Level 2].
-
In this
secret room youÆll find a lever to open the secret passage
leading to the treasure room [Room 22, Level 2].
-
Grab
everything you find in the treasure room but try not to be
seen going through the secret passage and do not open the
door while stealing!
-
You can
also get into the treasure room by stealing the key off one
of the goblin lords patrolling near the throne room.
■
Rob the bank (XP 2,000)
-
Go to
AliciaÆs bedroom [Room 8, Level 0] and activate the
timed lever behind the pot.
-
Run to
GaryÆs apartment [Room 43, Level 0] and go through
the sewers to the secret room [Room 8, Level 0].
-
Use some
mud putty on the sealed key to make a mold out of it without
being spotted by Alicia (mud putty can be found in GreuÆs
room [Room 17, Level 1]).
-
Go to
the dwarf forge [Room 23, Level 7] and create a bank
key, using the bank key mold.
-
Go back
to the bank, activate the button on the wall in the bank
office [Room 11, Level 0] behind the counter. This
will open the secret door, but make sure no one sees you.
-
Close
the secret wall once on the other side. Unlock the door with
the bank key.
-
Finally,
take the gold bars making sure nobody sees you doing this.
(The invisibility spell can help.)
-
ItÆs
best to do this when the bank is closed. You can access
either the bank office [Room 11, Level 0] or the bank
[Room 10, Level 0] by lockpicking both doors or
ôborrowingö the keys from GaryÆs inventory.
|

