
In the previous lesson, you created a box by assigning it to a named variable. Because you used a variable for the box, you can now access all of the box's properties easily. The variable name mybox is the handle to your box. To access the properties of the handle, append a "." (period), and then the property name. For example, mybox.height can be read as "the height of mybox."
All 3ds max objects have creation parameters such as width, length, and height for boxes, or radius for circles. These objects also have transformation properties, such as scale, rotation, or position, and general properties like name, wireColor, etc. To change any of these properties, you can set the property to a new value.
If you don't like the default object name Box01, you can change the name property of the box:
Enter mybox.name = "BlueBox" in the Listener window and the software renames the box. You can see the new name in the Name edit box when you go to the Modify panel:
Color
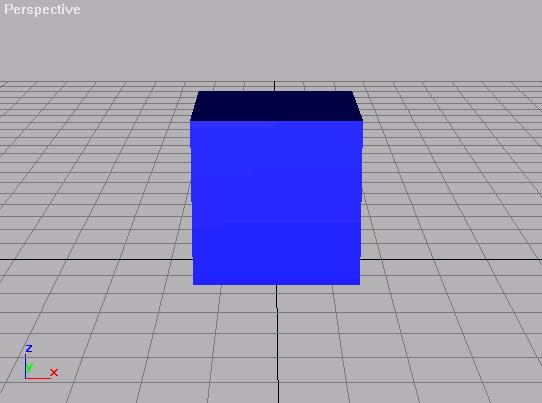
The software assigns the color of objects randomly at creation time. Therefore, the color of your box is not necessarily blue. In this case, BlueBox wouldn't be an appropriate name for your box. However, you can change the color of your box to match the name:
Enter mybox.wireColor = blue and watch the box in your viewports turn blue. You may have to select the box again to reflect the new color in the color swatch next to the object name in the Modify panel.
The color blue is a predefined color constant in MAXScript and its RGB value is defined as (0,0,255). The other predefined color variables are red, green, white, black, orange, yellow, and brown. Instead of using a predefined color, you can assign a color with different RGB values, such as:
mybox.wireColor = (color 255 0 255)
Notice the special syntax for entering specific color values. The example shown would change the box to magenta. If you entered this command, click
 Undo to change the box back to blue.
For more information on colors, see the Color Values topic in the MAXScript reference.
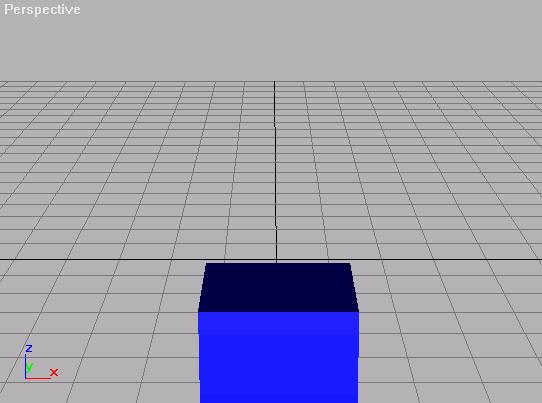
You can change the position of the box by changing the box's position property. You refer to the position property for this example box with mybox.pos. The position is expressed as the X, Y, Z coordinate. For example [0,-75,0]. Bring the box forward by entering mybox.pos = [0,-75,0] and watch the box jump forward in the perspective view:
Click
Undo to move the box back to the origin.
To make the box bigger, you can use the scale property of the box:
Enter mybox.scale = [1.5,1.5,1.5] to see the box resized to 1.5 times its original size.
The scale property requires a scaling factor for each of the X, Y, and Z axes, or, in this case, the width, length and height of the box. You don't have to use the same value for each axis unless you want to resize the box uniformly.
If you want to change the scale to affect only the height and the width, but not the length, use the following example:
mybox.scale = [1,3,2]
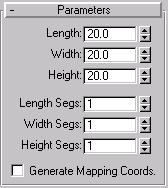
When you scale your original [20,20,20] box by any factor, the box's parameters are still 20 for width, 20 for length, and 20 for height. You can see this when you open the Modify panel. The box parameters are not changed by the scale transformation:
Although altering the height and width properties of the box achieves the same result, visually, the above scale modification is not equivalent to using the following two commands:
mybox.height = 40 -- 2 times the original 20 units
mybox.width = 60 -- 3 times the original 20 units
The reason for this is that changing the height property of the box changes the creation parameter of the box's height. Using the scale property to transform the height of the box does not.
Again, the effect of using either method is visually the same. However, when you want to maintain the original creation parameters of an object (so that you can alter them even after a number of different transformations), you must use the scale property to manipulate the size of the box, not the individual creation properties.
If you entered the last two commands, click
Undo twice to change the box back to its original height and width.
The Parameters rollout shows all the creation parameters for a box. You can change them using the spinners in the rollout. If you want to change the value of the length, width, and height segments, or the setting of the mapping coordinates in MAXScript, you need to know the syntax for these parameters. In order to find the syntax for all of the parameter settings, there are two different inspector functions. The first of these is showclass().
The showClass() function prints information about a specified 3ds max class or classes. The information entered in the parentheses is a string containing a wild-card pattern to match against 3ds max class names, superclass names, and property names.
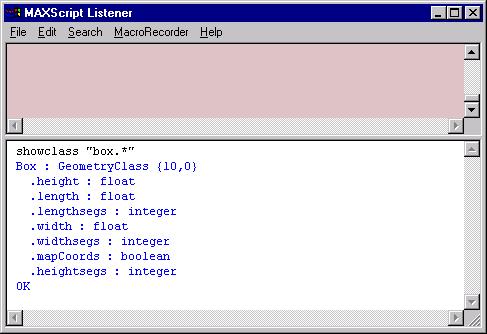
Enter showclass "box.*"
MAXScript shows all the box parameters that are equivalent to the ones you see in the Parameters rollout, including which object class the box object belongs to, and the data type that each parameter requires:
Notice that you can use the "*" character as a wildcard to see all box parameters. If you had entered showClass "box*.*," MAXScript would have listed all of the parameters of the Box and the BoxGizmo classes.
showClass "box*" -- all 3ds max classes starting 'box'
showClass "box.*" -- all the accessible properties of the
-- box class
showClass "*:mod*" -- all the modifier classes
showClass "*.*rad*" -- all the classes with a property name
-- containing 'rad'
The second inspector function is showProperties(). The showProperties() function is used to display the properties for a specific object that is an instance of one of the 3ds max classes. It can be used in place of showClass() in situations where you have an actual object in hand. Unlike showClass(), it can display the dynamic properties that may appear in individual objects as you work on them in the scene.
To learn more about these functions, search for the "Class and Object Inspector Functions and Properties" topic in the MAXScript Reference.
Next Topic