File menu > XRef Objects > XRef Objects dialog
The XRef Objects dialog provides controls to add and remove XRef objects, as well as provides additional controls for display and using proxy objects. Use this dialog to convert scene objects into XRef objects and merge XRef objects into scene objects. Tools for updating objects automatically and manually are found here as well.
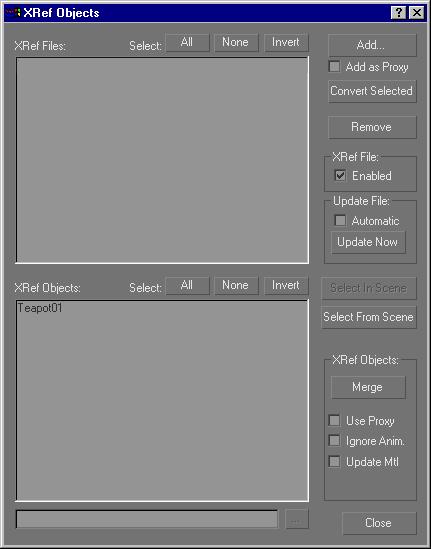
Interface
XRef Files window: Displays the file path and file name of the source .max files containing the source objects used as XRef objects in the current scene. These files are added and removed from this window using the Add and Remove buttons to the right. XRefs that have been disabled (by turning off Enabled) are listed in gray rather than black. If an XRef is listed in red, its file could not be loaded. Either the file is corrupted, or the path is not pointing to the correct directory or file name.
XRef Objects window: Displays the XRef objects in the current scene that belong to the source file(s) currently highlighted in the XRef Files window. If no source files are highlighted, this window is empty.
Select buttons
These standard buttons change the pattern of selection in the XRef Files and XRef Objects windows.
All: Selects all items in the window.
None: Deselects all items in the window.
Invert: Inverts the current selection pattern in the window.
File Path field: Lets you change the path or file pointed to by one or more XRef objects. You can either enter the information directly in the edit field, or click the browse button at right to display a file dialog in which you can specify a path and file name.
You can use this field to reassign more than one XRef object to a different file. When two or more XRef objects with different source files are highlighted, the edit field is blank, but you can assign a single source file to these objects. Use this in cases when youÆve moved XRef objects to different paths or different source files.
Add: Click to add XRef objects to your scene.
A standard Open File dialog first appears, listing .max scene files. After choosing a scene file, an XRef Merge dialog appears, letting you choose which objects in the source scene to add as XRef objects in your current scene. After clicking OK in the XRef Merge dialog, the file name and path of the source scene appear in the XRef Files window. You can add from the same scene file more than once, but the scene will be listed only once in the XRef Scenes window.
Important: Any transform animation assigned to the source objects can be merged along with the XRef object itself, but it will not be updated with the source object. Thus, if one or more of the source objects youÆve selected as XRef objects contains transform animation, an alert appears: ôOne or more of the objects you have selected has transform animation. Do you wish to merge this animation?ö
Click Yes to merge the object with the transform animation, choose No to merge only the object without the transform animation, or click Cancel to cancel the merge. If you click No, the object is merged at its frame 0 transform position. Note that this only pertains to transform animation. Animation of objects, or modifier parameters, for example, are updated in the XRef object when adjusted in the source object.
The stack and its animation are updated together with the XRef object, while the transformation (the node and transform controllers) become part of the target scene and are never updated.
The Add button changes to Set if you add an XRef object then select it in the lower window. Clicking it will allow you to change the file and object for the selected XRef.
Add as Proxy: When this option is on and then you click the Add button, you create a new object XRef by specifying the proxy object first instead of the full detail object first.
Set as Proxy: When this option is on and then you click the Set button, you can choose the proxy object for the currently selected XRef.
Convert Selected: Lets you take any selected objects in your scene and create XRefs out of them. Basically, this does a Save Selected for the objects, which are automatically cut from the .gmax file and pasted into a new file. A file dialog lets you name the new file. The selected objects remain in the viewport but are now XRefs.
Remove: Removes from the current scene all XRef objects referenced from the .max file(s) currently highlighted in the XRef File window.
XRef File group
Enabled: Turn off to disable all XRef objects referenced from the .gmax file(s) currently highlighted in the XRef File window. Disabled XRef files and objects are listed in gray in the windows and are not loaded into memory.
Update File group
Determines how and when the XRef objects are updated. Note that the options are applied to all objects in a selected source scene. As an example, the XRef objects from one source scene can have automatic updating, while objects from another scene can be manually updated, using the Update Now button.
Automatic: When this is on, the XRef objects from the selected source scene are automatically updated when the source scene is saved.
Update Now: Click this to update XRef objects from a selected source scene when youÆre not using Automatic (or when several source scenes are selected in which some are not set to Automatic). When you click Update Now, the XRef object is updated to match its twin in the latest saved version of the source file. Updating is done at the File level, all objects from the same file update together.
Select à Scene buttons
The two selection buttons that follow let you duplicate selections between the viewports and the list
Select In Scene: Lets you select objects in the scene based on those XRef objects that are highlighted in the list window. To use, highlight one or more items in the XRef Objects window, and then click the Select In Scene button to select those objects in the scene. You can add to the current scene selection by holding CTRL when you click the Select In Scene button. Similarly, you can deselect specific objects by holding ALT when you click the button.
Select From Scene: Highlights items in the XRef Objects list window based on the currently selected objects in the scene.
XRef Objects group
The items in this group apply to XRef objects that are highlighted in the XRef Objects window.
Merge: Click to merge the XRef objects currently selected in the XRef Objects window as real objects in the scene. A prompt appears so you can confirm the action. Since a merged XRef object becomes part of the scene and is no longer an XRef, its name is removed from the list window.
Merging an XRef object loads the full modifier stack of the original object, while maintaining any additional stack items that were added while the object was an XRef. Thus, you can use Merge to update an original object thatÆs been altered as an XRef. If you do this, use Convert Selected to save out the ôimprovedö original into a file, which then can be merged back into the original source.
Use Proxy: Turn on to display a proxy object instead of the selected geometry. The proxy object is chosen in the Modify panel, XRef Object rollout, or with the Set Proxy option and Set button.
Update Mtl: When turned on, the material assigned the highlighted XRef object is updated from the source object with each update. When off, source materials are not updated. This check box is also available in the Modify panel of the selected XRef object.
Important: By default, materials are independent of XRef objects. When you first add an XRef object to your scene, its assigned material comes with it. From that point on, however, you can edit that material, or assign a completely different material to the XRef object. Changes made to the source material will no longer affect the XRef object unless youÆve turned on Update Mtl. However, if you turn on Update Mtl., each update overwrites the material currently assigned to the XRef object, using the material from the source object.
Ignore Anim.: Disables the stack animation of the source object. Note that this does not affect any transform animation that might exist.
Close: Click to close the dialog.