The track bar is located between the time slider and the status bar.
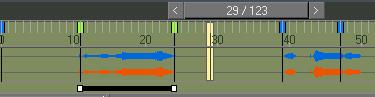
The track bar provides a timeline showing the frame numbers (or appropriate display units). It provides a quick alternative to Track View for moving, copying and deleting keys, and changing key properties. Select an object to view its animation keys on the track bar. The track bar also displays keys for multiple selected objects.
The keys are displayed as semi-transparent colored bars. The color can be customized in the Customize User Interface Dialog, and depends on the selected/unselected state of the key. The frame indicator is a similar bar displayed in blue.
A key on the track bar can represent any number of animated parameters for the selected object(s). Transformations, modifiers, and animated material parameters may all have keys at a particular frame.
Right-click a key on the track bar to display a list of all keys in the selected frame for the object selection in the track bar pop-up menu. Select a key type in the track bar menu to display its key properties dialog. Delete keys and filter the track bar display using options in the track bar menu.
The track bar right-click menu contains a submenu that lists any procedural controllers (list controllers, expression, noise, and so on) assigned to the current object selection. If you select one of the controllers from the submenu, the properties dialog for that controller displays in a modeless dialog.
The track bar can display a waveform (.wav file) that has already been assigned to the sound object in Track View. To display this feature, right-click the track bar, and choose Show Sound Track from the Configure submenu. If there is no waveform currently assigned to the sound object or if you are using a third-party sound object plug-in that is not compatible with the waveform display, this part of the track bar will be grayed out.
The animation range can be modified by pressing CTRL and ALT while dragging the track bar. Hold the left mouse button to slide the start of the range, the right mouse button to slide the end of the range, and the middle mouse button to change both the start and end frames together. A tooltip at the cursor and a status bar message will indicate the range you are setting.
Note: While the animation button is pressed, the track bar is highlighted red, to indicate that the software is in animate mode.
Procedures
To select keys on the track bar:
Click a key to select it.
Drag a window around a selection of keys to region-select multiple keys.
If the track bar right-click menu > Configure > Show Selection Range option is on, when multiple keys are selected, the range of the selected keys is shown in the selection range bar at the bottom of the track bar. You can then scale the selected keys proportionally by dragging either end of the selection range bar, or move the keys by dragging the center of the bar.
To move or clone keys on the track bar:
While keys are moved or cloned, small lines on the track bar mark the original position of the keys. All keys at a particular frame are moved simultaneously using the following procedures.
Drag a key selection to move it in time.
Hold down SHIFT, then drag a key(s) to clone keys.
Right-click to abort a move or clone operation.
To move a single key from a frame with multiple keys:
If, for example, a frame has both a transform key and a material key for the selected object, and only the transform key must move, display the transform properties dialog and use the Time parameter to move the transform key.
Right-click a key on the track bar and select a key on the pop-up window key list.
A key properties dialog displays.
Change the Time parameter in the key properties dialog.
The key slides along the track bar to a new location.
To delete keys on the track bar:
Make a Key Selection on the track bar and press DELETE.
All selected keys are deleted.
Make a Key Selection on the track bar, right-click anywhere on the track bar to display the track bar menu, and then select Delete Selected Keys on the pop-up window.
All selected keys are deleted.
To delete a single key type on a frame with multiple keys:
An object can have many keys for different animated parameters at a particular frame. Use this procedure to delete a key for a single parameter.
Right-click over a selected or unselected key on the track bar.
A pop-up window displays.
Move the mouse over Delete Key, then select a key to delete in the submenu.
To change the length of the active time segment:
You can change the animation length using track bar.
Hold CTRL + ALT and drag on the track bar with the left mouse button to change the active time segment start frame, with the right mouse button to change the active time segment end frame, and with the center mouse button to change the active time segment start and end frames simultaneously.
To hide or show the track bar:
Choose Customize > Show UI > Show Track Bar.
This menu item is a toggle: a check mark shows that the track bar is currently displayed.
Interface
Track Bar
Make an object selection in the viewports to display the object's keys on the track bar.
Selected keys are white; unselected keys are red.
Drag from an empty area of the track bar to region-select keys.
Drag a key to move it in time.
Hold SHIFT and drag a key to clone it.
Hold CTRL+ALT and drag on the track bar to change the active time segment, that is, the animation range displayed on the track bar.
Dragging with the left mouse button will change the start of the range, dragging with the right mouse button will change the end of the range, and dragging with the middle mouse button will change both the start and the end of the range.
Right-click to abort a move or clone operation.
During a move or clone operation, small lines represent the original key locations.
The cursor changes to a cross over unselected keys.
The cursor changes to a two-sided arrow over selected keys, signifying a move operation is possible.
Right-click over a key to display the track bar menu.
Some commands are unavailable in the track bar menu if you right-click over an empty part of the track bar.
Track bar menu
Right-click a key on the track bar to display the track bar menu.
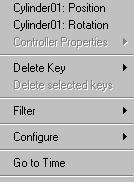
List: Displays the object name and key type for all keys at the current position. Select any of the keys in the list at the top of the track bar menu to display a key properties dialog. For more information on this dialog, see Key Info (Basic) and Key Info (Advanced).
A key with a check next to the name indicates the key is shared with other instances in the list. Two selected objects might share the same Twist modifier, for example.
The list displays keys for all selected objects. If there are more than 10 keys, then the list turns to a submenu under Key Properties in the track bar menu.
If there is no key properties dialog for a key type, the key is unavailable.
Controller Properties: Displays a submenu that contains a list of all of the procedural controllers (list controllers, expression controllers, noise, etc.) assigned to the object selection.
If you select one of the controllers from the submenu, the properties dialog for that controller displays in a modeless dialog.
Delete Key: Displays a submenu identical to the key properties list at the top of the track bar menu. Select a key type or choose All to delete one or all of the keys.
All: Deletes all keys at the current position.
Keys do not need to be selected on the track bar in order to use Delete Key. Keys are deleted from the track bar key over which you right-clicked.
Delete selected keys: Deletes selected keys.
A key or keys must be selected on the track bar. If no keys are selected, this command is unavailable.
Filter: Displays a Filter submenu. Select a filter to filter the track bar display; display only transformation keys, for example.
Right-click anywhere on the track bar, place the cursor over Filter in the track bar menu to display the Filter submenu, then choose a filter. According to the filters set, keys will disappear on the track bar.

All Keys: Displays all keys.
All Transform Keys: Displays only keys for position, rotation and scale.
Current Transform: Displays only keys that use the currently selected transform position, rotation or scale.
Object: Displays object modifier keys. Excludes transformation and material keys.
Material: Displays material keys for the material assigned to the selected object(s).
Configure: Displays a Configure submenu, which lets you change the track bar display.
Show Frame Numbers: Displays frame numbers in the track bar.
Show Selection Range: Displays a selection range bar below the track bar, whenever multiple keys are selected.
You can scale all selected keys by dragging either end of the selection range. This lets you change the length of an animation segment while maintaining the relative distance between animation keys. You can also move the selected keys in time by dragging the selection range bar.
Show Sound Track: Displays the waveform (.wav file) that is assigned to the sound object in Track View.
Snap to Frames: Keys snap to frame numbers when moved. If turned off, you can place keys between frames.
Go to Time: Moves the time slider to the cursor position.
Right-click anywhere on the track bar, then click Go to Time.