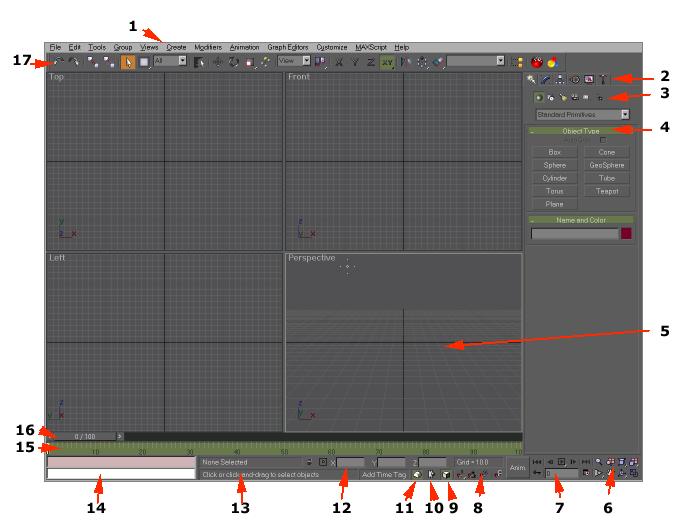
Menu bar
Command panels
Object categories
Rollout
Active viewport
Viewport navigation controls
Time controls
Snaps
Adaptive degradation override
Window/Crossing
Keyboard shortcut override toggle
Coordinate display
Status bar and Prompt line
MAXScript Mini Listener
Track bar
Time slider
Main toolbar
Most of the main window is occupied by the viewports, where you view and work with your scene. The remaining areas of the window hold controls and show status information.
One of the most important aspects of using gmax is its versatility. Many program functions are available from multiple user-interface elements. For example, you can open Track View for animation control from the Main toolbar as well as the Track View menu, but the easiest way to get to a specific object's track in Track View is to right-click the object, and then choose Track View Selected from the quad menu.
You can customize the gmax interface in a variety of ways: by adding keyboard shortcuts, moving toolbars and command panels around, creating new toolbars and tool buttons, and even recording scripts into toolbar buttons.
MAXScript lets you create and use custom commands in the built-in scripting language for gmax. For more information, access the MAXScript Reference file from the Help menu.
A standard Windows menu bar with typical File, Edit, Views, and Help menus. Special menus include:
Tools contains duplicates of many of the Main toolbar commands.
Group contains commands for managing grouped objects.
Create contains commands for creating objects.
Modifiers contains commands for modifying objects.
Animation Menu contains commands for animating and constraining objects.
Graph Editors provides graphical access to editing animation: Track View lets you open and manage animation tracks in Track View windows.
Customize Menu gives you access to controls that let you customize the user interface.
The Tab panel is off by default in gmax, but you can turn it on by right-clicking on the any blank area of the Main Toolbar, and selecting Tab panel. When visible, the tab panel appears directly under the main toolbar. It holds a collection of toolbars organized by index tabs. The toolbars contain buttons for creating, selecting, and modifying geometry in a scene, as well as most other functions in gmax. Some toolbar buttons are shortcuts for menu commands; others appear only on the Main toolbar.
Click a tab to display the collection of tools on each tab. When you click a tool button, the tool's parameters appear on the command panel or in a dialog.
You can "tear off" the entire tab panel as well as individual toolbars and place them wherever you like. You can also create new functions and toolbars and set them up any way you like.
If not all of a toolbar's buttons are visible, position the mouse cursor on a blank area of the toolbar and begin dragging horizontally when the "hand" cursor appears.
You can turn on and off the tab display by double-clicking a blank area of the menu bar.
See Tab Panel.
The Animate button turns on animation mode. The other controls navigate through time and play back an animation.
These six panels hold most of the modeling and animation features. In gmax, you have the ability to "float" the command panels and place them anywhere you like.
You can float or dismiss the command panels by right-clicking just above them. The default setting is to display the Command panel docked at the right of your screen. If it is not displayed, or you want to change its location and docking or floating status, right-click in a blank area on the tab panel, and choose from the shortcut menu.
Create holds all object creation tools.
Modify holds modifiers and editing tools.
Hierarchy holds linking and inverse kinematics parameters.
Motion holds animation controllers and trajectories.
Display holds object display controls.
Utilities holds miscellaneous utilities.
These two lines display prompts and information about your scene and the active command. They also contain system toggles controlling selections, precision, and display properties. See Status Bar Controls.
You can display from one to four viewports. These can show multiple views of the same geometry, as well as the Track View, and other informational displays. See Viewports.
The button cluster at the lower-right of the main window contains controls for zooming, panning, and navigating within the viewports. See Viewport Controls.