
Create panel > Geometry button > Standard Primitives > Object Type rollout > Sphere button
Create menu > Standard Primitives > Sphere
Tab panels > Objects tab > Sphere Object
Tab panels > Modeling tab > Sphere Object
Sphere produces a full sphere, or a hemisphere or other portion of a sphere. You can also "slice" a sphere around its vertical axis.

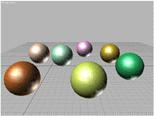
Examples of spheres
Procedures
To create a sphere:
In any viewport, drag to define a radius.
As you drag, a sphere emerges with its center at the pivot point.
Release the mouse to set the radius and create the sphere.
To create a hemisphere:
You can reverse the order of the following steps, if you like.
Create a sphere of desired radius.
Type 0.5 in the Hemisphere field.
The sphere is reduced to exactly the upper half, a hemisphere. If you use the spinner, the sphere changes in size.
Interface
Creation Method rollout
Edge: Draws a sphere from edge to edge. You can change the center location by moving the mouse.
Center: Draws a sphere from the center out.
Keyboard Entry rollout
See Creating Primitives from the Keyboard.
Parameters rollout
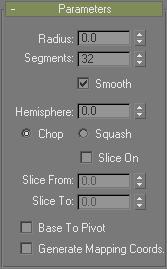
The defaults produce a smooth sphere of 32 segments with the pivot point at its center.
Radius: Specifies the radius of the sphere.
Segments: Sets the number of polygonal divisions for the sphere.
Smooth: Blends the faces of the sphere, creating a smooth appearance in rendered views.
Hemisphere: Increasing values will progressively "cut off" the sphere, starting at the base, to create a partial sphere. Values range from 0.0 to 1.0. The default is 0.0, producing a full sphere. A setting of 0.5 produces a hemisphere, and 1.0 reduces the sphere to nothing. Default=0.0.
The Chop/Squash choice specifies how Hemisphere reduces the sphere.
Chop: Reduces the number of vertices and faces in the sphere by "chopping" them out as the hemisphere is cut off. Default=on.
Squash: Maintains the number of vertices and faces in the original sphere, "squashing" the geometry into a smaller and smaller volume toward the top of the sphere. Since the geometry is maintained, you can use different versions of a squashed sphere for morph objects.
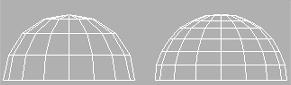
Effects of Chop and Squash during hemisphere cut-off
Slice On: Uses the From and To angles to create a partial sphere. The effect is similar to lathing a semicircular shape fewer than 360 degrees.
Slice From: Sets the start angle.
Slice To: Sets the stop angle.
For both settings, positive values move the end of the slice counterclockwise; negative values move it clockwise. Either setting can be made first. When the ends meet, the whole sphere reappears.
Smoothing groups are assigned to sliced spheres as follows: The surface of the sphere is always assigned group 1; the bottom, when Smooth is on, gets group 2. Facing the pie-slice surfaces, the cut on the left gets group 3, and the cut on the right gets group 4.
Material IDs are assigned to sliced spheres as follows: The bottom is 1 (when Hemisphere is greater than 0.0), the surface is 2, and the slice surfaces are 3 and 4.
Base To Pivot: Moves a sphere upward along its local Z axis so the pivot point is at its base. When off, the pivot point is on the construction plane at the center of the sphere. Default=off.
Turning on Base To Pivot lets you animate a hemisphere so it appears to grow out of the construction plane or sink into it. It also lets you place spheres so they rest on the construction plane, like pool balls on a table.
Effect of using Base To Pivot setting
Generate Mapping Coordinates: Generates coordinates for applying mapped materials to the box. Default=off.
Note: If a visible viewport is set to a non-wireframe or non-bounding-box display, Generate Mapping Coordinates is on for all primitives to which you apply a material containing a map with Show Map In Viewport on.