
Select a mesh, or patch object. > Modify panel > Modifier List > Animation Modifiers > Morpher
Select a mesh or patch, > Modifiers menu > Animation Modifiers > Morpher
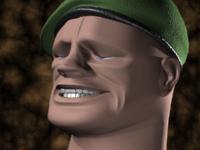
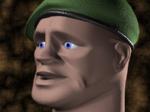
On this patch model, morph targets are created by moving control vertices and tangent handles in an Editable Patch.
Use the Morpher modifier to change the shape of a mesh or patch model. You can also morph shapes (splines), and World Space FFDs.
Morphing is commonly used for lip sync and facial expression on a 3D character, but can be used to change the shape of any 3D model. There are 100 channels available for morph targets. Channel percentages can be mixed, and the result of the mix can be used to create a new target.
On a mesh object, vertex count on the base object and targets must be the same. On a patch object, the Morpher modifier works on control points only. This means that the resolution of patches can be increased on the base object to increase detail.
For lip sync and facial animation, create a character's head in an "at rest" pose. The head can be a mesh or patch model. Copy and modify the original head to create the lip-sync and facial-expression targets. Select the original or "at rest" head and apply the Morpher modifier. Assign each lip-sync and facial-expression target to a channel in the Morpher modifier. Load an audio file in the Track View sound track, turn on the Animate button, scrub the time slider, and view the audio waveform in Track View to locate frames for lip sync. Then set the channel spinners on the Morpher modifier to create key frames for lip position and facial expression.
Teeth can either be a part of the model or animated separately. If the teeth and head are two different objects, model the teeth in an open position, and then apply the Morpher modifier, and create one target with the teeth closed. Eyes and head motion can be animated after the morph keys are created.
Nine mouth shape targets are commonly used for speech. If your character speaks an alien dialect, don't hesitate to create extra morph targets to cover these mouth shapes.
Include cheek, nostril, and chin-jaw movement when creating mouth position targets. Examine your own face in a mirror or put a finger on your face while mouthing the phonemes, if necessary, to establish the direction and extent of cheek motion.
Set lip-sync keys by viewing the audio waveform as well as listening to the sound as you scrub the time slider. Many mouth-position keys benefit from being set a frame early. Often the mouth must assume a shape before the appropriate sound is uttered. For the word "kilo", the "K" mouth shape precedes the actual sound, for example.
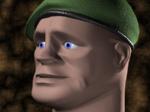
 A, I
A, I
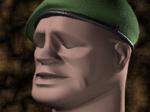
 E
E
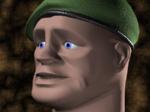
 F, V
F, V
 C, D, G, J, K, N, S, T, Y, Z
 L, T
L, T
 O
O
 U
U
 W, Q
W, Q
 M, B, P (This target can be the same shape as the "at rest" base object)
Create as many expression targets as necessary for the character. Joy, sadness, surprise, evil can all have their own targets. Depending on the personality of the character, certain targets, like a terror target, may not be necessary. Targets like nostril flare, jaw-muscle bunching, temple twitching can be effective to give a character an edge. Each morph channel can contain a material as well: as you morph the brows up, a bump map can crease the forehead, for example.
Save time and create targets as the need arises; if the audio file or scene you are working on requires a look of surprise, create the "surprise" target while the mood of the scene is with you.
If the character has teeth, copy the teeth and the base head to create a new target. The teeth act as a guide to shape and position the lips.
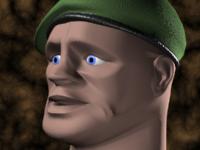
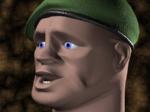
 Blink
Blink
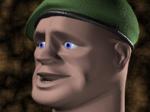
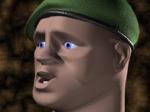
 Brows up
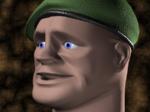
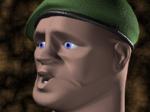
 A blend of the Pain, Blink, and Brows targets
Example: To add the morpher modifier to an object and assign a morph target to a channel:

 On the Create panel, click Geometry.
On the drop-down list, choose Patch Grids.
On the Object Type rollout, click Quad Patch.
In the Top viewport, click and drag to create a patch grid.
 On the Modify panel, on the modifier stack display, right click on Quad Patch and choose Convert To: Editable Patch from the right-click menu.
The base object is now an Editable Patch.
 In the Top viewport, Shift+Move to create a copy of the patch object.
 On the Modify panel, on the Selection rollout, click Vertex.
In the Front viewport, move patch vertices to deform the patch surface.
In the stack display, choose Editable Patch to go to the object (top) level. (The highlight should change from yellow to gray, and the Vertex sub-object icon is no longer displayed at the right of the stack.)
 Select the first patch object.
On the Modify panel, choose Animation Modifiers > Morpher from the Modifier List.
The Morpher modfier is added to the modifier stack.
On the Morpher modifier, on the Channel List rollout, right-click over the first channel (over the word "empty").
A right-click menu displays.
Choose Pick from Scene on the right-click menu, and click the deformed patch grid in the viewports.
QuadPatch02 is listed in the channel as a morph target.
Drag the Channel spinner up and down.
The flat patch grid "morphs" to the shape of the target.
Whatever is assigned as the default float controller in gmax will be assigned as the float controller on the morph channels as well. Float controllers handle the interpolation between keys; Bezier is the default float controller. You can assign the TCB float controller to the morph channels in Track View, if you prefer.
For morphing, the Bezier controller allows you to use function curves with vector handles on the keys for smoothing and easing control of interpolation in Track View. Default parameters of the TCB controller, however, handles morph interpolation with less overshoot. Try using both controllers, to decide which one you prefer.
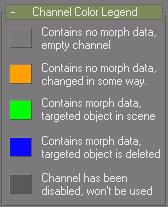
Gray: The channel is empty, and has not been edited.
Orange: The channel has been changed in some way but contains no morph data.
An artist may wish to name a channel and set up its parameters before actually assigning a morph target.
Green: The channel is live. The channel contains morph data and the target object still exists in scene (the target is available for refresh).
Blue: The channel contains morph data but the target has been deleted from the scene.
Dark Gray: The channel is disabled.
There is a problem with the morph, the topology of the base object, or targets, have changed and are no longer valid; for example, the vertex count might have changed. The channel cannot be used.
The channel is not active. This is controlled by the Channel is Active toggle in the Channel Parameters rollout.
Disabled channels are not included in the morph result.
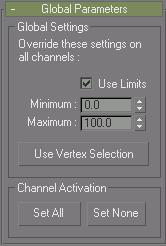
Global Settings group
Use Limits: Use the minimum and maximum limits for all channels.
You can turn off limits to double purpose a target. The target for a smile can be used to turn the corners of the mouth down using negative values for example.
Minimum: Sets the minimum limit.
Maximum: Sets the maximum limit.
Use Vertex Selection: Turn on to limit morphing to vertices selected in a modifier below the Morpher modifier in the modifier stack.
Channel Activation group
Set All: Click to activate all channels.
Set None: Click to deactivate all channels.
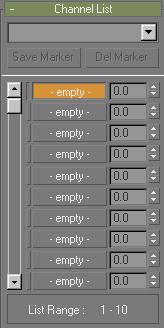
Marker drop-down list: Choose a previously saved marker in the list, or enter a new name in the text field and click Save Marker to create a new marker.
For example, channel 15 through 24 could contain all the emotion targets. Rather than scrolling to display these tracks, you can choose a marker from the list to display these channels in the list.
Save Marker: Move the scroll bar to frame a particular set of 10 channels, enter a name in the text field, and then click Save Marker to store the channel selection.
Delete Marker: First display the marker name in the field, and then click Delete Marker to delete it.
Channel List: There are 100 morph channels. Scroll through the channels using the slider. Once a channel is assigned a target, the targets name appears in the channel list, the channel name can be changed in the channel parameters rollout. Each channel has a percentage value field and a spinner to change the value.
Right-click over a morph channel to display a right-click menu:
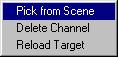
Pick from Scene: Choose this command and select an object in the viewports to assign a morph target to the channel.
Delete Channel: Deletes the morph data, name and parameters from the channel. Displays only if the channel has data.
Reload Target: Reloads morph data from the target. Use this after editing a target.
In the viewports, a "Morph Target" submenu is available by right-clicking over a target in the viewports. Use this to quickly check which objects in the scene are assigned as targets. The menu also lets you inspect which channel the object is assigned to, the percentage for that channel. Clicking the channel in the menu causes the morpher to jump to the object's channel in the Morpher channel list.
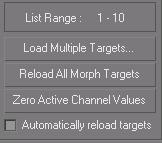
List Range: Displays the range of visible channels in the channel list.
Load Multiple Targets: Load multiple morph targets into empty channels by selecting object names in the selection dialog and clicking Load.
If there are more targets than empty channels, a warning displays and the channels are not assigned.
Reload All Morph Targets: Reloads all the morph targets.
If the targets have been edited, the channels are updated to reflect the changes. If a morph target has been deleted from the scene, then the morpher updates using the stored data in the channel, functions using the last stored morph data.
Zero Active Channel Values: Click to create keys with a value of 0 for all active morph channels, if the Animate button is on.
This is handy to prevent key interpolation from distorting the model. First click Zero Active Channel Values, and then set a particular channel to the value you want; only the altered channel affect the model.
Automatically reload targets: Turn this on to allow animated targets to be updated dynamically by the Morpher modifier. There is a performance penalty when using this option.
Channel Number: Click the number next to the channel name to display a menu. Use commands on the menu to group and organize channels, or to locate a channel.
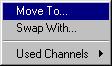
Move To: Displays the Channel Operations dialog. To move the current channel to the selected channel, choose a channel from the list, and click Move To.
Swap With: Displays the Channel Operations dialog. To swap the current channel with the selected channel, choose a channel from the list, and click Swap With.
Used Channels: Displays a list of active channels. Choose a channel to place it at the top of the channel list display in the Channel List rollout.
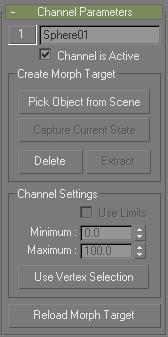
Channel Name: Displays the name of the current target. Change the name of the target in the text field if necessary. Parameter changes in the Channel Parameters rollout affect the current target.
Channel is Active: Toggles a channel on and off. Inactive channels do not affect the morph result. Use this control to turn off certain channels to focus on animating other channels.
Create Morph Target group
Pick Object from Scene: Turn on and click an object in the viewports to assign a morph target to the current channel.
Capture Current State: Choose an empty channel to activate this function. Click to create a target using the current channel values.
The captured channel is always blue because there is morph data but no specific geometry. Use Extract to create a mesh copy of the captured state.
Delete: Deletes the target assignment for the current channel.
Extract: Choose a blue channel and click this option to create an object from the morph data.
If you have used Capture Current State to take a snapshot of a group of channel values, but then want to edit it, use Extract to make a new object, pick it as the channel's target, and then start editing.
Channel Settings group
Use Limits: Turn on to use limits on the current channel if Use Limits is turned off in the Global Parameters rollout.
Minimum: Sets the lower limit.
Maximum: Sets the upper limit.
Use Vertex Selection: Morphs only selected vertices on the current channel.
Reload Morph Target: Reloads data from the current target into the channel.
You can also right-click a name in the channel list, and choose Reload Target to reload a target. Reload a target if it has been adjusted or edited.

Spinner Increments: Specify fine or coarse spinner increments. 5.0 is coarse and 0.1 is fine. Default=1.0
Compact Channel List: Compact the channel list by filling in any empty channels in between assigned channels. The status window displays how many channels were moved.
Approximate Usage: Click to display current memory usage.