The effect of a bitmap depends on which material component the map is applied to. See Component Factors and Bitmap Controls for more information about the user interface.
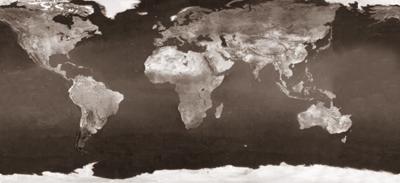
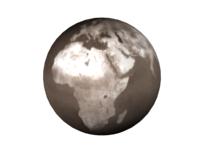
Applying a map of the earth to the diffuse color of a simple sphere
The colors of the map replace the material's diffuse color component. This is the most common kind of mapping. Mapping the diffuse color is like painting an image on the surface of the object. For example, if you want a wall to be made out of brick, you can choose a map with an image of bricks.
By default, diffuse mapping applies the same map to the ambient color as well. You seldom need to use a different map for diffuse and ambient components.
The map image is painted on the shaded parts of the object.
By default, diffuse mapping maps the ambient component as well, so you seldom need to use a different map for diffuse and ambient components. If you do want to apply a separate ambient map, first click to turn off Match Diffuse Color/Map in the Ambient color tab. This unlocks ambient and diffuse mapping, and the map controls for ambient color become available.

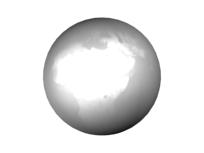
Mapping the specular highlight
The map's image appears only in the specular highlight areas. When the Amount spinner is at 100, all specular color is provided by the map.
Unlike Specular Level or Glossiness mapping, which alter the intensity and location of specular highlights, specular mapping alters the color of specular highlights.
Mapping the specular level
Mapping the specular level uses the intensity of the bitmap. White pixels in the map produce full specular highlights. Black pixels remove the specular highlights completely, and intermediate values reduce the specular highlights accordingly.
Mapping the specular level component is different from mapping specular color. Mapping the specular level alters the intensity of highlights, while specular mapping alters the color of highlights.
Tip: Specular level mapping usually works best when you assign the same map to both Specular Level and Glossiness. You can do this by dragging the map icon from one component's tab to the other component's tab.
A map assigned to glossiness determines which areas of the whole surface are more glossy and which areas are less glossy, depending on the intensity of colors in the map. Black pixels in the map produce full glossiness. White pixels remove glossiness completely, and intermediate values reduce the size of the highlight.
Mapping the glossiness component is different from mapping specular color. Mapping glossiness alters the location of highlights, while specular mapping alters the color of highlights.
Tip: Glossiness mapping usually works best when you assign the same map to both Glossiness and Specular Level. You can do this by dragging the map icon from one component's tab to the other component's tab.

Self-illumination mapping makes the glass panes of the lantern glow.
Mapping the self-illumination value makes portions of an object appear to glow. White areas of the map render as fully self-illuminating. Black areas render with no self-illumination. Gray areas render as partially self-illuminating, depending on the grayscale value.
Self-illumination means that the glowing area is not affected by lights in the scene (its ambient color component goes away), and does not receive shadows.

Mapping opacity
Mapping opacity makes an object partially transparent. Lighter (higher-value) areas of the map render as opaque; darker areas render as transparent; and values in between are semi-transparent.
Setting the opacity map's Amount to 100 applies all of the map. Transparent areas are fully transparent. Setting the Amount to 0 is the equivalent of turning the map off. Intermediate Amount values are blended with the Opacity value. Transparent areas of the map become more opaque.
Specular highlights are applied to transparent areas of the opacity map, as well as to opaque areas, creating the effect of glass. If you want the transparent areas to look like holes, map the specular level as well. You can use the same map for both components by dragging the map icon from one component's tab to the other component's tab.
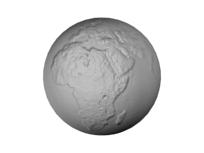
Bump mapping
Bump mapping makes an object appear to have a bumpy or irregular surface. Lighter (whiter) areas of the map appear to be raised, and darker (blacker) areas appear to be low.
Bump mapping uses the intensity of the map to affect the surface of the material. In this case, the intensity affects the apparent bumpiness of the surface: white areas protrude, and black areas recede.
Note: Bump mapping does not appear in viewports, and is supported only by certain game engines.
Use bump maps when you want to take the smoothness off a surface, or to create an embossed look. Keep in mind, however, that the depth effect of a bump map is limited. If you want extreme depth in a surface, you should use modeling techniques instead.
Grayscale images can make effective bump maps. Maps that shade between white and black generally work better than maps with hard edges between the white and black areas.
The bump map Amount adjusts the degree of bumpiness. Higher values render as higher relief; low values render as low relief.
The bumps are a simulation created by perturbing face normals. Because of this, bumps don't appear on the silhouette of bump-mapped objects.