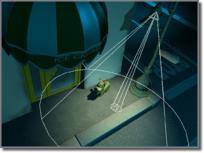

Activate a Light viewport. > Viewport navigation controls > Light Falloff

The streetlight has a narrow hotspot but a wide falloff area.

Making the falloff even wider illuminates a larger area.
Light Falloff adjusts the angle of a light's falloff. This button replaces the Region Zoom button when a light viewport is active.
Click Light Falloff, then move the mouse in the light viewport to make the falloff narrower or wider (the falloff extents are shown in gray, the falloff is in blue).
Hold down the CTRL key while moving the mouse to lock the initial angle separation of the hotspot and falloff cones.
You can't adjust the hotspot larger than the falloff, because that would change the falloff value. Likewise, when you reduce the falloff, it stops at the hotspot size.
To override the separation of the hotspot and falloff parameters and cause the parameters to affect each other, hold down the SHIFT key.
Procedure
To change a light's falloff:
Set up a Perspective viewport so you can see the light in 3D space.
Activate a Light viewport.
Press H to display the Select Object dialog. Select the light.
The light and its cones should be visible in the Perspective viewport.
 Click Light Falloff.
The button turns green when it is on.
Drag in the Light viewport to change the falloff angle.
The gray falloff cone expands and contracts as you drag.
Drag down to widen (increase) the falloff angle and illuminate more of the scene.
Drag up to narrow (decrease) the falloff angle and illuminate less of the scene.
As its angle decreases, the falloff shrinks around the hotspot. By default, the falloff cone can be no smaller than the hotspot cone.
Hold down SHIFT as you drag to override the default. This lets the hotspot cone decrease in size as you decrease the size of the falloff cone.
Hold down CTRL as you drag to lock the initial angle separation of the hotspot and falloff cones.
Press ESC or right-click to turn off the button.