
Display panel > Display Properties rollout
The Display Properties rollout provides controls that alter the display of selected objects.
See also
Procedure
To display trajectories using the Display panel:
Select one or more animated objects.
Expand the Display Properties rollout in the Display panel.
Turn on Trajectory.
By default, object trajectories appear with the following properties:
The trajectory curve is drawn in blue.
Frame increments display as white dots on the curve.
Position keys display as red boxes surrounding the appropriate frame dot on the curve. The boxes are white when the object is selected.
If Views > Show Key Times is turned on, the key frame numbers are displayed along side the keys on the trajectory.
You can change the colors for these items on the Colors panel of the Customize User Interface dialog.
You can also use object properties to display trajectories: right-click any object and choose Properties, then turn on Trajectory.
Interface
The first three options reduce the geometric complexity of selected objects in a scene, resulting in faster response time because the computer has less to calculate. These options are also available in the Display Properties group of the Object Properties dialog and the Display floater.
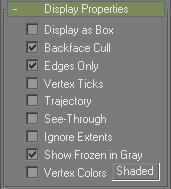
Display as Box: Toggles the display of selected objects, including 3D objects and 2D shapes as bounding boxes. Produces minimum geometric complexity.
Backface Cull: Toggles the display of faces and vertices with normals pointing away from view. When turned on, you see through the wireframe to the back faces. Applies to Wireframe viewport display only.
Edges Only: Toggles the display of face edges. When turned on, only faces appear. When turned on, all mesh geometry appears. Applies to Wireframe viewport display only.
Vertex Ticks: Displays the vertices in the selected geometry as tick marks.
If the current selection has no displayed tick marks, the check box is clear. If some of the vertices in the current selection display tick marks, the check box contains a gray X. If all vertices in the current selection display tick marks, the check box contains a black X.
Trajectory: Toggles trajectory display for the selected object so you can display its trajectory wherever you are in the software.
See-Through: When turned on, this toggle makes the object or selection translucent in viewports. It simply lets you see whatÆs behind or inside an object in a crowded scene, and is especially useful in adjusting the position of objects behind or inside the See-Through object. This is very handy when you have characters with bones inside. Default=off
This option is also available from Object Properties dialog and the Tools > Display Floater.
You can customize the color of see-through objects by using the Colors panel of the Customize > Customize User Interface dialog.
Keyboard shortcut (default): ALT+X
Ignore Extents: When turned on, the object is ignored when you use the display control Zoom Extents. Use this on distant lights.
Show Frozen in Gray: When on, the object turns gray in viewports when you freeze it. When off, viewports display the object with its usual color or texture even when it is frozen. Default=on.
Vertex Colors: Displays the effect of assigned vertex colors. You assign vertex colors in the editable mesh in vertex or face sub-object level.
The Shaded button determines whether the object with the assigned vertex colors appears shaded in the viewport. When this button is off, the colors are unshaded and appear in their pure RGB values, looking a little like self-illuminated materials. When the Shaded button is on, the colors appear like any other assigned color in the viewports.