
Select an editable spline. > Modify panel > Expand the editable spline in the stack display. > Spline sub-object level
Select an editable spline. > Modify panel > Selection rollout > Spline button
Select an editable spline. > Right-click the spline > Tools 1 (upper-left) quadrant of the quad menu > Sub-objects > Spline
While at the Editable Spline (Spline) level, you can select single and multiple splines within a single spline object and move, rotate, and scale them using standard methods.
Procedure
To change spline properties:
You change the properties of a spline from Line to Curve by right-clicking and choosing Line or Curve from the Tools 1 (upper-left) quadrant of the quad menu.
Changing the spline property also changes the property of all vertices in the spline:
Choosing Line converts vertices to Corners.
Choosing Curve converts vertices to Beziers.
Interface
Mesh Settings, Interpolation and Selection rollouts
See Editable Spline for information on the Mesh Settings, Interpolation and Selection rollout settings.
Soft Selection rollout
See Soft Selection Rollout for information on the Soft Selection rollout settings.
Geometry rollout
Create Line: Adds more splines to the selected spline. These lines are separate spline sub-objects; create them in the same way as the line spline. To exit line creation, right-click or click to turn off Create Line.
PolyConnect: Turn this off if you don't want the new line connected to the endpoint of an existing line. When PolyConnect is on, when creating lines, if the initial mouse click is over an existing endpoint in the shape, the newly created line is automatically attached to that endpoint. This can be an annoyance, especially when creating spline networks for use in Surface Tools.
Attach: Attaches another spline in the scene to the selected spline. Click the object you want to attach to the currently selected spline object. The object you're attaching to must also be a spline.
For further details, see Attach.
Reorient: Reorients the attached spline so that its creation local coordinate system is aligned with the creation local coordinate system of the selected spline.
Attach Mult.: Click this button to display the Attach Multiple dialog, which contains a list of all other shapes in the scene. Select the shapes you want to attach to the current editable spline, then click OK.
Insert: Inserts one or more vertices, creating additional segments. Click anywhere in a segment to insert a vertex and attach the mouse to the spline. Then optionally move the mouse and click to place the new vertex. Continue moving the mouse and clicking to add vertices. A single click inserts a corner vertex, while a drag creates a Bezier (smooth) vertex.
Right-click to complete the operation and release the mouse. At this point, you're still in Insert mode, and can begin inserting vertices in a different segment. Otherwise, right-click again or click Insert to exit Insert mode.
Reverse: Reverses the direction of the selected spline. If the spline is open, the first vertex will be switched to the opposite end of the spline. Reversing the direction of a spline is usually done in order to reverse the effect of using the Insert tool at vertex selection level.
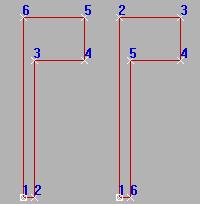
Original and reversed splines
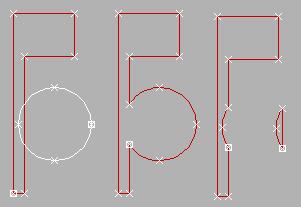
Outline: Makes a copy of the spline, offset on all sides to the distance specified by the Outline Width spinner (to the right of the Outline button). Select one or more splines and then adjust the outline position dynamically with the spinner, or click Outline and then drag a spline. If the spline is open, the resulting spline and its outline will make a single closed spline.

Original and outlined splines
Note: Normally, if using the spinner, you must first select a spline before using Outline. If, however, the spline object contains only one spline, it is automatically selected for the outlining process.
Center: When off (default), the original spline remains stationary and the outline is offset on one side only to the distance specified by Outline Width. When Center is on, the original spline and the outline move away from an invisible center line to the distance specified by Outline Width.
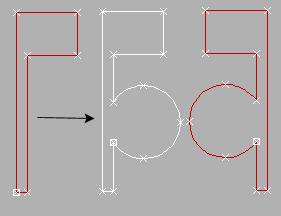
Boolean: Combines two closed polygons by performing a 2D Boolean operation that alters the first spline you select, and deletes the second one. Select the first spline, then click the Boolean button and the desired operation, and then select the second spline.
Note: 2D Booleans only work on 2D splines that are in the same plane.
There are three Boolean operations:
Union: Combines two overlapping splines into a single spline, in which the overlapping portion is removed, leaving non-overlapping portions of the two splines as a single spline.
Subtraction: Subtracts the overlapping portion of the second spline from the first spline, and deletes the remainder of the second spline.
Intersection: Leaves only the overlapping portions of the two splines, deleting the non-overlapping portion of both.
Original splines (left), Boolean Union, Boolean Subtraction, and Boolean Intersection, respectively
Mirror: Mirrors splines along the length, width, or diagonally. Click the direction you want to mirror first so it is active, then click Mirror.
Copy: When selected, copies rather than moves the spline as it is mirrored.
About Pivot: When on, mirrors the spline about the spline object's pivot point (see Pivot). When off, mirrors the spline about its geometric center.
Mirrored splines
Trim: Use Trim to clean up overlapping segments in a shape so that ends meet at a single point.
To trim, you need intersecting splines. Click the portion of the spline you want to remove. The spline is searched in both directions along its length until it hits an intersecting spline, and deleted up to the intersection. If the section intersects at two points, the entire section is deleted up to the two intersections. If the section is open on one end and intersects at the other, the entire section is deleted up to the intersection and the open end. If the section is not intersected, or if the spline is closed and only one intersection is found, nothing happens.
Extend: Use Extend to clean up open segments in a shape so that ends meet at a single point.
To extend, you need an open spline. The end of the spline nearest the picked point is extended until it reaches an intersecting spline. If there is no intersecting spline, nothing happens. Curved splines extend in a direction tangent to the end of the spline. If the end of a spline lies directly on a boundary (an intersecting spline), then it looks for an intersection further along.
Infinite Bounds: For the purposes of calculating intersections, turn this on to treat open splines as infinite in length. For example, this lets you trim one linear spline against the extended length of another line that it doesn't actually intersect.
Hide: Hides selected splines. Select one or more splines, and then click Hide.
Unhide All: Displays any hidden sub-objects.
Delete: Deletes the selected spline.
Close: Closes the selected spline by joining its end vertices with a new segment.
Detach: Copies selected spline(s) to a new spline object, and deletes them from the currently selected spline if Copy is clear.
Copy: When selected, copies rather than moves the spline as it is detached.
Reorient: The spline being detached is moved and rotated so that its creation local coordinate system is aligned with the creation local coordinate system of the selected spline.
Explode: Breaks up any selected splines by converting each segment to a separate spline or object. This is a time-saving equivalent of using Detach on each segment in the spline in succession.
You can choose to explode to splines or objects. If you choose Object, you're prompted for a name; each successive new spline object uses that name appended with an incremented two-digit number.
Surface Properties rollout
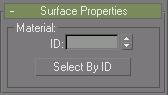
Material group
You can apply different material IDs (see material ID) to splines in shapes containing multiple splines. You can then assign a multi/sub-object material to such shapes, which appears when the spline has thickness, or when used for lathing or extrusion.
ID: Lets you assign a particular material ID number to selected splines for use with multi/sub-object materials and other applications. Use the spinner or enter the number from the keyboard. The total number of available IDs is 65,535.
Select by ID: Displays a dialog for you to enter a material ID number. Clicking OK selects the segments assigned that material ID. If Clear Selection is on, any previously selected splines are first deselected. If Clear Selection is off, the new selection is added to any previous selection set.