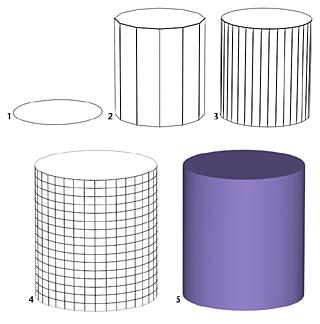
1 Diameter defined
2 Height defined
3 Sides increased
4 Height segments defined
5 Smoothing and shadows enabled
With some variations, these steps apply to creating any type of object on the Create panel. For concrete examples, see the Procedures section in any object's topic.
Choose a category of object:
 Click the Create tab to view the Create panel.
Click one of the buttons at the top of the Create panel. For example, click Geometry.
Choose the subcategory Standard Primitives (also known as Surface Objects) from the list.
A number of buttons appear on the Object Type rollout.
Choose an object type:
Click the button for the type of object you want to create.
The button highlights, showing that it is active. Four rollouts appear: Name and Color, Creation Method, Keyboard Entry, and Parameters.
Choose a creation method (optional):
You can accept the default method and skip this step.
Choose a method in the Creation Method rollout.
Preset the creation parameters (optional):
You can adjust all creation parameters after you create an object. Skip this step if you prefer.
In the Parameters rollout, you can set parameters before you create an object. However, changing the values of parameters you set by dragging the mouse (for example, the Radius and Height of a cylinder) has no effect until after you create the object.
Create the object:
Move the cursor into the viewport where you want to place the object, and hold the mouse button down (do not release the button).
Drag the mouse to define the first parameter of the object; for example, the circular base of a cylinder.
Release the mouse button.
This sets the first parameter.
Move up or down without touching the mouse button.
This sets the next parameter; for example, the height of a cylinder.
If you want to cancel: Until you complete the next step, you can cancel the creation process with a right-click.
Click when the second parameter has the value you want, and so on.
The number of times you press or release the mouse button depends on how many spatial dimensions are required to define the object. (For some kinds of objects, such as Line or Bones, the process is open-ended.)
When the object is complete, it is in a selected state and ready for adjustments.
Name the object (optional):
Highlight the default object name in the Name and Color rollout, and then enter a name. Available only when a single object is selected. This is useful for organizing your scenes. You can also name a group of selected objects, see Named Selection Sets.
Change the objectÆs display color (optional):
Displays the selected object's color and lets you select a new one. The color is the one used to display the object in viewports. Click the color swatch to display the Object Color dialog.
Adjust the parameters:
Change the creation parameters immediately after you complete an object, while itÆs still selected. Or, you can select the object later and adjust its creation parameters on the Modify panel.
While making adjustments, you can use viewport navigation controls like Zoom, Pan, and Arc Rotate to change your view of the selected object. You can also adjust the time slider.
Ending the creation process:
While the object type button remains active, you can continue creating objects of the same type until you do one of the following:
Select an object other than the one you created most recently.
Transform an object.
Change to another command panel.
Use commands other than viewport navigation or the time slider.
When you end the creation process, the Parameters rollout disappears from the Create panel. To make further changes to the objectÆs parameters, you must go to the Modify panel. See Using the Modify Panel.
See also